How to Scrape Google Scholar With Python
Google Scholar is a free search engine for academic articles, books, and research papers. If you're gathering academic data for research, analysis, or application development, this blog post will give you a reliable foundation. In this guide, you'll learn how to scrape Google Scholar with Python, set up proxies to avoid IP bans, build a working scraper, and explore advanced tips for scaling your data collection.
Dominykas Niaura
Last updated: May 12, 2025
10 min read

Why scrape Google Scholar
Web scraping Google Scholar can unlock data points that are otherwise difficult to collect manually. From bibliographic databases to research trend analysis, there are countless reasons why users may want to automate this process.
By scraping Google Scholar, you can extract valuable metadata like article titles, abstracts, authors, and citation counts. This is especially useful for creating datasets, building academic tools, or tracking influence and trends within a specific field.
You can also pull co-author data and "Cited by" information to analyze collaboration networks or academic impact. You could use Google Scholar cite data for citation analysis, extract full author profiles for research profiling, or capture Google Scholar organic results for comparative research.
What you need for Google Scholar scraping
Before diving into scraping Google Scholar, it's important to make sure you have the right setup. Here’s what you’ll need:
- Python 3.7 or higher installed. Python’s flexibility and large ecosystem of libraries make it the go-to language for web scraping. Make sure you have Python 3.7 or later installed on your machine. You can download it from the official website.
- Requests and BeautifulSoup4 libraries. You'll need two Python libraries for sending web requests and parsing HTML content. Requests allows you to programmatically make HTTP requests, while BeautifulSoup4 makes it easy to navigate and extract data from HTML documents. You can install them with the following command in your terminal:
- Basic familiarity with browser inspection tools. You should know how to use the "Inspect Element" feature (available in Chrome, Firefox, Edge, and other browsers). Inspecting page elements helps you identify the HTML structure, classes, and tags that your scraper needs to find and extract the right data.
- A reliable proxy service. Google Scholar actively limits automated access. If you're scraping more than just a few pages, a proxy service is crucial. Using residential or rotating proxies can help you avoid IP bans and maintain a stable scraping session. For small-scale, manual tests, proxies may not be essential, but for any serious scraping, they're a must-have.
Why proxies are necessary for stable scraping
When scraping Google Scholar, proxies are extremely helpful. Google Scholar has robust anti-bot mechanisms that can quickly block your IP address if it detects unusual behavior, such as sending too many requests within a short time. By routing your traffic through different IP addresses, proxies help you distribute requests and avoid hitting rate limits or triggering CAPTCHAs.
For the best results, it's recommended to use residential proxies. Residential IPs are associated with real internet service providers, making your traffic appear more like a typical user browsing from home. Ideally, use a rotating proxy service that automatically assigns a new IP address with each request, providing maximum coverage and minimizing the chance of bans.
At Decodo, we offer residential proxies with a high success rate (99.92%), a rapid response time (<0.5s), and extensive geo-targeting options (195+ worldwide locations). Here's how easy it is to get a plan and your proxy credentials:
- Head over to the Decodo dashboard and create an account.
- On the left panel, click Residential and Residential.
- Choose a subscription, Pay As You Go plan, or opt for a 3-day free trial.
- In the Proxy setup tab, choose the location, session type, and protocol according to your needs.
- Copy your proxy address, port, username, and password for later use. Alternatively, you can click the download icon in the lower right corner of the table to download the proxy endpoints (10 by default).
Step-by-step Google Scholar scraping tutorial
Let's walk through the full Python script that scrapes Google Scholar, step by step. We'll break down each part of the code, explain why it's needed, and show you how it all fits together to create a reliable scraper.
1. Importing required libraries
We start by importing the necessary libraries: Requests for making HTTP requests and BeautifulSoup from the bs4 module for parsing HTML. Using these libraries, you can send HTTP requests as if you were a browser and then parse the resulting HTML to extract exactly what you need:
2. Setting up proxies
At the top of the script, we define the proxy credentials and build the proxy string. This string is later used to configure our HTTP request so that it travels through a proxy. In this example, we'll use a proxy endpoint that randomizes the location and rotates the IP with each request. Make sure to insert your username and password credentials where appropriate:
3. Defining custom headers and proxies
By using a detailed user agent string, we ensure that the server treats the request just like any regular browser request. This helps avoid blocks that might result from automated scripts. Instead of setting proxies to None when no proxy URL is provided, we use an empty dictionary, simplifying the request logic so that the proxies parameter always receives a dictionary.
4. Retrieving and validating the page
The following block sends our HTTP GET request to Google Scholar. By passing the headers dict, we present ourselves as a real browser and transparently route through the proxy when one is configured. Immediately after, we check the response’s status code. If it's not "200 OK", we print an error and return an empty list, preventing further parsing of an incomplete or errored page.
5. Parsing the HTML content
Once we successfully download the page, we parse its contents with BeautifulSoup. The parser then searches for all <div> elements with the class "gs_r," which typically encapsulate each Google Scholar result.
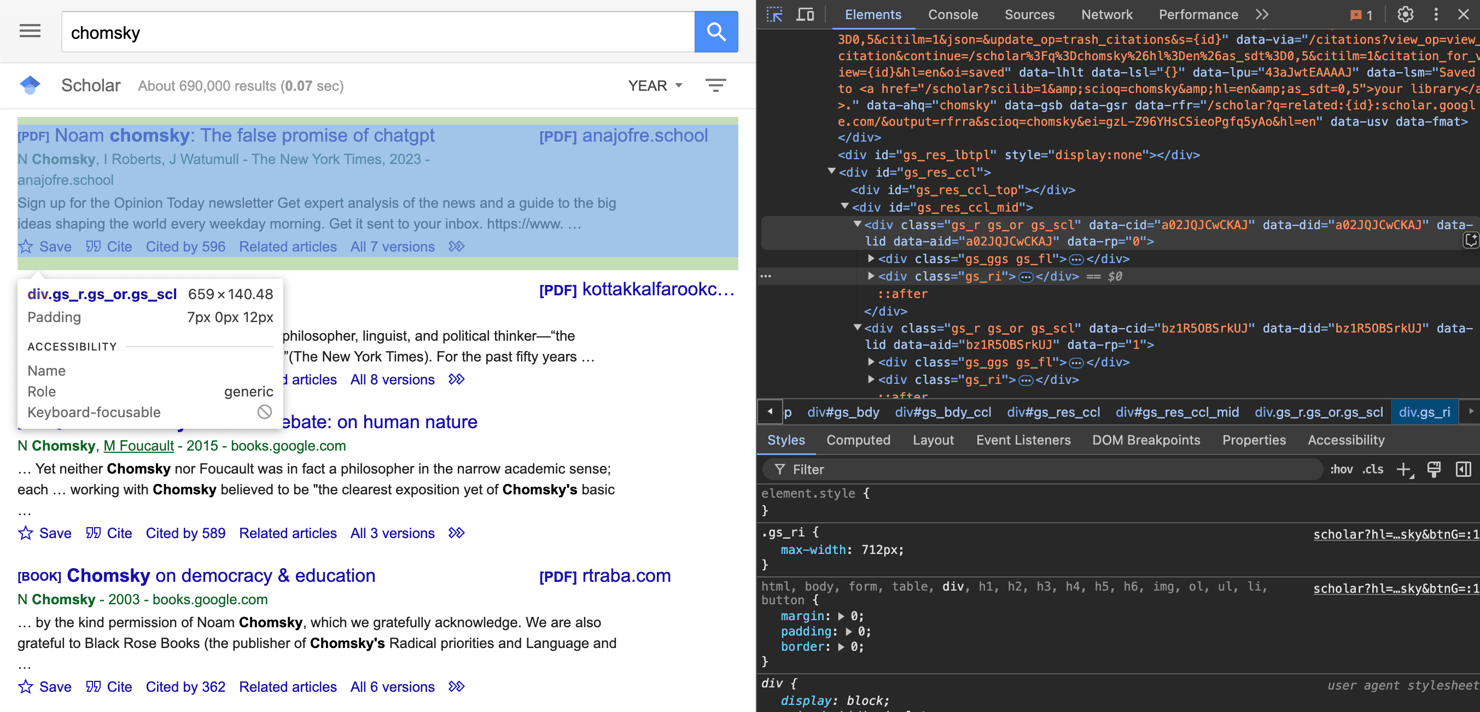
We discovered this class using the browser's Inspect tool: by clicking on a Google Scholar result box, the developer tools highlight the corresponding <div> and its class.
6. Extracting data from each result
Next, we loop through each of the result blocks we just selected and extract the fields we care about, such as title, authors, snippet, and citation info, skipping over anything that isn't a real publication (like author‑profile summaries).
Here's what the code above does:
- Title extraction and filtering. We look for an <h3 class="gs_rt"> inside each result. If it's missing, we skip that block entirely. We also ignore any result whose title begins with "User profiles for," since that's Google Scholar's author‑overview section, not a publication.
- Authors and publication info. Next, we grab whatever text lives in <div class="gs_a">. That usually contains author names, journal titles, and publication dates. If it isn't present, we record None.
- Description. The snippet is found in <div class="gs_rs">. This is the short excerpt Google Scholar shows under each title. Again, if it's missing, we assign None.
- Citation count and link. We search for an <a> tag whose text starts with "Cited by." If found, we parse the next integer. We also take its href attribute (a relative URL) and prepend "https://scholar.google.com" to create a full link to the list of citing papers. If no “Cited by” link is found, we set both count and link to sensible defaults.
- Saving the record. Finally, each item dictionary, which is now packed with title, authors, snippet, citation count, and link, is appended to our data list for later use.
Pagination and looping
To collect results beyond the first page, we need to handle Google Scholar's pagination. Create a function and name it scrape_multiple_pages. It will automate pagination by iterating through each page’s start parameter, invoking our single‐page scraper repeatedly, and stitching all of the individual page results into one consolidated list:
- Initialize an empty list. We start with all_data = [] to collect every result from all pages.
- Loop over page numbers. The for i in range(num_pages) loop runs once per page. So, i=0 is page one, i=1 is page two, and so on.
- Construct the correct URL. On the first iteration (i == 0), we use the original base_url. On subsequent iterations, we append start={i * 10} to the URL. Google Scholar expects a start parameter that skips the first N results (10 per page). We choose & or ? depending on whether base_url already has query parameters.
- Scrape each page. We call scrape_google_scholar(page_url, proxy_url) to fetch and parse that page’s results.
- Stop early if no results. If a page returns an empty list, we assume there's nothing left to scrape and break out of the loop.
- Aggregate all results. Each page’s page_data is extended onto all_data, so by the end of the loop, you have a single list containing every result from all requested pages.
Running the script
In the final section, we set up our search URL and page count, invoke the scraper (with proxy support), and then loop over the returned items to print each one. When you run the script, this block:
- Initializes the query. Defines base_url with your Scholar search parameters. Sets num_pages to control how many result pages to fetch.
- Launches the scraper. Calls scrape_multiple_pages(base_url, num_pages, proxy_url=proxy), which handles pagination and proxy routing behind the scenes.
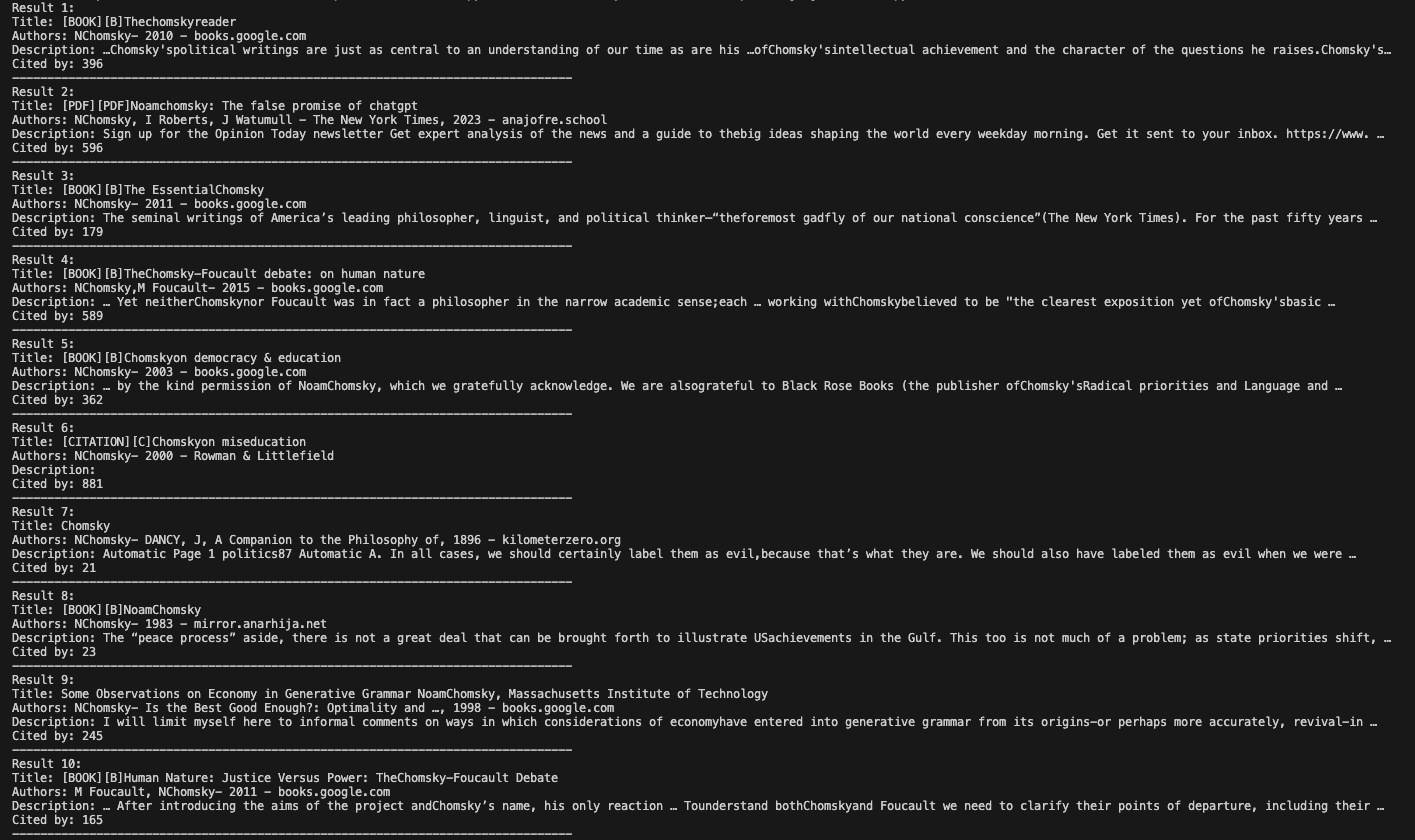
- Formats and outputs results. Iterates through each dictionary in the results list. Prints title, authors, description, "Cited by" count, and the full citation link in a readable layout.
This final block ensures that, upon execution, the script seamlessly connects through your proxy, fetches and parses Google Scholar results across the specified number of pages, and displays every record in an organized, human‑friendly format.
In this example, we use “chomsky” as our search term. Noam Chomsky’s extensive body of work means that his name will yield a rich mix of publications, citation counts, and related links, showcasing how the script handles diverse result entries.
The complete Google Scholar scraping code
Below is the full Python script we've assembled throughout this tutorial. You can copy, run, and adapt it to your own Google Scholar scraping projects.
After running it in your coding environment, the result will look something like this:
Advanced tips and alternatives for scraping Google Scholar
Once you have a basic scraper running, you may start running into more advanced challenges, such as handling dynamic content, scaling scraping volume, or dealing with occasional access restrictions. Here are some additional techniques and solutions to level up your Google Scholar scraping:
Handle JavaScript-rendered content
Although most of Google Scholar’s main pages are static HTML, some edge cases or future changes might introduce JavaScript-rendered elements. Tools like Selenium, Playwright, or Puppeteer can simulate a full browser environment, making it easy to scrape even dynamically loaded content.
Add robust error handling and retry logic
Network hiccups, temporary server issues, or occasional failed requests are inevitable when scraping on a large scale. Build retry mechanisms into your scraper to automatically reattempt failed requests, ideally with randomized backoff intervals. This helps maintain stability over long scraping sessions.
Save and resume your scraping sessions
If you plan to scrape a large number of pages, consider implementing a system to save your progress after every few pages or results. That way, if your scraper is interrupted, you can easily resume from where you left off without duplicating work or losing data.
Use an all-in-one scraping solution like Decodo’s Web Scraping API
For even greater efficiency and reliability, consider using Decodo’s Web Scraping API. It combines a powerful web scraper with access to 125M+ residential, datacenter, mobile, and ISP proxies, eliminating the need to manage IP rotation yourself. Its key features include:
- JavaScript rendering for dynamic pages;
- 200 requests per second without worrying about throttling;
- 195+ geo-targeted locations for precision scraping;
- 7-day free trial to test the service with no commitment.
To sum up
By now, you've learned that Google Scholar can be accessed using Python with the Requests and BeautifulSoup libraries and that employing reliable proxies is crucial for a successful setup. Don't forget to follow best practices and consider using a streamlined tool to extract the data you need.
About the author

Dominykas Niaura
Technical Copywriter
Dominykas brings a unique blend of philosophical insight and technical expertise to his writing. Starting his career as a film critic and music industry copywriter, he's now an expert in making complex proxy and web scraping concepts accessible to everyone.
Connect with Dominykas via LinkedIn
All information on Decodo Blog is provided on an as is basis and for informational purposes only. We make no representation and disclaim all liability with respect to your use of any information contained on Decodo Blog or any third-party websites that may belinked therein.