Apache Nutch Tutorial: Install, Crawl, Index, and Automate
Scraping a page is simple. Crawling an entire website repeatedly, at scale, while also producing structured data that you can query, can be complex. Most scraping tools aren't designed for it, and that's what Apache Nutch is developed for. Nutch is an open source web crawler with built-in robots.txt compliance and native Apache Solr integration. By the end of this guide, you'll have a scoped crawl pipeline running and your data indexed into Solr.
Lukas Mikelionis
Last updated: Apr 24, 2026
15 min read

TL;DR
- Apache Nutch is an open-source web crawler built for scalable, multi-round URL discovery, not simple scraping. It integrates with Apache Solr for data indexing and querying.
- Nutch 1.22 requires JDK 17. You must explicitly set the http.agent.name in conf/nutch-site.xml for robots.txt compliance.
- You must define your URL filters in conf/regex-urlfilter.txt before your first crawl. If off-domain URLs clog your crawldb, the only solution is to delete the crawl/ directory and restart.
- A crawl is a mandatory 7-step sequence: inject, generate, fetch, parse, updatedb, invertlinks, and index to Solr
- For scheduled crawls, use the helper script ./bin/crawl and automate it with Cron, ensuring you add a lock check to prevent concurrent runs that can damage the crawldb
- Apache Solr transforms Nutch's binary crawl output into structured, queryable documents accessible via a REST API or browser UI for downstream applications
What is Apache Nutch?
Apache Nutch is an open-source web crawler created by the Apache Software Foundation. It was originally built to power large-scale web search, and that origin shows in how it's designed.
Most developers reach for Scrapy or Beautiful Soup when they need to pull data from the web. Those tools work well for specific, one-time data pulls from URLs you already know. Nutch is designed for more extensive tasks. It crawls many pages across multiple rounds, discovering new URLs as it goes, and building up a complete picture of a site over time.
How Nutch is built
Nutch runs on a plugin-based architecture. You can easily change or add parts like parsers, URL filters, and storage without modifying the main code. It uses segment-based storage, meaning each crawl round produces its own timestamped directory of fetched and parsed content. It also follows robots.txt rules based on the agent name you set up.
Standalone vs. distributed mode
Nutch runs in 2 modes:
Mode
Storage
Best for
Standalone
Local filesystem
Targeted single-site crawls
Distributed
Hadoop/HDFS
Internet-scale crawling
This guide focuses on standalone mode, which is the best starting point for most situations.
Here’s how people typically use it:
- To create search indexes that are specific to their field
- To build training datasets for machine learning
- To monitor large amounts of content across many pages
- To track changes in a site's content or structure for competitive insights
Installing and configuring Apache Nutch
Before writing any commands, you'll need to set up your environment correctly. Most problems with setting up Nutch happen because of mistakes here, like using the wrong Java version, not setting environment variables, or missing configuration values. These issues can lead to problems later on.
Prerequisites
Nutch 1.22 works with both JDK 11 and JDK 17. This guide uses JDK 17 because it is the more modern option and is fully supported in version 1.22.
First, check which version you have:
If the command returns java: command not found, Java isn't installed. Here's how to install JDK 17 based on your OS:
If you're on a Mac and you don't have Homebrew installed yet, get it first:
Then install JDK 17:
Then tell your system to use it:
On Linux, use your package manager:
If you use Windows, you need to have WSL 2. Nutch runs on Unix-based environments only. Install WSL 2 first, then follow the Linux steps above inside it
Before you continue, check that the right version is active:
Download and unzip Nutch
You can download the binary release directly. There's no need to build it from source.
Before unzipping, check that the file isn't damaged or incomplete. This is important because a broken file can lead to problems that you won't discover until later steps.
You should see:
If it says anything other than OK, the file is corrupted. Delete it and re-download:
Once the checksum passes, unzip and navigate into the directory:
Your directory should now look like this:
Verify the installation
Run this:
You should see a list of available Nutch commands. If you see this instead:
Set it explicitly for your current session:
Don't assume it's set up in your shell profile. Set it up, then run bin/nutch again to check that it works before you move on.
To make this permanent so you don't have to set it every session, add it to your shell profile:
Then re-run bin/nutch to confirm it works before continuing.
Key configuration files
Nutch has a system that defaults to standard settings and allows you to make changes. Don't edit the file named nutch-default.xml. Instead, place your custom settings in conf/nutch-site.xml.
To crawl websites, Nutch needs you to identify yourself. Nutch needs this to follow robots.txt rules correctly. Open conf/nutch-site.xml and add this inside the <configuration> tags:
The http.agent.name value is what Nutch sends as its HTTP user agent when requesting pages. Websites use this information to identify crawlers and to check their robots.txt rules. If this agent name is blank or generic, it could unintentionally violate those rules, so always set a clear and identifiable name.
There are two other important files to know about:
- conf/regex-urlfilter.txt. This file uses regular expressions to decide which URLs Nutch can visit. It helps prevent your crawler from going to unwanted websites.
- conf/crawl-urlfilter.txt. This is a secondary filter used by the crawl script to better control which domains are processed.
Both of these files will be explained in detail in the next section.
Understanding the crawl directory
When you start a crawl in Nutch, it creates a structured database in a folder called crawl/. Knowing this layout saves you time when the pipeline is running:
- crawl/crawldb/. This is the main part of the crawl. It keeps track of every URL that Nutch knows about and its current status, like if it has been fetched, is missing, or is waiting.
- crawl/segments/. This part contains the data collected from the web. It is divided into time periods for fetching, parsing, and raw content.
- crawl/linkdb/. This part shows the links between the pages you have crawled, tracking which pages link to each other. The data is useful for relevance scoring in Solr
You'll frequently refer to these folders throughout the process. Knowing where everything is will make the next steps much easier to understand.
Scoping the crawl: Seed URLs and URL filters
Nutch is an efficient discovery engine. It's designed to find and follow every link it sees. Without proper limits, a single starting website can lead Nutch to thousands of unrelated pages in a short time. Scoping involves guiding Nutch on where to begin and, importantly, where to stop.
This is the section most tutorials rush through, and it's exactly where most first-time Nutch setups go wrong. Skip the URL filter setup, run your first crawl, and you'll end up with thousands of off-domain URLs clogging your crawldb before you've fetched a single page you actually wanted.
Seed URLs
Seed URLs are the entry points for your crawl. Nutch starts here, fetches each page, extracts every link it finds, and adds those links to the URL queue for future rounds.
Make sure you're inside the apache-nutch-1.22 directory first, then create a directory urls/ and a seed.txt file:
Confirm it was created correctly:
Your directory should now look like this:
One URL per line. You can add multiple seeds if you want to start from specific sections:
To run your first crawl round, you'd inject your seed URL and generate a segment:
Nutch fetches the page and finds all the links on it, putting them into a queue. One page on decodo.com can have 50 to 100 links. If these links go to other sites like x.com, linkedin.com, or third-party tools, and you haven’t set URL filters, all of them will go into the crawldb. By the second round, you'll be crawling far beyond the site you intended.
URL filtering with conf/regex-urlfilter.txt
The regex-urlfilter.txt file tells Nutch which websites to crawl and which to ignore. The rules are processed from top to bottom. The first match is the one that counts. A rule with a + means to allow it, while a rule with a - means to block it.
Open the file:
At the bottom, you'll see this default catch-all rule:
This allows every URL without restrictions. To focus on specific crawls, this needs to be removed.
To focus on a single domain, replace the default catch-all with these two rules:
The first rule allows any URL that starts with /. The second rule blocks everything else. The order of these rules is important; if you swap them, nothing will get crawled.
Adding path-level restrictions:
Want to crawl only Decodo's blog?
Want to crawl both the blog and the proxies section?
Rules stack. Add a new + line for each path you want included, always ending with - to reject everything else.
The caveat nobody warns you about
URL filters only apply to future crawl rounds. If you've already run a crawl without any filters, the off-domain URLs (like x.com and linkedin.com) that are linked on Decodo's homepage are already in the crawldb. They will be fetched in the next round, no matter what filters you add now.
The only solution is to delete your crawl directory and start over:
Then re-inject your seeds with filters in place before running anything else. It's a tough lesson to learn later: always set your filters before your first crawl.
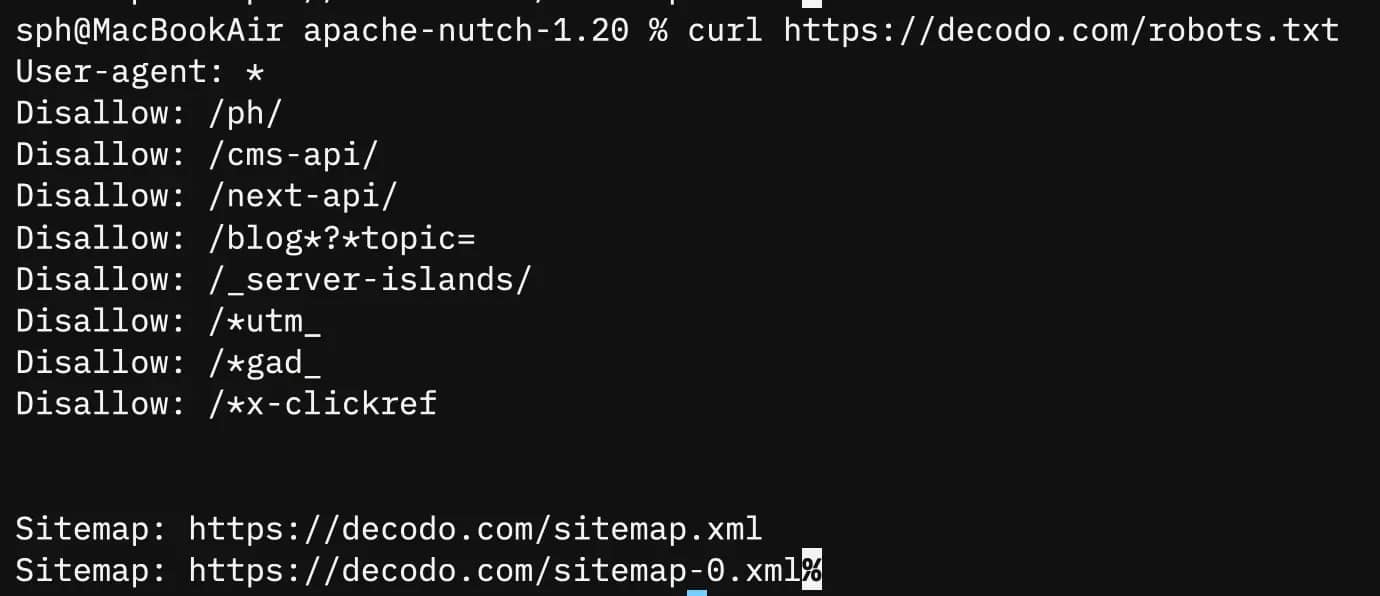
robots.txt and crawl politeness
Nutch respects robots.txt automatically. It reads the file on the target domain and checks your http.agent.name against any crawl directives before fetching. If your agent is blocked, it will skip those URLs.
You can verify what Decodo allows before you begin crawling:
You can control how fast Nutch sends requests with the http.delay setting in conf/nutch-site.xml:
The time value is in milliseconds. Using 1000ms means one request per second, which is a safe setting. If you set it too low, you might trigger rate limits on the server you’re trying to reach. This can lead to request failures that are hard to spot. The server won’t inform you if it’s blocking you; instead, requests will time out without warning.
Nutch isn't so great without Decodo
When your crawl starts hitting CAPTCHAs and IP bans, Decodo's residential proxies keep the spider moving without the constant babysitting.
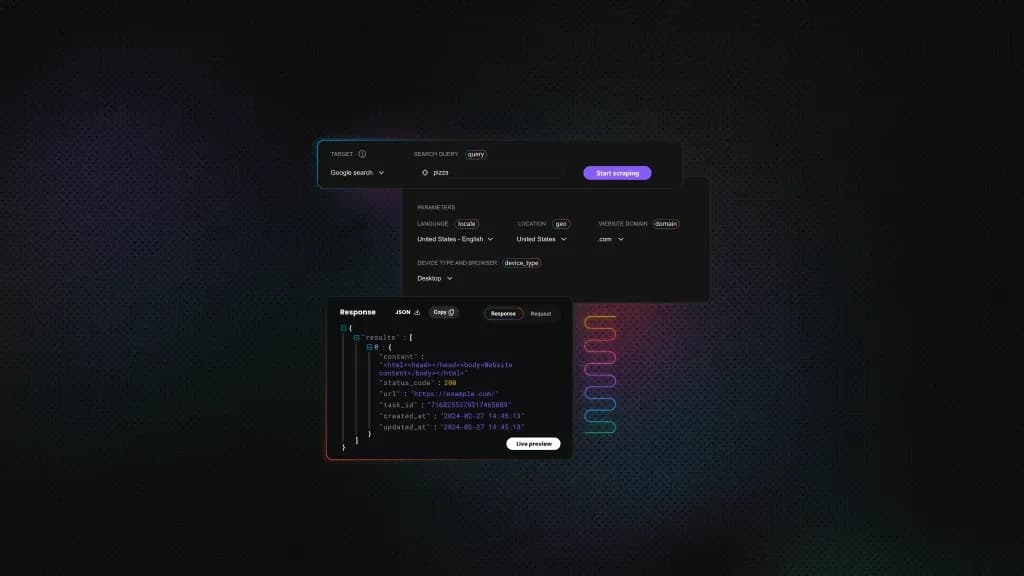
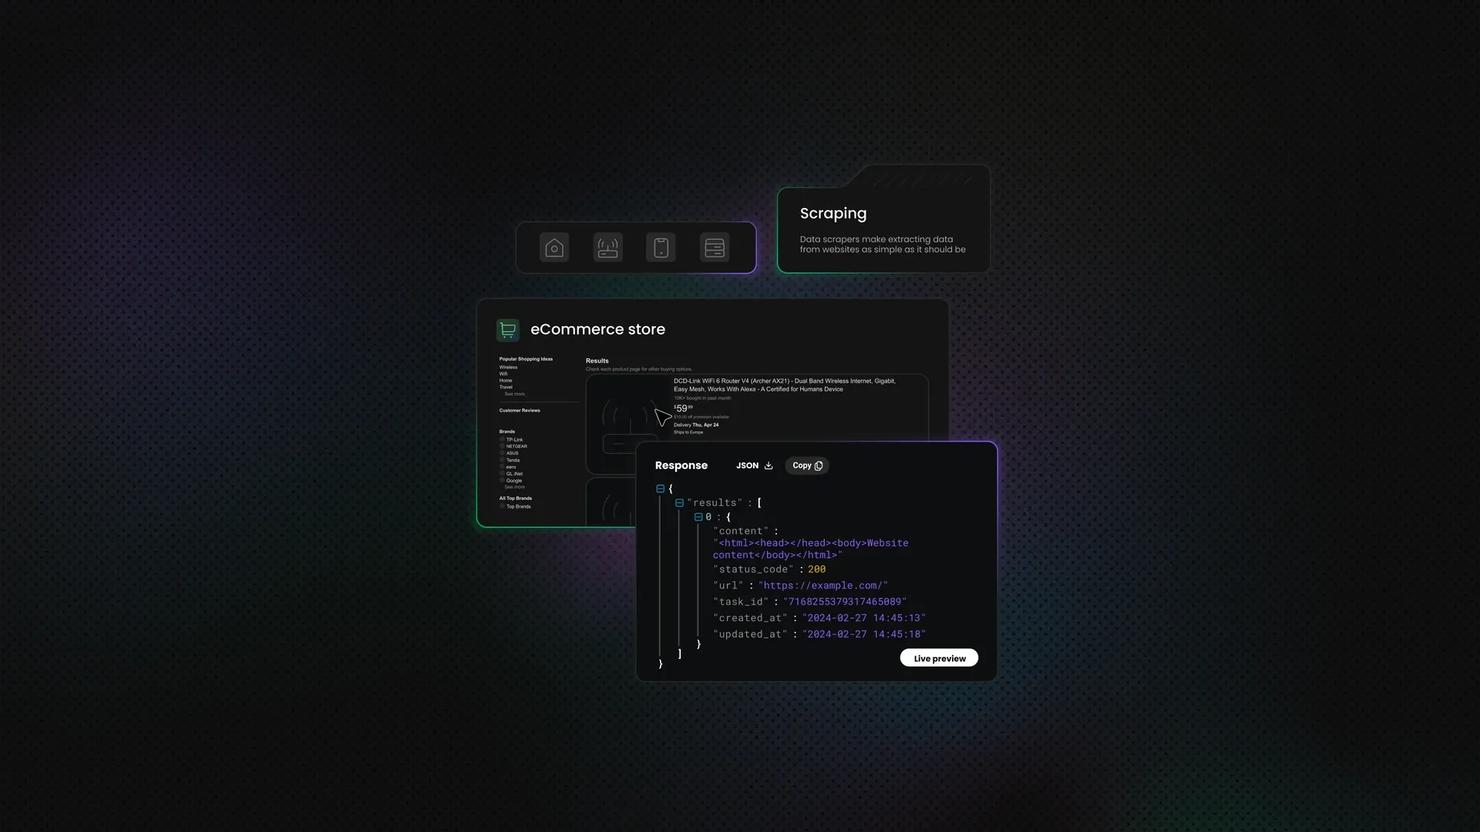
Integrating Apache Nutch with Apache Solr
Nutch produces binary segment files that are only readable through Nutch's own CLI tools. Apache Solr transforms that into structured, field-indexed documents you can query through a browser UI or REST API.
Set Solr up before your first crawl. Some settings affect how data is persisted during the crawl pipeline itself, not just at the indexing step at the end.
Installing and starting Solr
Download Solr version 8.11.2. This version works well with Nutch version 1.22. Make sure to download it in the same location as your apache-nutch-1.22 directory, but not inside that directory.
Your working directory should now look like this:
Start the Solr server:
Confirm it's running by opening http://localhost:8983 in your browser. You should see the Solr admin UI. If the page doesn't load, check whether the port is blocked:
Next, create a dedicated core for Nutch. A core is what Solr calls an individual index. You can think of it as a separate database for the data you collect while crawling:
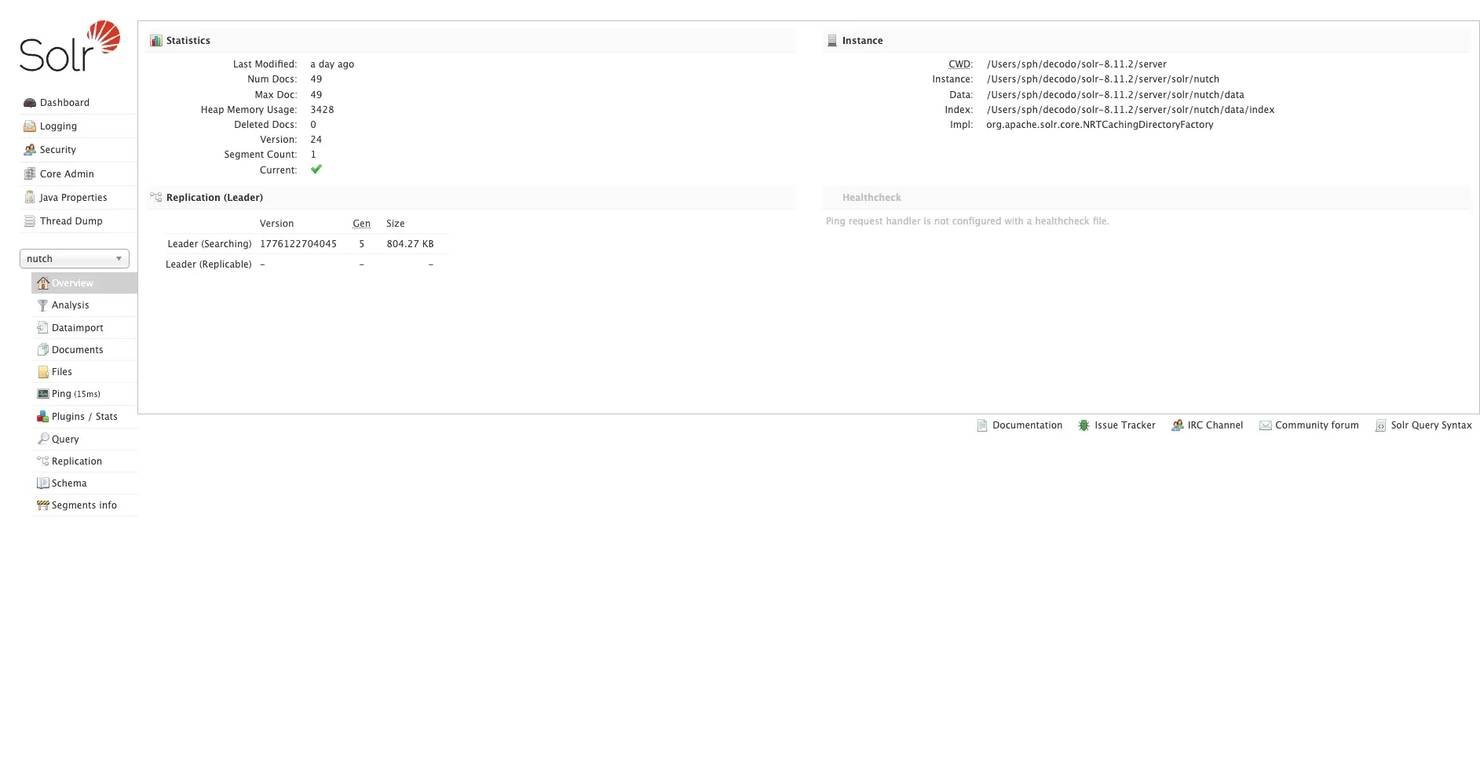
Confirm the core exists by navigating to http://localhost:8983/solr/#/nutch/core-overview in your browser. If you see the core overview page, you're good to continue.
Configuring Nutch to write to Solr
Switch back to your Nutch directory:
Open conf/nutch-site.xml and add these properties inside the <configuration> tags:
The plugin.includes property tells Nutch which plugins to load. The indexer-solr plugin must be included for indexing to work. If it is missing, Nutch will crawl and parse correctly, but it will skip the indexing step without showing any error.
What Solr adds to the pipeline
Without Solr, here's what Nutch's output looks like:
These are binary files and can't be easily searched without using Nutch's CLI tools.
With Solr, the same data is transformed into structured documents with clear fields:
You can search this data easily through a web interface, a REST API, or directly with a Python script. This makes the crawl output queryable and ready for downstream processing.
If you are crawling websites that use IP-based rate limits or anti-bot measures, like decodo.com, you should use Nutch with Decodo's residential proxies during the fetching step. This combination helps avoid blocks that could cut your crawl short. Without it, you might see timeout errors in your logs, but won’t know if your IP was flagged.
Running a web crawl with Apache Nutch
This is the most important part. The Nutch crawl pipeline has 7 steps, and you must run them in order. Each step relies on the previous one, so skipping or changing the order will break the pipeline.
Before running any command, confirm you're in the apache-nutch-1.22 directory. Also, confirm Solr is still running.
Step #1: Inject seed URLs
This creates crawldb from scratch on the first run and populates it with your seed URLs. You should see output ending with something like:
![Apache Nutch log showing '2026-04-13 00:05:10,418 INFO o.a.n.c.Injector [main] Injector: Total urls injected: 1' in terminal](https://decodo.com/cdn-cgi/image/width=1480,quality=70,format=auto/https://images.decodo.com/apache_nutch_2_png_3930693005/apache_nutch_2_png_3930693005.webp)
Verify the URL made it into the database:
You should see https://decodo.com with a status of db_unfetched. If it's not there, the inject failed; double-check your urls/seed.txt path and re-run before continuing.
Step #2: Generate a crawl segment
This process selects URLs from the crawldb that are ready to be fetched and creates a new segment directory with a timestamp inside crawl/segments/. The -topN 20 flag limits the number of URLs in each segment. Keeping this number low in the early rounds helps you review the output without feeling overwhelmed.
To avoid retyping the long timestamp for every command that follows, you can grab the most recent segment path with this variable:
While using ls to capture the segment path works for manual walkthroughs, it can be unpredictable in automated scripts. When moving to full automation, the bin/crawl helper script handles this timestamp logic internally, ensuring the latest data is always targeted without manual pathing.
You should see something like:
Confirm the segment was created correctly:
Step #3: Fetch pages
This downloads the actual pages into the segment. Nutch runs concurrent fetch threads by default. Watch the output, you should see URLs being fetched with status codes:
![FetcherThread 54 fetching https://decodo.com/ (queue crawl delay=5000ms) — log line: 2026-04-13 00:18:15,248 INFO o.a.n.f.FetcherThread [FetcherThread]](https://decodo.com/cdn-cgi/image/width=1480,quality=70,format=auto/https://images.decodo.com/apache_nutch_3_png_c4c16849e7/apache_nutch_3_png_c4c16849e7.webp)
The status means the page was successfully fetched. If you mostly see timeouts or 403 responses, your IP might be blocked. This is where Decodo's residential proxies can help. By rotating IPs during the fetch step, you can avoid blocks that may disrupt your crawl.
Other common problems to check:
- Make sure JAVA_HOME is set. If not, set it explicitly and try again.
- If you experience connection timeouts, check your network connection or lower the fetch concurrency in conf/nutch-site.xml.
Re-run readseg after fetching to confirm URLs moved to fetched status:
Step #4: Parse content
When Nutch fetches a page, it extracts 3 things:
- Text content: This is the main body of the page that gets indexed in Solr.
- Metadata: This includes the title, type of content, and when it was last modified
- Outlinks: This is a list of every URL found on the page, which will be used in future rounds of crawling.
This process helps Nutch crawl incrementally. Each round uncovers new URLs that can be explored next. For more details on what data parsing produces and why it matters, check out what is data parsing?
Watch the output, you should see this:
Some types of content may not be parsed correctly. This includes images, raw JSON files, and PDFs that don’t have a specific parser plugin. In these cases, you might see errors like:
This is expected behavior, not an error in your setup. Nutch skips unparseable resources and moves on.
Step #5: Update the crawl database
This merges the parsed results back into crawldb, updates URL scores and statuses, and queues newly discovered URLs for future rounds. After this step, crawldb knows about every URL Nutch found on decodo.com during this round.
Check the updated stats:
![Terminal displaying INFO o.a.n.c.CrawlDbReader [main] log: 'Statistics for CrawlDb: crawl/crawldb' 'TOTAL urls: 53'](https://decodo.com/cdn-cgi/image/width=1480,quality=70,format=auto/https://images.decodo.com/apache_nutch_4_png_0ffb8b2dc2/apache_nutch_4_png_0ffb8b2dc2.webp)
After round 1, you should see a jump from 1 URL to 50+ in the total URL count. That jump confirms outlink discovery is working. If the number stays at 1, either your URL filter is too restrictive, or parsing failed entirely. Go back and check step 4's output.
Step #6: Invert links
This converts outlinks to inlinks and writes them to linkdb. Instead of tracking "this page links to X," Nutch now keeps track of "X is linked to by these pages."
One important note: only cross-domain links are included. Links between pages on decodo.com itself are excluded from linkdb. Only links from external domains pointing to decodo.com count here.
This data about incoming links helps with scoring relevance when we index into Solr. Pages with more incoming links from outside sources rank higher in search results.
Step #7: Index to Solr
Flag breakdown:
- filter: Applies your URL filters to the index.
- normalize: Standardizes the URL format by removing trailing slashes and making the scheme lowercase.
- deleteGone: Removes URLs that returned a 404 error or other issues from the Solr index.
After this runs, open http://localhost:8983/solr/#/nutch/core-overview in your browser. The document count should match the number of URLs that were successfully fetched and parsed in this round.
Run this after every crawl round, not just at the end. This keeps the Solr index up to date with the latest data from each round.
Running subsequent rounds
For rounds 2 and onward, repeat steps 2–7. You don't need to re-inject seeds because crawldb will carry the state forward automatically:
After round 2, running crawldb -stats will show a significant increase in the total number of URLs. Outlinks discovered in round 1 are now being fetched and parsed, revealing even more URLs for round 3.
Automating the crawl workflow
Running each step manually works fine when you're learning the pipeline. For anything recurring like nightly content monitoring, weekly dataset updates, and scheduled competitive intelligence, you need a single command that handles everything automatically.
The bin/crawl script
Nutch includes a built-in script that combines the entire pipeline into one command:
Flag breakdown:
- -i: This option turns on Solr indexing after each round.
- -s urls: This option specifies the location of your seed directory.
- crawl: This is the output directory where the crawldb, segments, and linkdb files are saved.
- 3: This is the number of rounds to run.
This process runs the full series of steps: inject, generate, fetch, parse, update the database, invert links, and index. It repeats this sequence 3 times, indexing into Solr after each round.
When to use the script vs. manual steps
Use the script for regular crawls when you are confident that the pipeline is working well. If you are troubleshooting, stick to manual steps. The script runs everything one after the other without stopping, so if something goes wrong during the process, you will need to check the logs to see where the error happened.
Incremental crawling behavior
Nutch doesn't re-crawl everything from the beginning every time you run the script. Here’s how it decides what to fetch:
- Nutch re-fetches pages that are already in crawldb only after 30 days, unless you change this setting in conf/nutch-site.xml
- Pages that have not changed are less likely to be re-fetched
- New URLs found in outlinks are given priority over pages that have already been fetched
If you need more frequent updates, like for a news site that publishes daily, you can shorten the re-fetch interval in conf/nutch-site.xml:
The value is in seconds. 86400 = 24 hours.
That's what makes it incremental, not a full re-crawl each time. The crawldb keeps track of what has been fetched, what is new, and what needs to be refreshed. This way, Nutch knows exactly what to do.
Scheduling with cron
Cron is a job scheduler for Unix systems. It runs commands automatically on a set schedule, so you don’t have to do it manually. To get started, open your crontab file.
Before you set up the cron job, create a logs directory in your Nutch folder. Do this first. If the directory doesn't exist when cron runs for the first time, the job will fail without any error message, and you won’t see any log output:
The cd ~/apache-nutch-1.22 before the crawl command is the safest approach. Nutch resolves the conf/ directory relative to where it's run from if you use absolute paths without setting NUTCH_HOME; Nutch can't find its config files, and the crawl fails silently. Always cd into the Nutch directory first rather than calling it from an absolute path.
Now open your crontab file. You can do this from any directory since cron works at the system level and isn’t linked to a specific folder:
Your terminal will open a text editor, usually nano or Vim. Scroll to the bottom of the file and paste this entry:
Save and exit. In nano, that's Ctrl + O to save, then Ctrl + X to exit.
Breaking the cron entry down:
- 0 2 * * *: Runs at 2:00 AM every day
- cd ~/apache-nutch-1.22: Navigates to the Nutch directory first
- ./bin/crawl -i -s urls crawl 1: Runs 1 crawl round with Solr indexing
- >> logs/crawl_$(date +%F).log: Appends output to a dated log file
- 2>&1: Captures both standard output and errors in the same log file
To check your scheduled log output the next morning:
Always remember this important rule: never run 2 crawl rounds at the same time. Running them together can damage the crawldb, and if that happens, you'll need to restart your entire crawl from the beginning. Set your cron interval wisely. If one round takes 45 minutes, don’t try to schedule it every 30 minutes
Add a lock check to prevent overlap:
This creates a crawl.lock file at the start of each run and deletes it when the run finishes. If a previous round is still running when cron fires again, the lock file exists, and the new run is skipped entirely.
Operational hygiene
A few things that will save you headaches over time:
- Segment accumulation. Each crawl round creates a new timestamped directory inside crawl/segments/. After a few weeks of nightly crawls, that folder gets large fast. Archive or delete old segments after their data has been indexed into Solr:
- Zero new results. If a scheduled crawl round doesn't produce 0 new URLs, start by checking logs/hadoop.log These logs contain a lot of helpful information, even when running in standalone mode. You can find issues like agent name mismatches, robots.txt blocks, and fetch failures there before they appear elsewhere.
Two common causes for zero results are:
- The target site's structure changed, and your URL filters no longer match any paths
- Your crawl IP has been rate-limited between rounds, especially common with daily or hourly schedules, hitting the same domain repeatedly
For the second case, rotating Decodo's residential proxies between crawl rounds prevents your IP from being flagged. A residential proxy changes your outbound IP among a group of real home addresses. This makes repeated crawls appear as if they come from different users, similar to normal traffic, instead of a bot overloading the same server.
Analyzing and using the indexed data
When you use Solr, you can work with your data in two main ways: through the browser interface for exploring it or by using the REST API for accessing it programmatically.
Exploring data in the Solr UI
Open your browser and navigate to:
Check the document count on this page. It should match the number of URLs you fetched and parsed successfully in your last crawl.
If it shows 0, either your index step didn't work, or Solr wasn't running when you ran it. Go back and re-run:
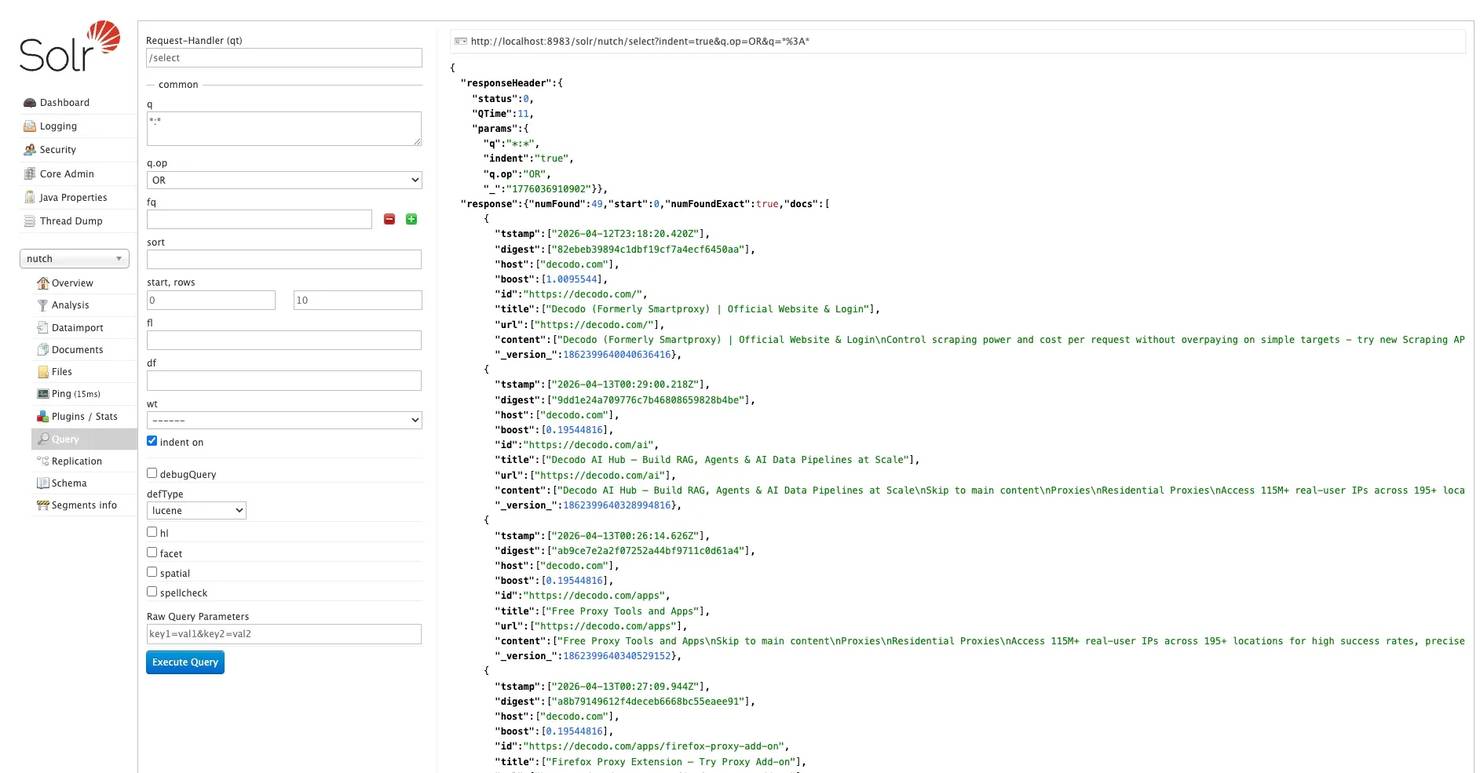
To run queries, click Query in the left sidebar. The default query *:* returns all indexed documents.
Here are some useful queries to start with:
Search by page title:
Search page content for a specific term:
Find all crawled URLs from a specific path:
Combine queries with filters:
Use the fl parameter to return only specific fields instead of full page content for every result. In the Query panel, find the fl field and enter:
This keeps response sizes manageable, especially important once your index grows to thousands of documents.
You can also sort results by different fields. Sort by relevance score:
Or by last modified date to see the most recently crawled pages first:
Querying Solr via the REST API
For automated pipelines and downstream processing, skip the UI and query Solr directly via its REST API. Send an HTTP GET request to:
Here's how to query and parse the response in Python:
Run it:
Expected output:
The rows parameter controls how many results come back per request. The default is 10; increase it for larger result sets.
When to use the UI vs. the API
- UI: ad hoc exploration, checking index health, running one-off queries
- API: automated pipelines, feeding crawled data into downstream systems, scheduled exports
Practical downstream applications
- Domain-specific search engine. Index a documentation site or knowledge base and build a search interface on top of Solr's query layer. Every page on decodo.com becomes a searchable document.
- LLM/RAG pipeline. Feed crawled text into a retrieval-augmented generation pipeline for document Q&A over a site's content. This guide on building a production-ready RAG pipeline with LlamaIndex walks through a practical implementation using crawled web content as the data source.
- Content change monitoring. Run scheduled crawls and compare the content or digest field values between index snapshots to detect updates. The digest field is a hash of the page content. If it changes between crawl rounds, the page changed.
- Competitive intelligence: track how a target site's content, structure, or pricing changes over crawl rounds by querying specific fields and comparing results over time.
Alternatives to Solr for storage
Solr isn't your only option for storing Nutch's output:
- Elasticsearch. A near-drop-in alternative with similar indexing semantics and a more active open source community. The query syntax is slightly different, but the concepts map directly.
- Raw segment export. For custom processing pipelines outside the Solr ecosystem, export raw segment data using bin/nutch readseg and pipe it into whatever storage system fits your stack.
Before feeding crawled data into any downstream pipeline, it's worth cleaning it first, removing duplicate content, stripping boilerplate HTML, and normalizing text. This guide on data cleaning covers the practical steps.
For teams that need structured web data without building and maintaining a full Nutch pipeline, Decodo's Web Scraping API handles targeted extraction as a managed service, with no infrastructure to run, no crawl state to maintain, and no segment directories accumulating on your disk.
Final thoughts
Apache Nutch handles what most scraping tools can't. It allows you to crawl many pages over time in a structured and repeatable way. Setting it up may take some effort, but once the pipeline is running, it can crawl a system that scales well beyond a single page or a single session.
To save time, make sure to set your URL filters before your first crawl. Also, set JAVA_HOME explicitly until it's permanent in your shell profile. Get these steps right from the start, and the rest of the pipeline will be easier to follow.
If you encounter rate limits or failures when fetching data from websites with anti-bot measures, Decodo's residential proxies automatically switch IPs during the fetching process. This ensures your crawl continues smoothly without interruptions.
Crawl blocked? Been there
When Nutch runs into anti-bot walls and rendered content, Decodo's Web Scraping API returns clean data without the workarounds.
About the author

Lukas Mikelionis
Senior Account Manager
Lukas is a seasoned enterprise sales professional with extensive experience in the SaaS industry. Throughout his career, he has built strong relationships with Fortune 500 technology companies, developing a deep understanding of complex enterprise needs and strategic account management.
Connect with Lukas via LinkedIn.
All information on Decodo Blog is provided on an as is basis and for informational purposes only. We make no representation and disclaim all liability with respect to your use of any information contained on Decodo Blog or any third-party websites that may belinked therein.