How to Use Wget With a Proxy: Configuration, Authentication, and Troubleshooting
Wget is a great tool for quickly downloading files or other web content, but you can also run into IP bans or geo-restrictions while using it. A simple way to bypass this limitation is to pair your setup with a proxy server. Instead of connecting directly to a website, wget then sends your requests through a proxy, which can help you stay under the radar and avoid getting blocked.
Lukas Mikelionis
Last updated: Mar 17, 2026
15 min read

TL;DR
- Wget supports HTTP, HTTPS, and FTP downloads and is reliable on unstable networks
- Route Wget through a proxy to reduce the likelihood of blocks and improve reliability
- Configure a proxy with Wget in three ways: command-line options, .wgetrc, or environment variables
- For authenticated proxies, use --proxy-user and --proxy-password and avoid hard-coding credentials
- Use no_proxy for hosts that must bypass the proxy
- Wget doesn't support SOCKS5 natively; use proxychains or torsocks, or switch to curl
- Rotating proxies helps reduce blocks and improve success rates at scale
- When proxy issues occur, check for common causes, such as incorrect credentials, timeouts, SSL interception, or 403 blocks
What is Wget?
Wget (short for web get) is an open-source CLI utility from the GNU Project. It's commonly used to fetch files over HTTP, HTTPS, and FTP.
Compared with many alternatives, Wget is strong for long-running downloads because it retries automatically and resumes partial files in the event of slow or unstable network connections.
You can also use Wget to interact with REST APIs without having to install any additional external programs. Wget is most commonly used on Linux and Unix servers, but you can also install it on macOS and Windows.
Installing Wget across operating systems
Some Linux distributions include Wget by default. But if you are running macOS or Windows, you'll probably need to install it. Check whether wget is already installed:
If you see an output like this, that means wget is already installed.
If you don't have Wget installed, you can download it on pretty much any operating system, including the big three (Windows, Mac, and Linux).
You can also download it directly from the GNU project website and install it manually, but using a package manager is usually far more convenient. Follow along to install wget on your operating system.
Install Wget on Linux
Most Linux distributions come with wget pre-installed. If yours doesn't, or if you need to reinstall it, use the package manager for your distribution.
If you're using a Debian-based distro like Ubuntu, install Wget using apt:
If you're running a distro that uses YUM, use:
For newer distros that use DNF, run:
As for ZYpp, you can install it like this:
And for Arch Linux users:
Install Wget on macOS
MacOS does not ship with wget out of the box. The easiest way to install it on a Mac is using Homebrew.
If you don't have Homebrew installed, head over to brew.sh and install it before running the command.
Install Wget on Windows
If you're on Windows, you can download the Wget Windows binaries manually, but using Chocolatey is usually easier. Chocolatey is a package manager for Windows, just like Homebrew on Mac.
Note: Before running these commands, make sure you run your Command Prompt or PowerShell terminal as an administrator.
Another option is to install Windows Subsystem for Linux (WSL) and run sudo apt install wget inside the Linux environment.
Verify your installation
Once the installation finishes, confirm everything worked by checking the version:
Wget basics: Syntax and essential commands
Once it's installed and ready to go, we can start using it right away. But before that, let's quickly cover some basic Wget commands that'll come in handy.
Basic syntax
The general structure is:
[OPTIONS] are the optional flags or parameters that can customize Wget's behavior, while [URL] is simply the URL of the file you want to download.
The Wget help command (wget -h) shows all available flags. However, let's look at some of the most commonly used ones and what they do:
- -c continues an interrupted download
- -q runs in quiet mode
- -O FILE saves to a custom filename
- -r enables recursive downloading
- -P DIR saves files to a specific directory
For the full option list, see the GNU Wget manual.
Downloading files
One of the most basic command examples is downloading a single file and storing it in your current working directory. For example, you can download the latest version of WordPress by using the following command:
You'll see an output as below, and the file will be saved under the same name it has on the server, in your current working directory:
You'll also see extra information, such as the download progress, speed, size, time, and date.
Downloading multiple files (-i)
We can take one step further and download multiple files at once. To do this, just pass multiple URLs:
You can also create a text document and place the URLs inside it. The .txt file could look like this:
Use the -i flag to download everything in the file:
Once the download finishes, you'll have downloaded multiple files with wget.
Download to a specific directory (-P)
If you want to specify the download destination or directory, you can easily accomplish this with the –P flag:
The file you retrieve using this syntax will appear in the documents/archives/ folder.
Save with a custom filename (-O)
To save a file under a different name with Wget, use the -O flag:
The downloaded resource will be saved as wordpress-install.zip instead of its original name. The -O option makes working with archives easier, as you don't need to retype long filenames.
Quiet mode for scripts (-q)
When you're running downloads in scripts or cron jobs, you may not want progress output in your logs. Quiet mode suppresses most output:
Continue interrupted downloads (-c)
Sometimes your download can get interrupted, or your internet connection is unstable. Instead of starting over, it's possible to continue the download using the -c flag:
Bravo! You just extracted your first web content using wget.
Setting a custom user agent
Your browser sends a data string known as the user agent to the target website every time you visit it. This user agent string contains information about your browser and operating system.
Web servers receive a user agent header on each request. This user agent string contains information about your browser and operating system.
Wget has its own default user agent, which can be easily detected in anti-bot setups, so you must spoof your user agent when using Wget to reduce the risk of being blocked or banned.
To visualize this, first check the default Wget user agent:
You should get the following response:
The default value is wget/1.25.0, which isn't a real browser user agent. Here's what a valid browser (Chrome) user agent looks like:
There are two ways to set the Wget user agent: by specifying the user_agent option in your .wgetrc config file or using the --user-agent flag in your request.
To use the --user-agent flag directly via the terminal, run the following command:
This command outputs the following:
If you'd like to modify the user agent permanently, you can change the configuration in the .wgetrc file. Create a .wgetrc file in your project root directory and add the user agent string to the file:
Run your request with the configuration file:
Why the user agent matters for avoiding blocks
- It can reduce quick bans
- It helps your bots blend in with normal traffic
Extract links from a web page
You can also use wget to extract links directly from a webpage. This feature is quite handy for crawling pages or collecting URLs for later downloads.
To quickly demo this and save the crawl output to a log file, run the following command:
Using Wget to retrieve whole websites
You can also use the Wget command to download the content of an entire site. This lets you view the site locally without an internet connection.
The –mirror flag makes your download recursive, while –convert-links rewrites links so the site works offline. The --page-requisites flag downloads page assets like CSS, JS, and images, and finally, the --no-parent prevents wget from crawling up to parent directories.

Scrape without getting blocked
Decodo's residential proxies rotate IPs automatically so your scrapers stay under the radar.
Once the process finishes, you'll be able to open the downloaded website locally and find all the files in the documents/websites/ folder.
Sometimes you may want to retrieve information from just one page instead. Run this:
You'll get an offline clone of that single page that actually looks and works like the online one.
How to configure Wget with a proxy
Before we configure a proxy, let's first confirm what your current IP address looks like. A quick way to do that is to request an endpoint that returns your public IP.
To see your current public IP, run:
The value of the origin key is your IP address. You'll get an output similar to this:
Now, let's use a proxy and see if the IP address changes. If you don't yet have a proxy, you can sign up for Decodo and activate a 7-day free trial to follow along.
Method 1: Command-line options
The fastest way to use a proxy with Wget is by using the -e flag, which lets you set configuration options directly in the command line.
Let's see a quick example:
Please note that your proxy should be in this format:
Some proxy servers, especially premium proxies, require client authentication before granting access. In that case, your Wget proxy setup will require you to specify a username and password when connecting to the proxy server.
You can do this by passing the --proxy-user and --proxy-password options to wget, alongside your proxy settings:
You can also use the --proxy flag as a shorthand for enabling or disabling proxy use:
Method 2: Creating a config file
The second method of Wget proxy integration is to use a .wgetrc config file. This file stores proxy configuration, which wget then reads before it runs.
If you use a proxy regularly, you can save a few minutes by storing it in a config file. Create a config file .wgetrc in your current directory and add the following to it:
To set the proxies as a global configuration that applies to all users, you can use the system config file at /etc/wgetrc instead. This way, even if you turn off your computer, Wget still uses the same proxy settings for your next session.
Note that this approach requires root access and is typically applicable only on Linux or Unix-like systems. Check if your IP address has changed to the proxy server's IP:
Method 3: Environment variables
Environment variables are one of the cleanest ways to use wget with a proxy because you set them once, and Wget picks them up automatically. This is useful in containerized environments, CI/CD pipelines, and shell scripts where you want consistent behavior without editing config files.
Linux/macOS
Windows (CMD)
The export command makes the variables available to programs you run from that terminal session. If you want to persist Linux/macOS variables in your shell profile:
- Bash: .bashrc or .bash_profile
- Zsh: .zshrc
Let's see an example in Linux/macOS:
Using no_proxy
Sometimes you don't want wget to use a proxy for certain hosts, like internal services, local dev machines, or virtual machine instances. That's where the no_proxy flag comes in handy.
To set up a no_proxy instruction, use the following command:
Linux/macOS
Windows (PowerShell)
This way, wget will skip the proxy for anything that matches the no_proxy list and use the proxy for everything else.
Choosing the setup
All three proxy setup methods work well with Wget. However, the best choice comes down to how often you use proxies with Wget and whether you need the settings to persist.
Scenario
Best method
One-off test
Command-line options
Regular local use
.wgetrc file
CI/CD or containers
Environment variables
Proxy bypass for internal hosts
no_proxy
HTTP, HTTPS, and SOCKS5 proxies with Wget
There are different types of proxy protocols, and among the popular ones today are HTTP, HTTPS, and SOCKS5.
Wget supports HTTP, HTTPS, and FTP proxy settings out of the box, and while the setup across these is often similar, there are still a few details that we need to spell out.
For a deeper comparison, check out the difference between SOCKS5 and HTTP proxies.
Let's see how we can set up wget with each of these protocols.
HTTP proxies
This is the most common setup because it works out of the box with Wget and most proxy providers. Wget simply sends your request to the proxy, which forwards it to the target server.
The set up is also straightforward, use --proxy=on and pass your proxy URL through http_proxy:
If your proxy requires authentication, add --proxy-user and --proxy-password:
If you use the same proxy often, put it in a .wgetrc file:
Now you can run wget normally, and it will use the proxy.
HTTPS proxies
HTTPS proxies provide encrypted communication for secure data transfer. In terms of setup, HTTPs proxies are quite similar to HTTP proxies, as wget still uses proxy settings, but the traffic is encrypted end-to-end between your machine and the target site.
SSL/TLS considerations
HTTPS through a proxy is usually smooth, but some situations can cause trouble, such as:
- Corporate proxies are doing SSL inspection. Some networks intercept HTTPS traffic and present their own certificates. If your machine does not trust the corporate CA, you may see certificate errors. The clean fix is installing the correct CA certificate on the machine.
- Bad CA bundle on the machine. If your OS is missing updated CA certificates, HTTPS requests can fail even without a proxy.
You'll see people use --no-check-certificate to fix this, but it reduces security and should be avoided unless you fully understand the risk.
SOCKS5 Proxies
Now, Wget doesn't have built-in support for SOCKS5 proxies, and a lot of guides get this wrong. The GNU Wget manual confirms it only handles HTTP, HTTPS, and FTP proxy protocols.
Why SOCKS5 proxies are preferred over HTTP(s)
People choose SOCKS5 when they want:
- better protocol flexibility than HTTP proxies
- stronger anonymity
- compatibility with tools like Tor
Now that we've established this, if you must use a SOCKS5 proxy with wget, you have three solid workarounds:
Option 1: Proxychains (Recommended)
Proxychains is a simple wrapper that forces apps like wget to route traffic through a SOCKS5 proxy. To use Proxychains, first install it:
Next, open the config file and your SOCKS5 proxy.
Scroll to the bottom under [ProxyList] and add your proxy in this format:
Then, prepend proxychains4 to your wget command when running it:
Option 2: torsocks
If you're routing through Tor, torsocks makes it straightforward to use SOCKS5 proxies. First, install torsocks:
Option 3: Use cURL instead
If SOCKS5 is essential to your workflow and you don't want wrapper tools, switching to cURL is often the simplest move because it supports SOCKS5 natively.
Check out our in-depth guide to learn more about configuring proxies with cURL.
FTP proxies
This is less common these days, but they're still relevant for legacy file servers and older package repositories.
You can configure FTP proxies using the ftp_proxy flag:
Security best practices for proxy credentials
You are likely aware that leaving your proxy credentials in plain sight is a recipe for trouble. Follow these practices to keep your proxy username and password safe.
Lock down your config file
If you store credentials in .wgetrc, restrict permissions so only you can read it:
Avoid shell history leaks
Commands with passwords in them can get saved in your shell history. On many systems, you can prefix a command with a space to prevent this, as long as HISTCONTROL=ignorespace is enabled.
Also, if you accidentally run a command with secrets, remove it from your history file as soon as possible.
Use environment variables for secrets
Instead of hardcoding credentials into commands or config files, you can load them at runtime using environment variables:
This keeps credentials out of your command text:
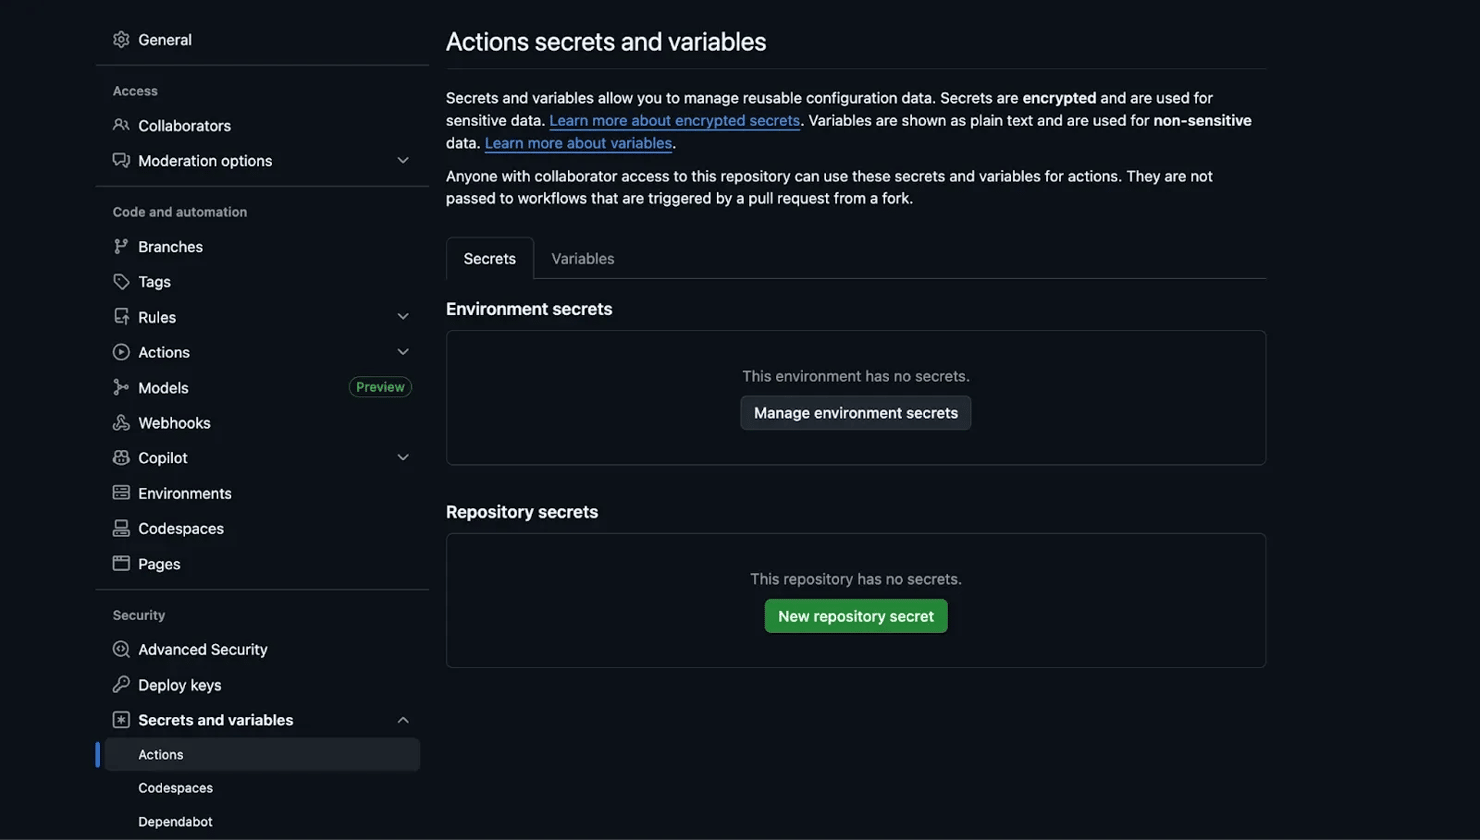
Use secret managers in CI/CD
Never commit real credentials. In CI/CD pipelines, use your platform's built-in secret management, like GitHub Actions secrets, GitLab CI variables, or your cloud provider's secret store.
Rotating proxies with Wget: Manual and automated approaches
A rotating proxy is a proxy setup that constantly changes the IP addresses over time or per request.
When your requests keep coming from different IPs, websites find it harder to spot automation and block you. In this context, rotating proxies can be super helpful when you are downloading many files or running cron jobs.
Why rotate proxies?
Some of the benefits of rotating proxies include:
- Avoiding IP-based rate limiting and temporary bans
- Spread requests across multiple IPs to reduce detection
- Improving success rates when downloading lots of files
- Keep your job running even if one IP gets blocked
Let's set up a rotating proxy using Wget.
Manual rotation with a shell script
Wget doesn't have a standard way of randomly selecting proxies, so a free alternative is to create a list of proxies with different IPs and randomly select one per request.
You can do this with a shell script in a few simple steps.
Step 1: Create a proxies.txt file
Create a proxies.txt file and add the proxies you intend to use. Each proxy should be on a new line:
Step 2: Create a rotation script
Create a random_proxies.sh script that uses GNU's shuf utility to pick a random proxy from proxies.txt. Then we set the proxy in Wget using the -e option. We also run the request three times so you can confirm the IP changes.
Step 3: Run the script
Make it executable and run it:
If you're using Windows, you'll need a Unix-like shell environment like WSL to run this script.
You should see output where the IP changes between requests, for example:
Downsides of DIY rotation
Manual rotation works, but it comes with tradeoffs:
- You manage proxy quality and uptime yourself
- Free proxies are often slow or already blocked
- There are no automatic checks, so dead proxies can break your script
- It does not scale well for big downloads
- Success rates can be low because IP quality is inconsistent
Automated rotation with backconnect proxies
A DIY solution is fine for quick tests, but it will struggle to perform or even hold up at scale. It's even worse when paired with free proxies, as you run a serious risk of being exposed to security gaps or being blocked.
A more reliable option is premium rotating proxies (sometimes called backconnect proxies). With this setup, you don't rotate anything yourself. You get one proxy endpoint, and the provider rotates IPs behind the scenes from a large pool, so each request looks like it's coming from a different user.
This is a productivity hack for:
- Large file downloads
- Repeated cron jobs and scheduled data pulls
- Strong anti-bot systems
- Automation gigs
Integrating Wget with Decodo rotating proxies
Decodo is rated as the best residential proxy provider in 2026 according to Proxyway, an independent proxy reviewer. It offers smart proxy rotation capabilities. Decodo provides over 115 million high-quality residential IPs across more than 185 countries, with enterprise-grade uptime guarantees.
Let's set up Decodo Residential Proxies with Wget so you get automatic IP rotation without needing to write DIY scripts.
Step 1: Get your Decodo credentials
Sign up for Decodo and activate your free trial or plan.

Copy the proxy server details (proxy domain and proxy port) and your proxy credentials (username and password).
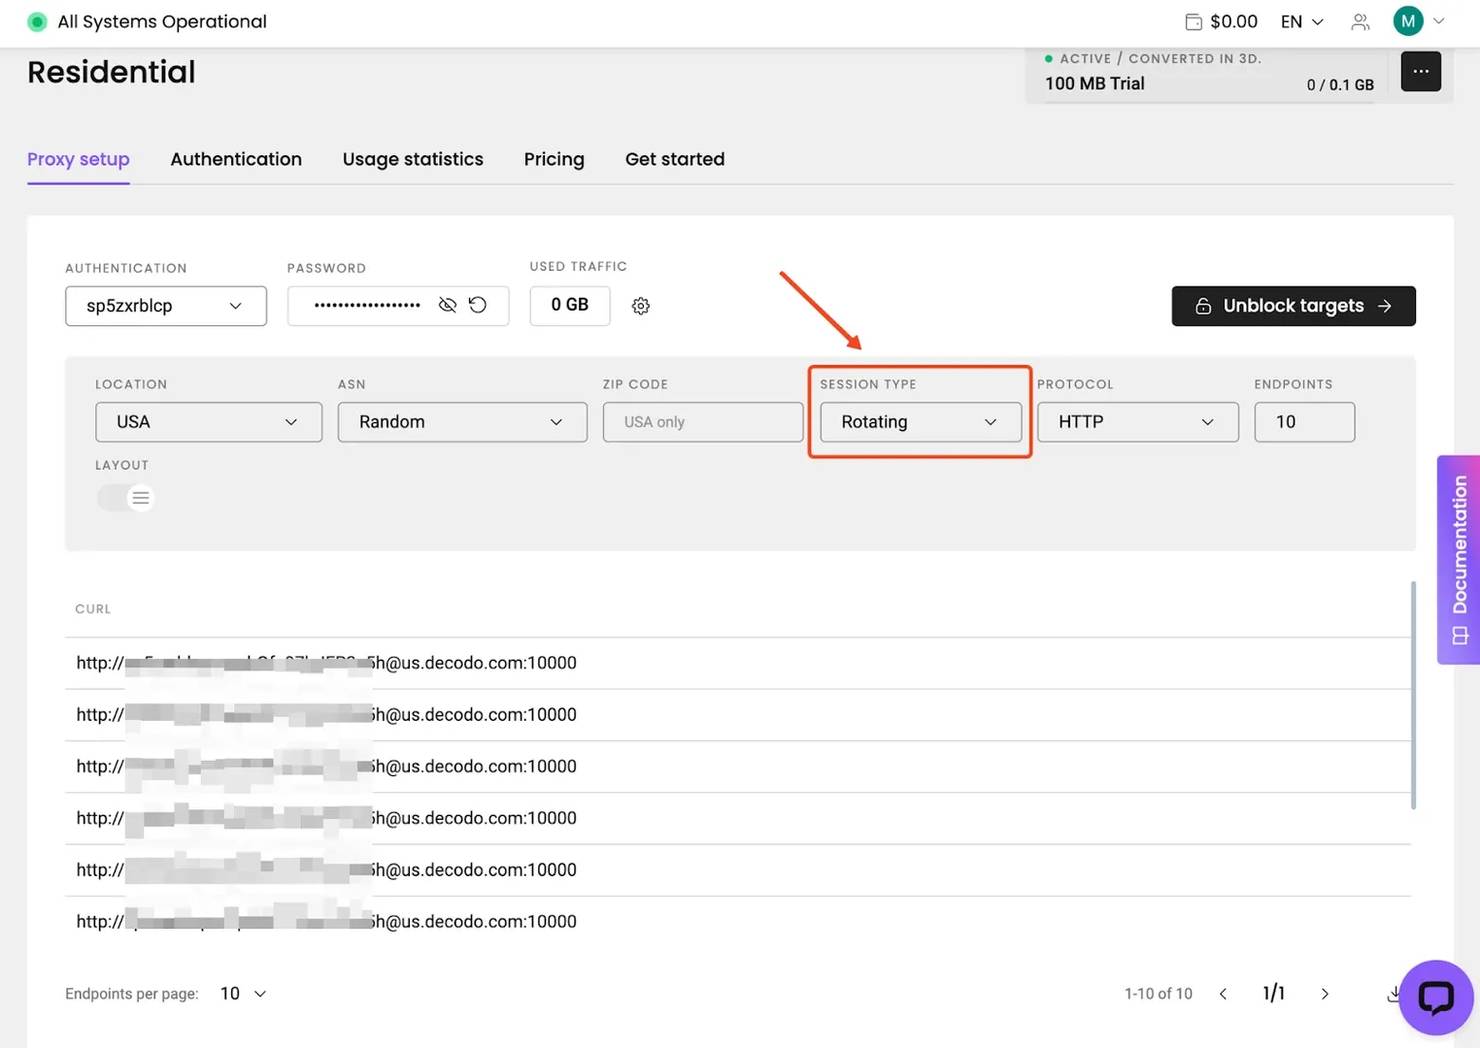
Step 2: Configure .wgetrc
Create or edit a .wgetrc file in your project folder and paste your proxy credentials into the file:
Lock the file permissions:
Step 3: Run Wget through Decodo and check your IP
Run Wget using the configuration file:
See the result for two consecutive requests:
You should see a different IP each time.
Wget vs cURL
cURL is another open-source command-line tool for downloading files and is available for free.
cURL and wget share many similarities; both are capable command-line tools for making HTTP requests, and both work with proxies.
What they have in common
Both tools:
- Are open-source and free to use
- Can download content over HTTP, HTTPS, and FTP
- Can send HTTP requests like GET
- Support cookies
- Work well in scripts and automation
- Can run quietly in the background
Where Wget is better
Wget is built for downloading. It's the better pick when your goal is to reliably fetch lots of files, and you want the command to keep working even if the network is not perfect.
Wget is usually the better choice when you need:
- Recursive downloads and website mirroring
- Resume interrupted downloads
- Batch downloads from a URL list
- Simpler syntax for straightforward download tasks
Where cURL is better
cURL is more flexible for HTTP requests. It's the better pick when you care less about downloading a bunch of files and more about controlling the request itself.
cURL is usually the better choice when you need:
- Native SOCKS5 support
- Richer API request controls
- Broader auth and protocol flexibility
Quick decision table
Your need
Best tool
Download files recursively through a proxy
Wget
Mirror a website through a proxy
Wget
Batch download from a URL list
Wget
Resume interrupted large downloads
Wget
Use SOCKS5 proxies natively
cURL
Interact with APIs
cURL
Script in a CI/CD pipeline
Either works
Note: To learn more, see how to download files with cURL.
Best practices for using Wget with proxies
These are the practical best practices we recommend for using proxies with Wget:
Add delays between requests
Hammering a server with requests is one of the fastest ways to get blocked, and it puts unnecessary load on the target. Use --wait and --random-wait to add pauses between requests.
--random-wait varies the delay between requests so your traffic does not look perfectly timed.
Respect robots.txt
If you're crawling or downloading pages recursively, check the site's robots.txt rules first. Even when something is technically accessible, it may be disallowed for automated fetching.
Configure timeouts and retries
Use timeouts for slow networks, and retries for flaky proxies or targets. If you are downloading large files, combine this with resume support (-c) so you don't restart from zero after a drop.
Limit bandwidth when needed
If you're downloading large files through a shared proxy (or on a shared server), avoid consuming all available bandwidth. Bandwidth limiting also helps keep other services stable while your download runs.
Log everything for debugging
When running batch operations, always log your activity so you can review failures later.
Use -o to write to a new log file, or -a to append to an existing one. For deep debugging, add the -d flag for verbose output, especially when you suspect proxy issues.
Test the proxy before long jobs
Before starting a long download job, do a quick test to confirm your proxy works and that your IP is actually changing.
If the returned IP does not match your proxy IP, then you should probably investigate that
Common use cases of Wget
- Geo-restricted resource access. Accessing documentation, datasets, or content that's only available in certain regions by routing through proxies in those locations.
- Scheduled data collection. Setting up cron jobs to regularly download publicly available datasets, research papers, or government data while using rotating proxies to stay within rate limits.
- Development and testing. Testing how your application behaves from different geographic locations by simulating client connections through different proxy endpoints.
- Privacy-conscious downloads. Downloading files without exposing your server's real IP, which can be useful for research and OSINT (Open Source Intelligence) workflows.
Troubleshooting common Wget proxy issues
When a Wget request fails, first try to figure out what's failing. Once you isolate that, the fix is usually quick. Here are the most common proxy-related issues and how to fix them.
Connection refused error
If Wget can't connect to the proxy at all, check the basics first. Verify the proxy address and port are correct, confirm the proxy server is running, and check whether a firewall is blocking the connection.
A quick sanity test is to hit a simple IP endpoint through the proxy. If this fails immediately, your issue is the proxy connection, not the website:
407 proxy authentication required
A 407 error means the proxy requires credentials and didn't accept what you provided. Double-check the username and password, and watch out for special characters. If you embed credentials directly in a proxy URL, characters like @ and: can break the format unless they're URL-encoded.
Timeout issues
If downloads keep timing out, the proxy might be slow or overloaded. Increase the timeout and try again:
SSL/TLS certificate errors
These usually pop up when a proxy performs SSL interception, or when your system's CA certificates are outdated. The safest fix is updating your CA certificates or installing the correct corporate CA
403 responses
A 403 can come from the proxy or the target site. If multiple unrelated sites return 403, suspect the proxy. If only one site returns 403, you're likely being blocked by the target.
Environment variables not working
Wget typically expects lowercase variable names like http_proxy and https_proxy, not HTTP_PROXY.
Also, check if the proxy settings are defined in the .wgetrc file, as they can override what you set in your shell.
Final thoughts
Using Wget with a proxy is one of the simplest ways to download any remote file over the internet. In this guide, you learned how to configure Wget with a proxy and how to handle authentication, rotation, or common errors.
If you're doing large-scale downloads or you need consistent success rates, a rotating proxy setup is usually worth it. Sign up for Decodo and get started with premium residential proxies today!
Skip the scraping infrastructure
Decodo's Web Scraping API handles proxies, headers, and retries – you just send a URL and get HTML back.
About the author

Lukas Mikelionis
Senior Account Manager
Lukas is a seasoned enterprise sales professional with extensive experience in the SaaS industry. Throughout his career, he has built strong relationships with Fortune 500 technology companies, developing a deep understanding of complex enterprise needs and strategic account management.
Connect with Lukas via LinkedIn.
All information on Decodo Blog is provided on an as is basis and for informational purposes only. We make no representation and disclaim all liability with respect to your use of any information contained on Decodo Blog or any third-party websites that may belinked therein.