How to Send JSON With cURL: Syntax, Flags, and Practical Examples
If you work with APIs, webhooks, automation scripts, or web scraping, chances are you've needed to send JSON with cURL. cURL is one of the most widely used command line tools for making HTTP requests, and modern APIs almost always rely on JSON payloads. In this guide, you’ll learn how to send JSON with cURL, work with files and authentication, debug requests, and route traffic through proxies when needed.
Mykolas Juodis
Last updated: May 20, 2026
29 min read

What is cURL and why use it for JSON requests?
cURL (client URL) is an open-source tool available on the command line that you can use to transfer data to and from a server using a URL syntax. It's been around since 1998 and ships with pretty much every Linux distribution, macOS, and modern Windows install. You can use cURL with HTTP, HTTPS, FTP, SMTP, and other protocols to send and receive data directly from your terminal. It comes in handy when you need a fast way to test endpoints or send requests without having to write code for a full web application just to do that.
Here are some of the things you can use cURL for when sending JSON requests:
- Testing APIs. Sometimes you might just want to test an API endpoint as quickly as possible, and you don’t have the bandwidth to build an actual API tester or start configuring the details on Postman, you can simply test that endpoint on the terminal with cURL.
- Quick data submissions. In some cases, where you need to push a config update, send a log entry, or kick off a background job, you can do all that with cURL without opening a code editor or spinning up a project, as long as the service exposes an HTTP endpoint.
- Debugging webhooks. If an API or web service is firing notifications or payloads to your server and you need to see what’s actually being sent, you can use cURL to replay the request with the same headers and JSON body, and watch how your server handles it instead of waiting for the next notification to come in.
- CI/CD pipeline integrations. You might need to fire off deploy hooks, Slack notifications, or dashboard status updates from your shell scripts in production pipelines. cURL ships on most CI/CD runners by default, so you don't have to install anything extra to make that happen.
Why JSON?
JSON (JavaScript Object Notation) is the standard payload format for most REST APIs these days because it's lightweight, easily readable, and every major programming language has a JSON parser built into it. So when you send a POST request with a JSON request body to an API with cURL, you're sending structured data that the server can easily parse and process. Even when you're creating a user, updating a record, or triggering an action, you can still send JSON payloads with your request.
How cURL fits into broader developer workflows
One of the underrated things about cURL is that it acts like a bridge between tools on the command line. You can copy a request from your browser, convert it into a cURL command, and test it instantly on the command line. Simply open your browser's DevTools, right-click any request in the Network tab, and copy it as a cURL command, then paste it into your terminal. You will get a working reproduction of the exact request your browser sent, with the actual cookies, headers, and request body intact.
This is usually the fastest way to debug or test an API before you write any actual client code. You confirm if the endpoint actually works and see exactly what response you get before you translate it into Python, Node, or whatever language you’re using for your project. It's also why cURL is the best tool for web scraping on the command line.
You can combine cURL with other tools, pipe responses into parsers, or route requests through a proxy server when you need to test location-based responses or send requests to other regions that may reject traffic from yours. You can reference Decodo's comprehensive guide on using proxy with cURL to get a better picture of how you can use proxies with cURL.
Understanding HTTP methods for JSON data
REST APIs use different HTTP methods for different operations, and you can use cURL to send a JSON body with any of them. Before you learn how to send JSON with cURL, you should understand which method fits which job.
Here's a quick breakdown of the four methods you can send JSON payloads with:
1. POST method: Creating data
You send POST requests to a server when you want to create a new resource on a server.
Think of it like filling out a form and handing it to the server to process. You can send a JSON payload describing what you want to create, and the server will add it to its database and send back a confirmation.
This is the most common use case, and it's exactly what most people focus on. Practical examples of POST requests include creating a new user account, submitting a comment, or posting a message to Slack:
POST requests are not idempotent i.e. every time you send the same request, the server will treat it as a brand new action. So if you send the same request 5 times, you'll end up with 5 separate records in the database, not one. You can reference Decodo’s guide on how to send a POST request with cURL for a deeper walkthrough on how you can send POST requests with cURL.
2. PUT method: Replacing an entire resource
PUT requests are for when you want to completely replace an existing resource with a new version. You can send the full JSON representation of the resource, and the server will overwrite whatever was there before. Any field you don't include in your payload will become null or revert to its default, depending on how they built the API:
PUT requests are idempotent, i.e. no matter how many times you send the same request, you will still get the same result on the server. Whether you send it once or send it 10 times, the resource will still end up in exactly the same state as before.
3. PATCH: updating part of a resource
You can send PATCH requests when you only want to update specific fields of a resource, so everything else on the server stays untouched. A practical example of a PATCH request is when you want to update your username or email on your profile page on a social media platform. You're not replacing the whole profile, just tweaking one field:
PATCH requests are not inherently idempotent. Some PATCH operations, like replacing a field value, may behave idempotently in practice, while others, such as incrementing counters or appending items to a list, can produce different results each time the request is sent.
4. DELETE with a JSON body
DELETE requests are mostly used to remove resources, though some APIs also accept JSON request bodies with them. It’s not common, but you can use it when you need to delete multiple records at once by passing an array of IDs.
Support for DELETE request bodies varies by server and framework, so always check the API documentation first. You can also learn how to retrieve information on the command line with cURL.
Note: You might have noticed that we use the -X flag followed by the method name (i.e. -X POST, -X PUT, -X PATCH ) in all the examples. The -X (or --request) flag explicitly sets the HTTP method. If you don’t use this flag, cURL will send all your regular requests as GET requests by default, and only send them as POST requests when you add the -d flag with a JSON payload.
How to send JSON with cURL: basic syntax and essential flags
If you want to understand how to send JSON with cURL, you need to get comfortable with a few core flags, like the -X and -d flags I mentioned earlier. Once you know these, you can send a cURL request with JSON data to almost any API without writing a single line of extra code.
Here's the shape of every cURL JSON request you'll ever send:
Here’s what each flag does:
The -d flag
The -d (or --data) flag is what you use to send the cURL JSON request body. This is where you place your JSON payload like this:
This command tells cURL to include this data in the request body. Using the -d flag is the simplest way to send JSON data with cURL requests. When you use the -d flag, cURL automatically treats the request as a POST request, so you don’t always need to specify the HTTP method explicitly with the -X flag in this use case.
The -X flag
The -X flag tells cURL exactly which HTTP method to use for your request. As I mentioned earlier, cURL defaults to POST the moment you add -d, so -X POST is technically optional for sending basic JSON payloads. When you want to send JSON with other HTTP methods like PUT, PATCH, or DELETE, then you have to use the -X flag to specify them in your cURL request.
Here's how you'd use it to update a user record with the PUT method:
Using the -X flag to specify the exact request methods you’re sending is a best practice for sending JSON data with cURL. Anyone reading your script later will immediately know what the request is doing and what to expect from it.
The -H flag
The -H flag is one that developers often miss, and skipping it usually causes the request to fail. When you use -d on its own, cURL sends the body as application/x-www-form-urlencoded by default which works fine for form data, but not when your API expects a JSON payload. Most JSON APIs check the Content-Type header first, and if it's wrong, you'll get a 415 Unsupported Media Type error back.
You can avoid that by setting the header yourself like this:
The -H flag will now add an HTTP header to the request and tell the server that your request contains JSON. You can also add more than one header by using multiple -H flags, one header at a time. That becomes useful when you need authentication, custom tokens, or want the API to return JSON in the response. That last part is where the Accept header comes in.
While Content-Type tells the server what you're sending, the Accept header tells the server what you want back from the server. Most REST APIs these days usually return JSON by default, but some support multiple response formats like JSON, XML, or plain text. If you want to be explicit that you expect JSON in the response, you can add this command:
If you want to go deeper into the -H flag and what else you can do with it, simply check out Decodo's guide on sending HTTP headers with cURL.
Sending JSON from a file
When you have to pass a lot of JSON data in your request body, writing the whole payload inline isn't a best practice. Imagine typing out about 100 user object fields directly into your terminal, your script ends up cluttered, and one misplaced quote can break the whole thing.
That's where cURL's @ file prefix comes in handy. You can store your JSON in a .json file and point the -d flag at it, so cURL reads the payload straight from that file instead of from the command itself.
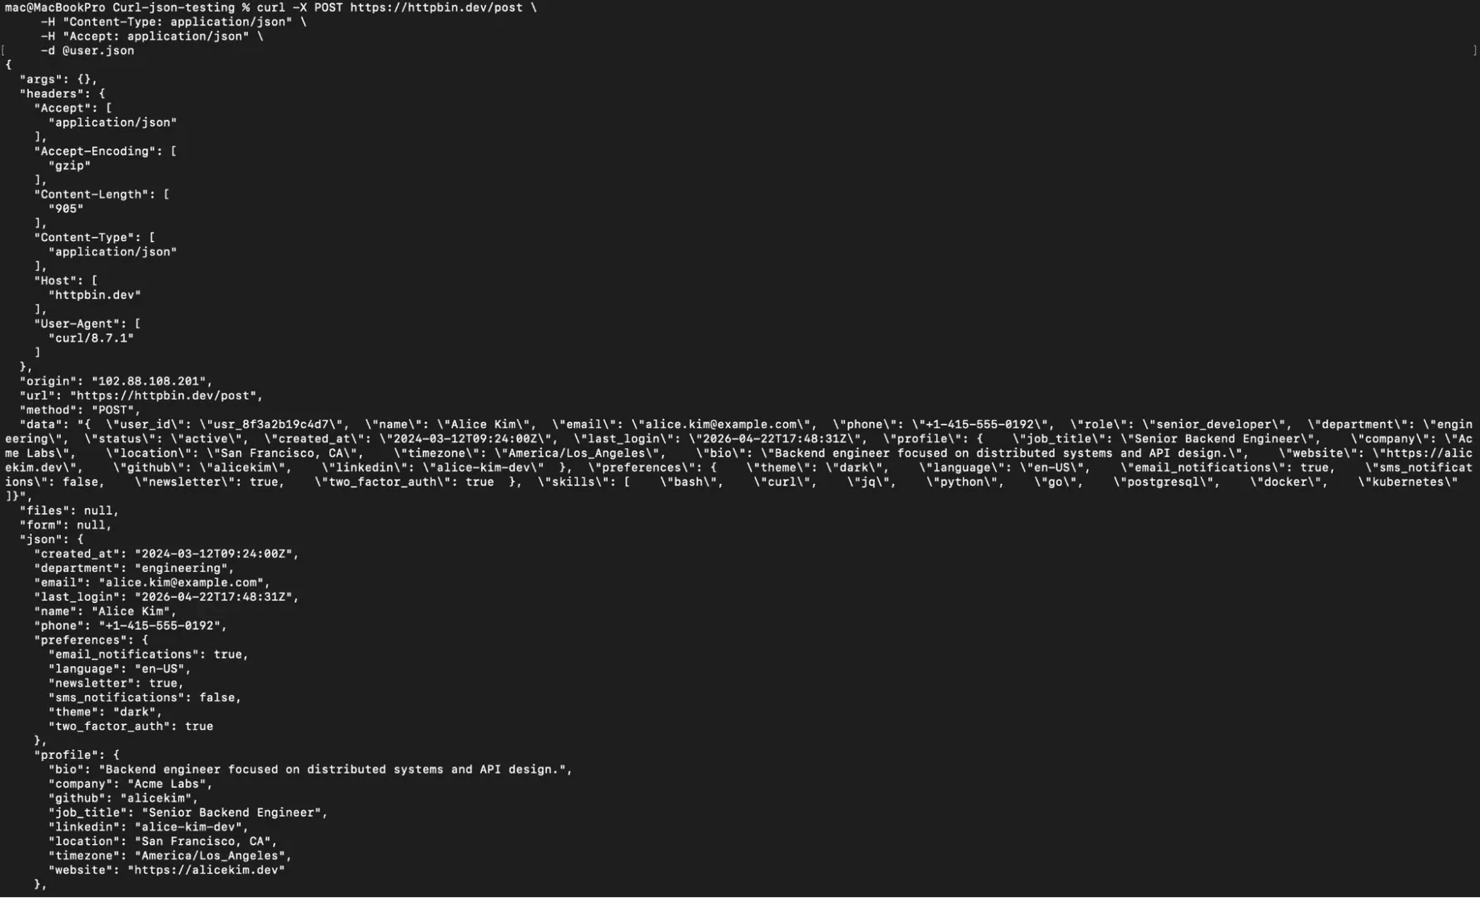
As an example, create a file called user.json like this:
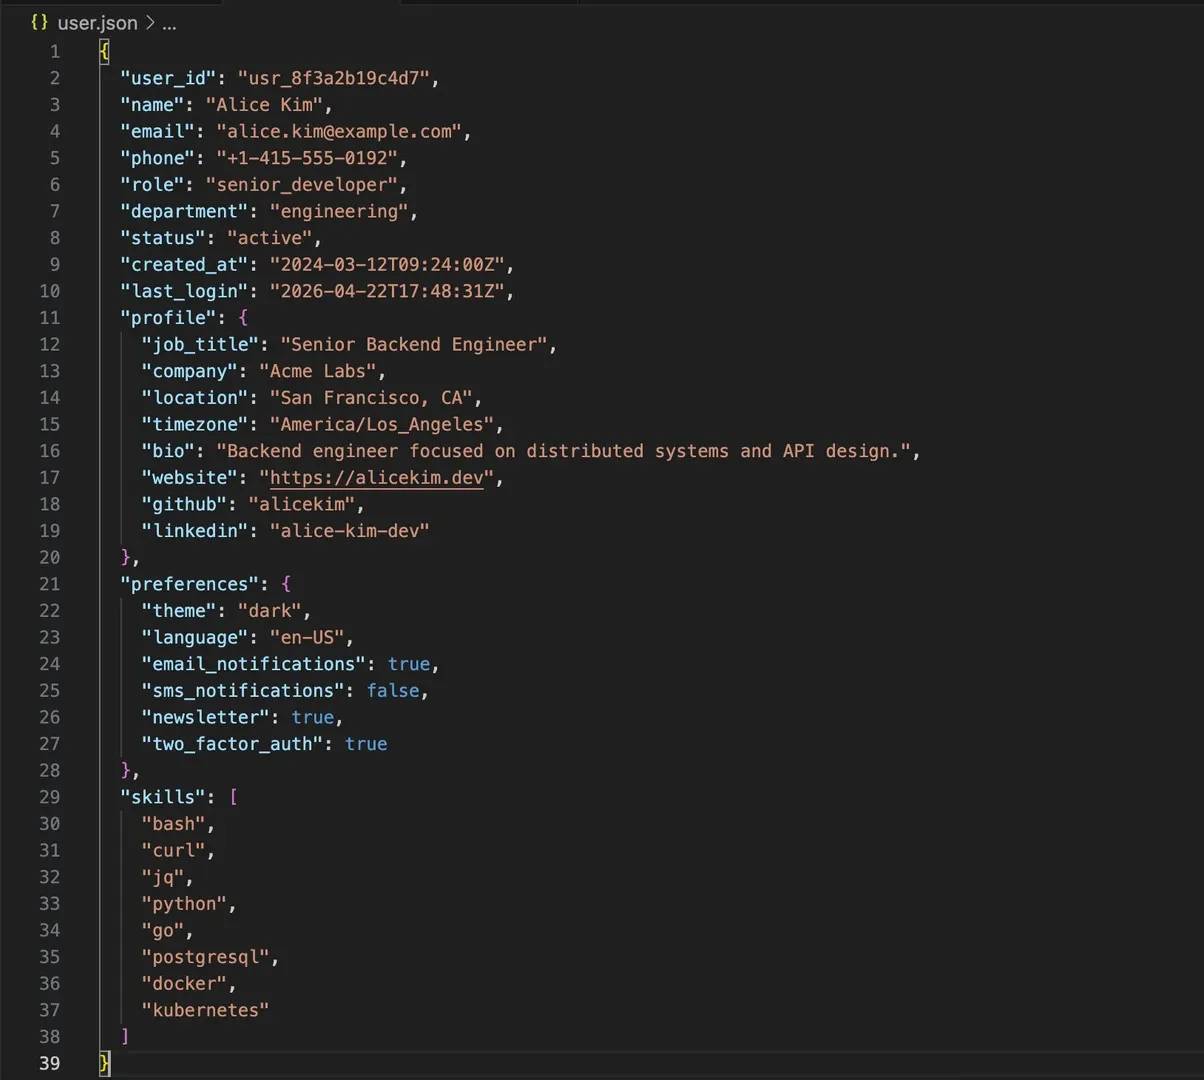
You can then pass this file as a payload in your cURL request like this:
The @ prefix will tell cURL to read the file contents instead of treating user.json as a literal string.
Why send JSON from a file?
Loading your JSON payloads from a file isn't just about convenience; it solves certain problems that may come up when you start sending more complex types of requests with cURL.
Here are some of the cases where it makes more sense to send your JSON payload from a file:
- JSON data is too large or complex. When you’re working with JSON data that has more than 5 - 10 object fields, it becomes more difficult to manage them inline with your cURL requests. Even nested objects and arrays are easier to manage in a JSON file than when you’re using them directly in the command line.
- Reusing the same request multiple times. If you’re testing the same endpoint over and over with the same payload, typing it out every time just slows you down. It’s better to save your JSON payload in a file so you can call it whenever you need it. This also makes things easier when you want to reuse the same request across different environments, like sending the exact same JSON data to a staging API and then to production.
- Storing test data in version control. When you want to store test data in version control, you can drop your JSON files into a fixtures/ folder inside your git repo so that every test run will use the exact same data. You won’t have to copy and paste anything, and there will be no discrepancies between what you sent and what your teammate or colleague sent. If something breaks, you can compare the payload with the last working version and quickly spot the issue.
- Running automated scripts or CI/CD pipelines. Automation scripts that run in build pipelines need to be reproducible, which is why it's smarter to store your JSON body in a file instead of inline. This keeps your pipeline config clean and lets you swap payloads without ever touching the script itself.
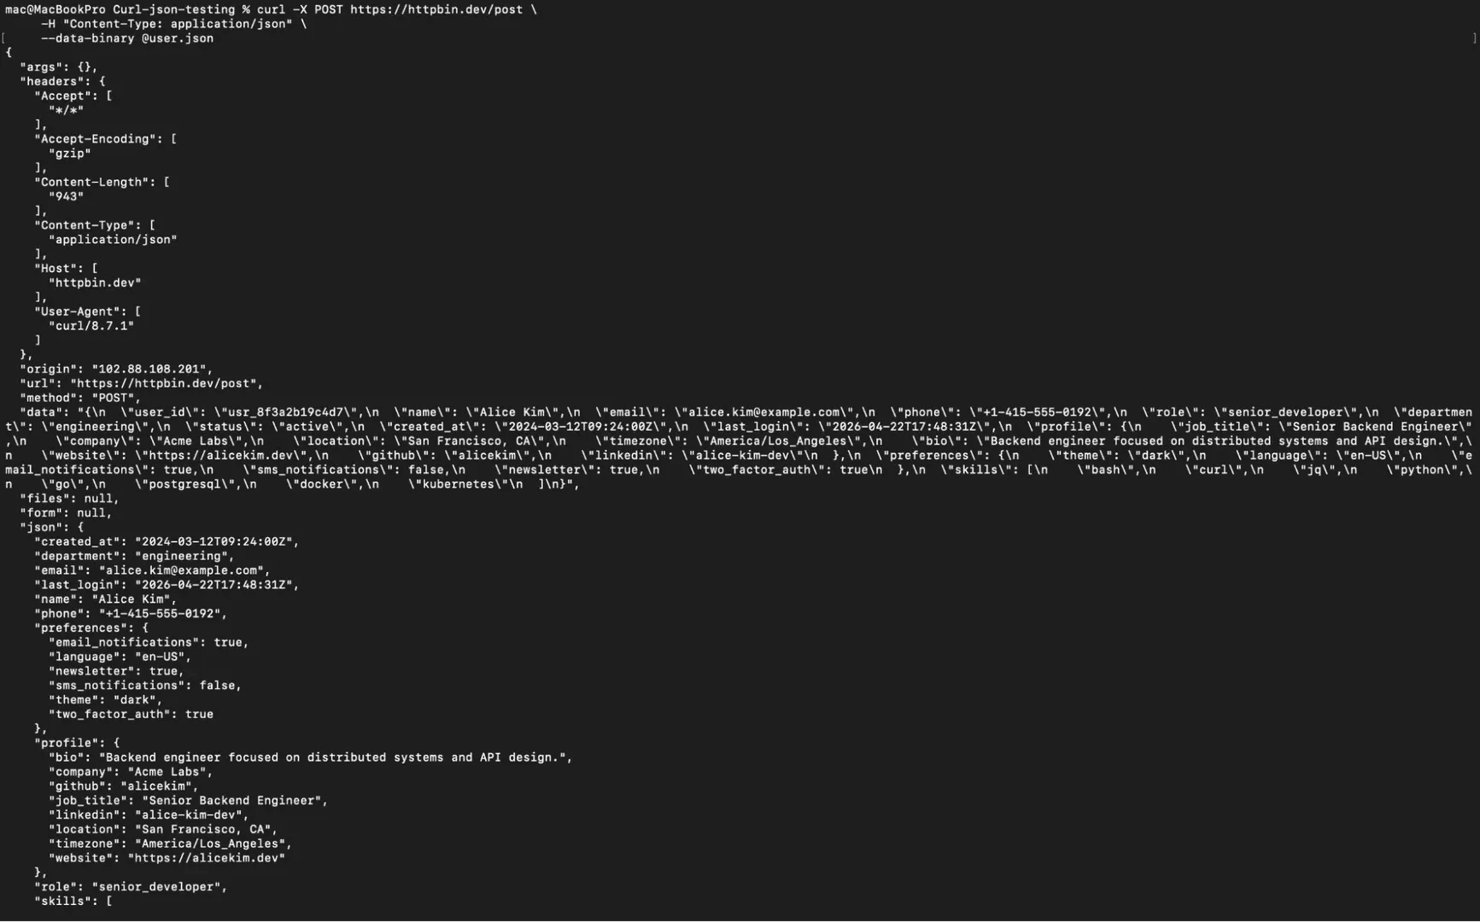
Here's an example of using JSON file payloads with other flags we have discussed so far:
This command sends a POST request to the API endpoint, loads the JSON payload from user.json, and includes the required headers for content type and response format. The server will echo back what it received, and if you scroll to the "json" field in the response, you'll see your payload exactly as it appeared in your file. That's how you know cURL read the file correctly and the server parsed it as JSON:
Note: If you’re on Windows, it’s even better for you to send JSON payloads from a file because CMD and PowerShell try to parse the quotes(“‘’”) in your JSON objects, and they can break your script if you hardcode the JSON payload in your command line.
Dynamic JSON with environment variables and shell commands
There is almost always a need to automate your JSON payloads when they start becoming bulky, because hardcoding them becomes redundant. Like in situations where you need to send data that changes between requests, or you need to pull values from a config file, or even chain commands together, you need to find smarter ways to pass your JSON payload with these types of requests.
There are 3 ways to automate the way you send JSON data with cURL requests:
- Environment variable interpolation
- Building JSON with jq
- Piping JSON from other commands
Environment variable interpolation
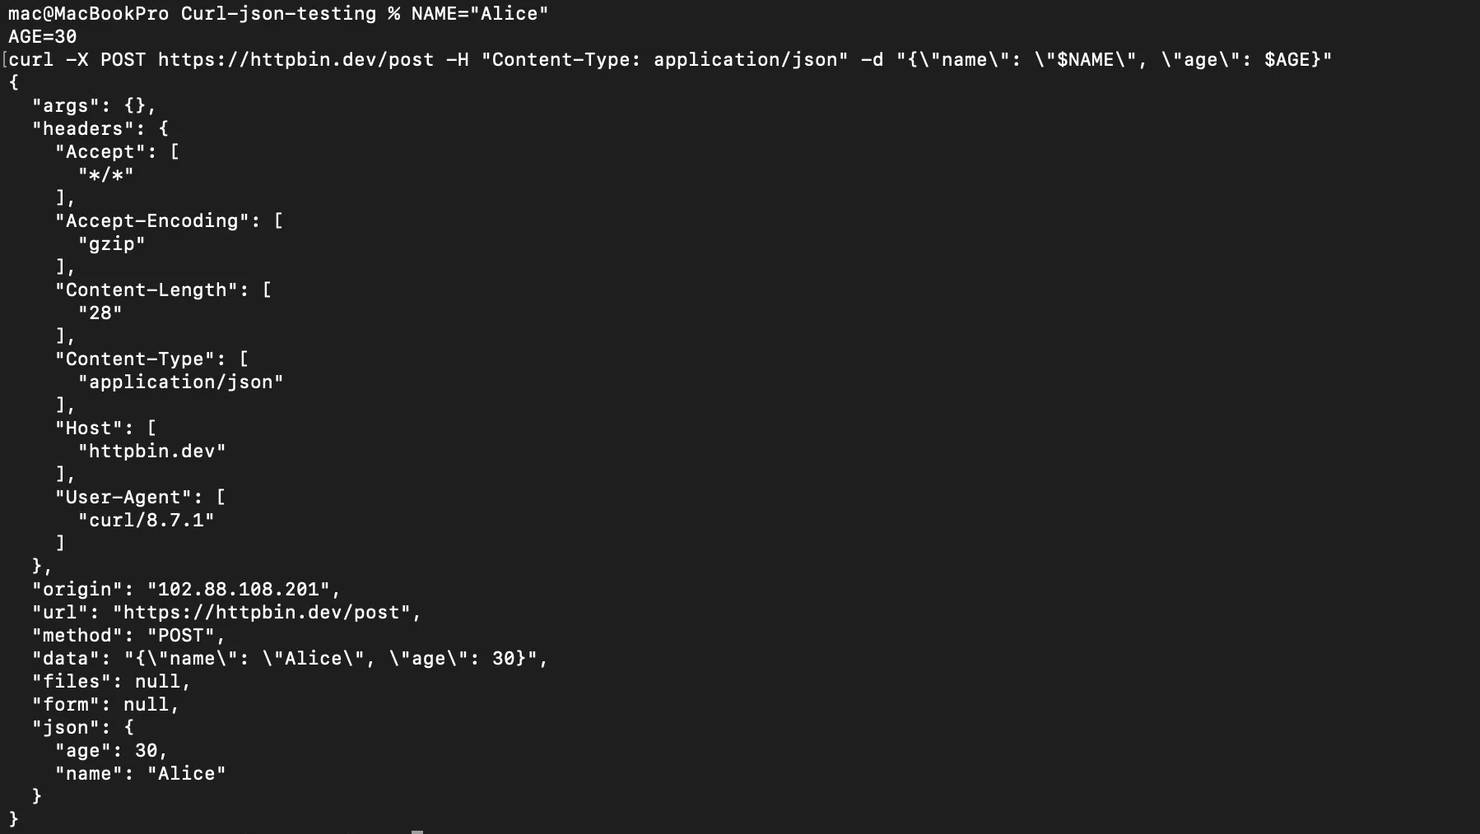
The quickest way to send JSON payloads with cURL requests dynamically is by using environment variables on the command line. You define your values once on the command line, then inject them into your JSON string at request time.
Here's what that looks like in practice:
You need double quotes around the -d string (not single quotes) so the command line can expand $NAME and $AGE into their actual values. When the request runs, you should see the response come back with "name": "Alice" and "age": 30 in the "json" field, which confirms your variables were expanded correctly before being sent:
One thing to keep in mind, every command you type on the command line gets saved in ~/.bash_history. So if you're passing API keys or passwords directly into your cURL commands, they'll be sitting right there for anyone with access to read and copy. A safer way to handle sensitive values is to store them in a .env file or export them as environment variables so they never show up in your shell history:
Now you can use your API token in your script without having to directly use the actual value in your cURL command.
Building JSON with jq
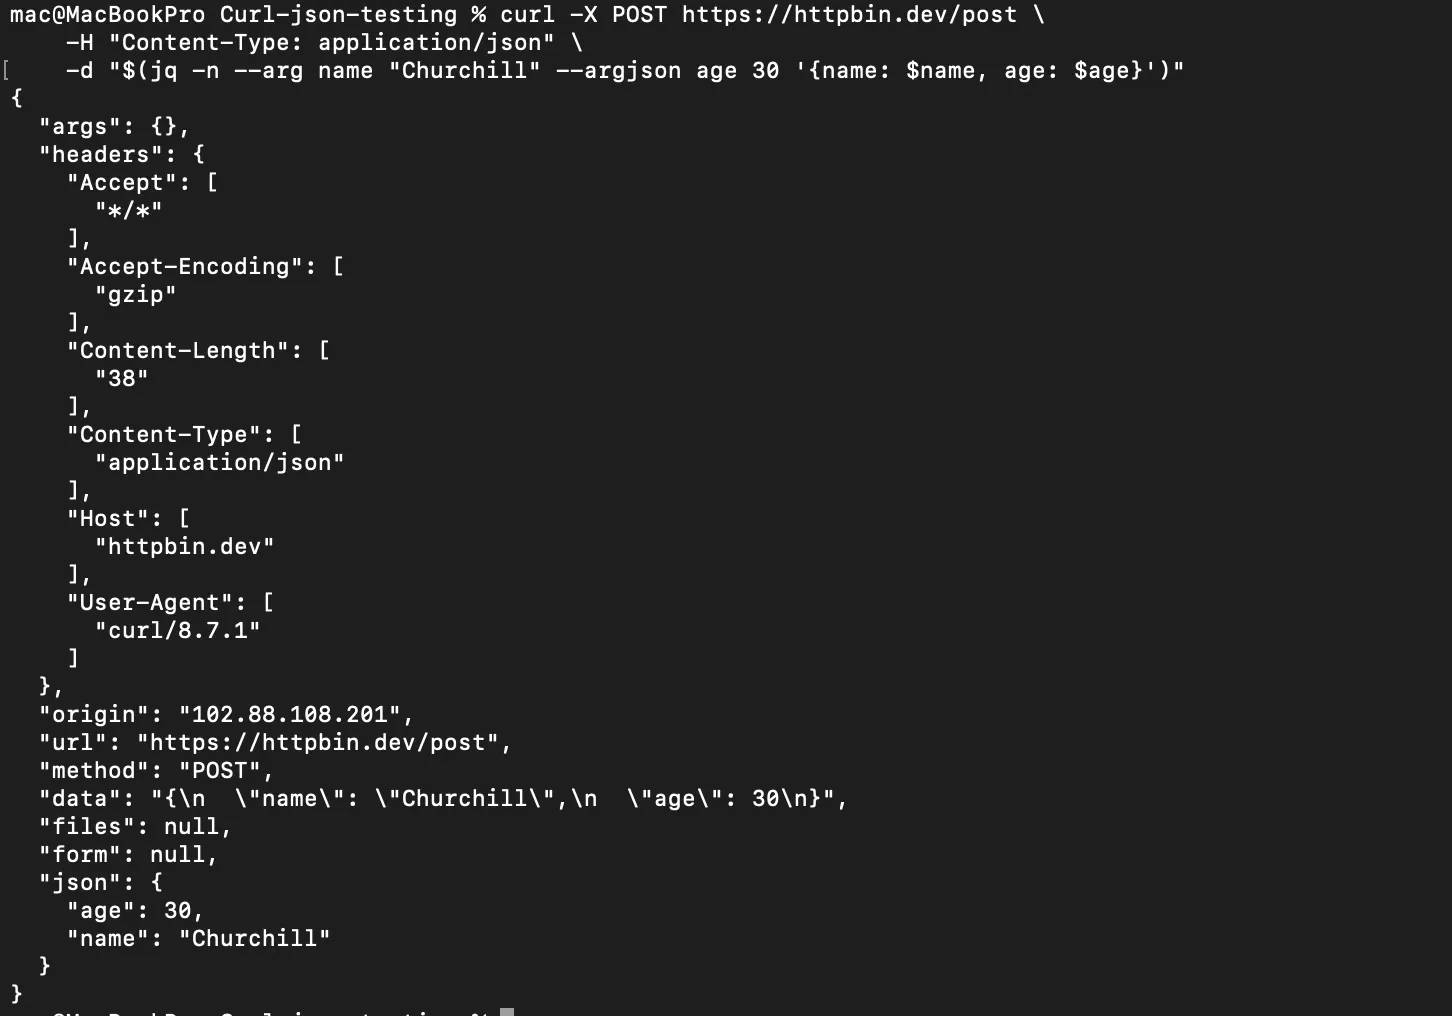
Another good option you can use to avoid manually typing in your JSON payload is to use jq to construct it. You can use jq -n with --arg and --argjson to build valid JSON data from variables, like this:
This command uses jq to build a clean JSON object with a string value ("Churchill") and a number (30), then passes that output directly as the JSON body in a cURL request to httpbin.dev/post. You don't have to worry about escaping quotes or formatting because jq will handle all of that for you:
Piping JSON from other commands
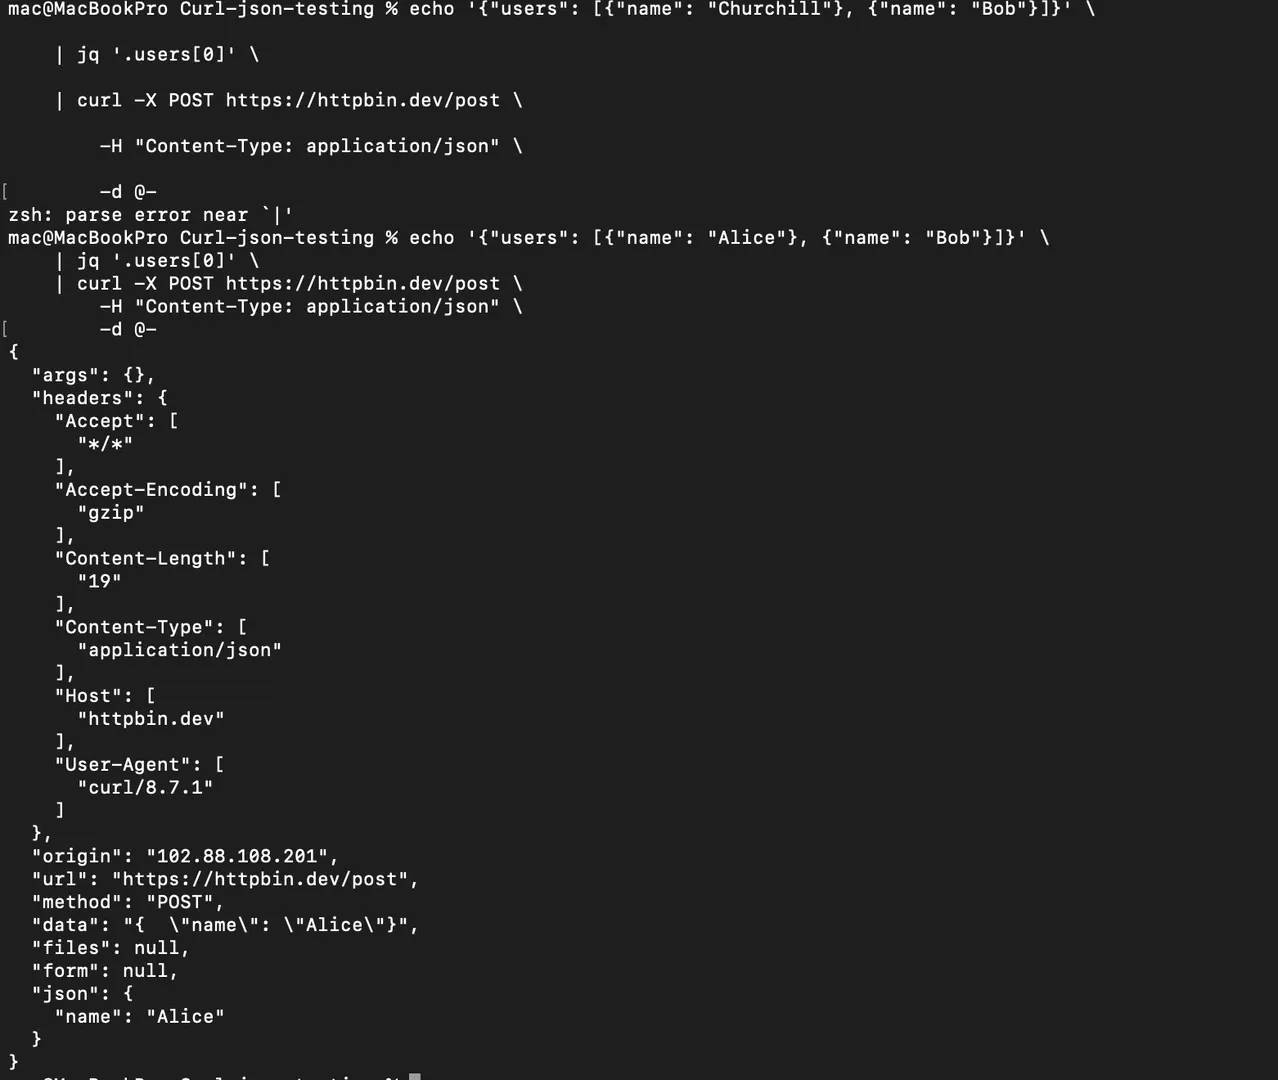
Sometimes the JSON you need to send doesn't come from variables at all. It might come from the output of another command, maybe a file you want to filter first, or a change you need to apply before the request goes out. That’s where -d @- comes in, it tells cURL to read the request body directly from piped input instead of a string or file.
Here’s how to use -d @:
This command takes a JSON object with 2 users, pulls out just the first one using jq, and pipes that result straight into a cURL POST request as the JSON payload. The -d @- part is what tells cURL to read the request body from the pipe instead of you typing it out manually. This pipeline will benefit you more when you start working with automation scripts or you’re trying to integrate cURL with other tools:
Handling JSON on Windows vs. Linux and macOS
Sometimes when you’re learning how to send JSON with cURL requests, you may find out that some of the cURL commands work on Linux but do not work on Windows. What mainly causes this is quoting and escaping, which is how each operating system handles the double quotes(“”) that JSON requires around keys and string values. Your command line uses quotes to wrap command arguments, and depending on your environment (Linux, Windows, or macOS), those quoting rules can change completely.
Let's break it down by platform so you know exactly what to expect.
Linux and macOS
On Linux and macOS, things are quite straightforward. You wrap the entire JSON payload in single quotes(‘’), and you use double quotes(“”) inside the JSON, like this:
This would work because the Linux and macOS command lines won’t try to interpret anything inside single quotes because it will view them as strings, so your JSON data will stay intact.
Windows CMD
Windows Command Prompt doesn't support single quotes for wrapping arguments. You have to use double quotes on the outside, which means the double quotes inside your JSON payload will clash with them. You can fix that by escaping each inner quote with a backslash(\) in your cURL requests, like this:
Here you use ^ for line continuation instead of _\_, and escape every inner double quote with \", which can quickly get messy when you’re working with larger JSON payloads.
Windows PowerShell
Windows PowerShell is quite different from CMD in the sense that you have to deal with the escaping rules differently. PowerShell interprets strings its own way before passing them to cURL, so what worked in CMD won't necessarily work here.
You can escape inner double quotes with a backslash, same as CMD, but PowerShell also gives you the option of using its native backtick character (`) as an escape.
Here’s how to do it:
This works, but it becomes harder to manage when you’re dealing with a much larger JSON payload. PowerShell also replaces cURL with its own tool sometimes (Invoke-WebRequest cmdlet), so you can use curl.exe to make sure you’re running the real cURL command and not the PowerShell alias.
If you're on Windows and tired of worrying about quotes, just put your data in a JSON file and reference it with the @ prefix like this:
This will work similarly on Linux, macOS, and Windows. The file will hold the raw JSON, so there's nothing to escape. This is the simplest cross-platform way to send JSON with cURL.
Authentication and JSON requests
Most API endpoints these days require you to authenticate your requests before you can get any output. This also applies to cURL requests; you have to send relevant API keys or authentication tokens to validate your cURL requests, especially the ones that come with JSON payloads.
Here are the 3 most common authentication methods you’ll likely run into when you’re sending cURL requests with JSON payloads:
1. Bearer token authentication
This is the most common authentication method you will run into when sending cURL requests. The way to go is to pass the relevant Bearer token for the platform you’re sending a request to in the Authorization header while you send your JSON data with it.
You can do that with the -H flag like this:
2. API key authentication
Other API endpoints validate your requests with API keys instead of Bearer tokens. These APIs require you to pass your API key as a custom header with your cURL requests and the JSON payload.
This is the most common way to send API keys with cURL requests that have JSON payloads:
Same idea as bearer tokens, the server will read your key, validate it, and process the request. Always remember not to hardcode API keys directly into scripts, store them as environment variables, and reference them from there instead.
3. Basic authentication
This is the oldest authentication method here, and a lot of APIs and web services still use it to validate requests. cURL has a dedicated -u flag that will let you input basic authentication credentials (a username and password), so you don't need to manually encode them (Base64) yourself.
Here’s how you can send cURL requests that have JSON payloads to API endpoints with a relevant username and password:
cURL will encode the username and password for you before it sends the request with your JSON data. You can combine the -u flag with other flags for authentication, loading JSON, and setting headers.
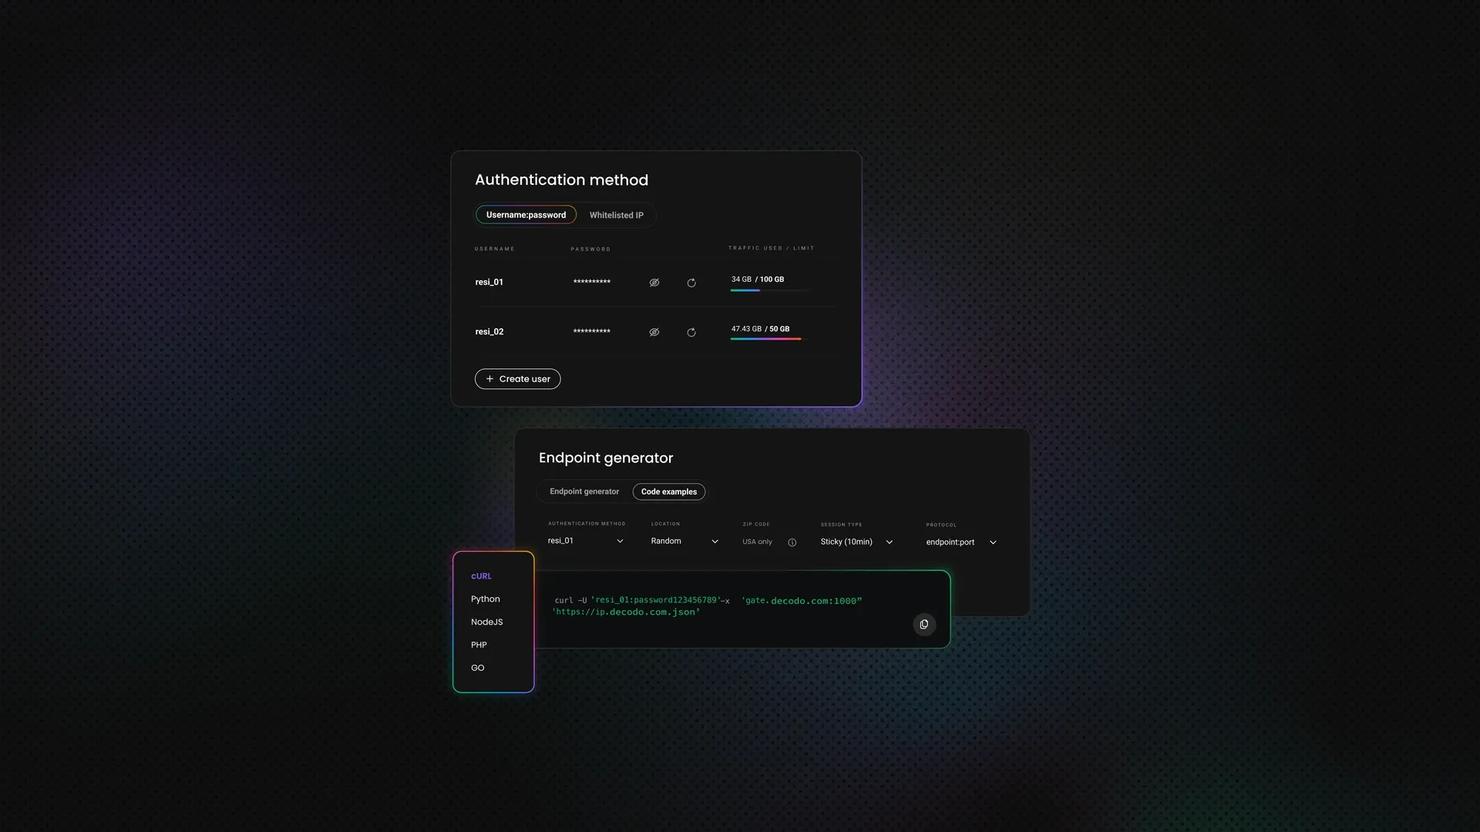
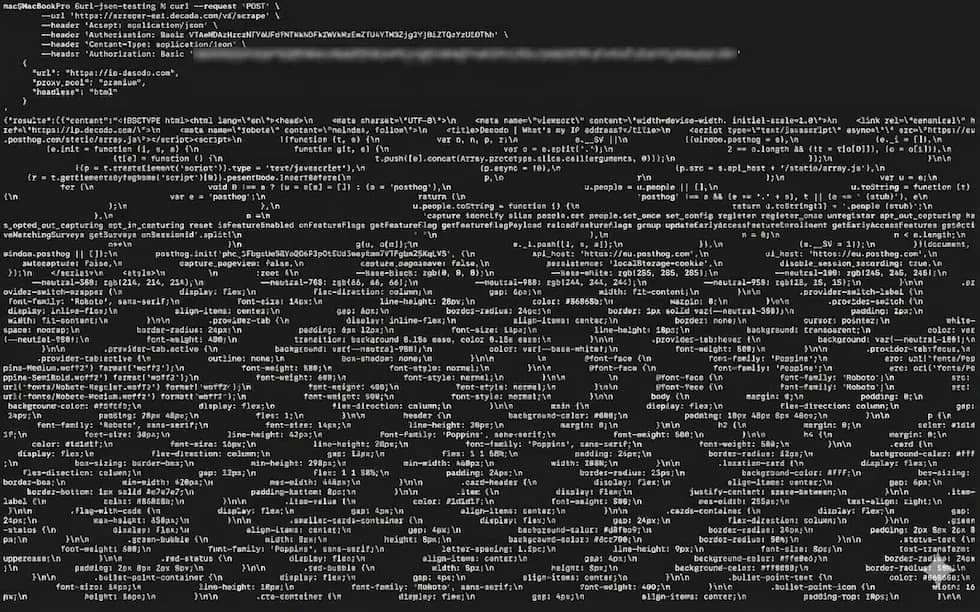
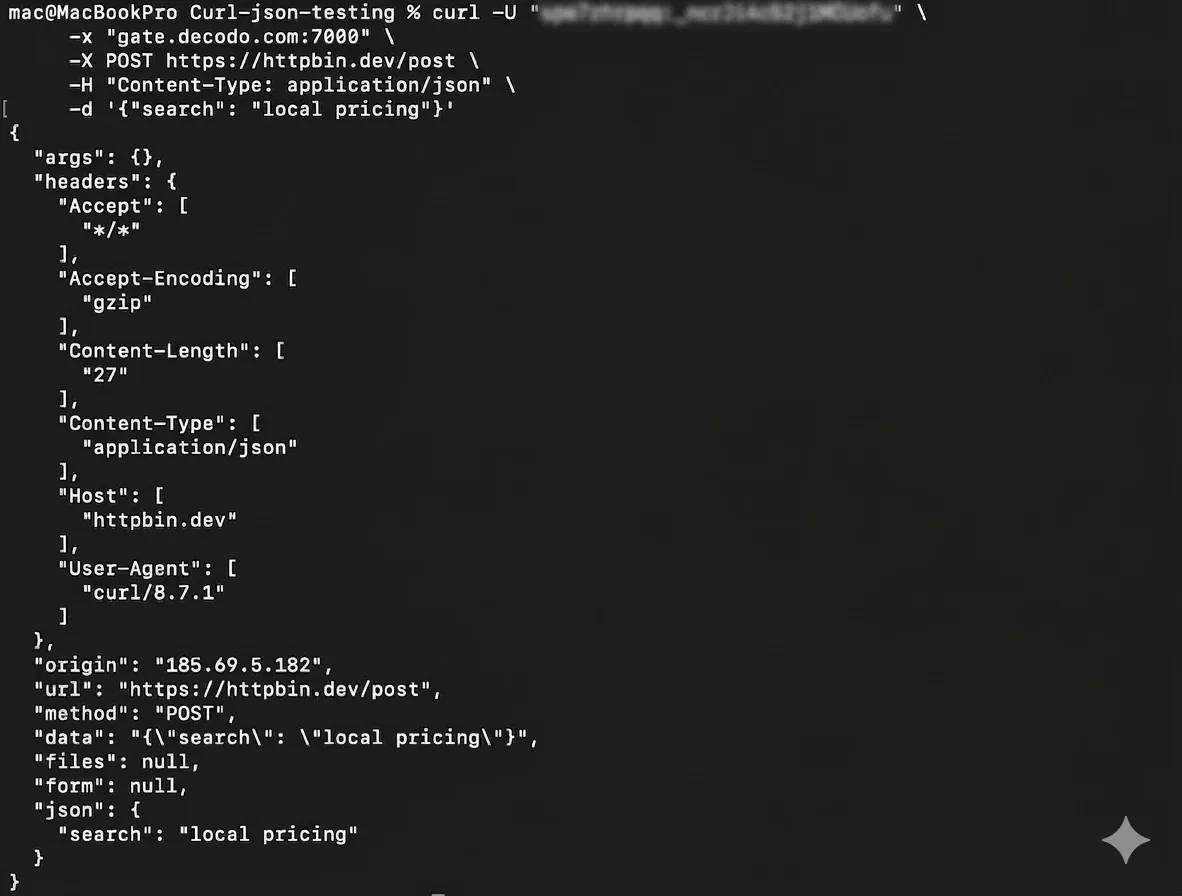
Here's how you can put them together with a real example. Decodo's Web Scraping API uses Basic auth, accepts a JSON payload, and returns scraped HTML in the response. So you can test all the flags you've learned so far in a single command like this:
This command sends an authenticated POST request to Decodo's Web Scraping API, telling it to scrape https://ip.decodo.com through the premium proxy pool and return the rendered HTML. The Authorization: Basic header carries your base64-encoded credentials, while the JSON body tells the API exactly what to scrape and how.
Once you’ve grabbed your YOUR_BASE64_TOKEN value from your Decodo dashboard, you will get a result like this:
Skip the boilerplate
Decodo's Web Scraping API handles proxies, CAPTCHAs, and anti-bot detection so your code stays short and your requests actually land.
Debugging cURL JSON requests
When sending cURL requests with JSON data as payload, you might run into authentication errors or network errors, or you might just see a nothing response. When you start getting errors or unexpected results like this, it becomes difficult to execute tasks, and you might not even know where the errors are coming from, whether it’s from your script or the server you’re sending the request to. This is the reason why you have to include debugging measures in your cURL request scripts so that you can easily identify what you’re sending, how the process is going, and what is causing an error, if any.
Some of those debugging measures include:
1. Using the -v flag
The -v flag is the first debugging measure you can use in your cURL request scripts. It shows you the full request structure along with the response headers, so you can get an idea of what happened when you sent the request and what request you sent.
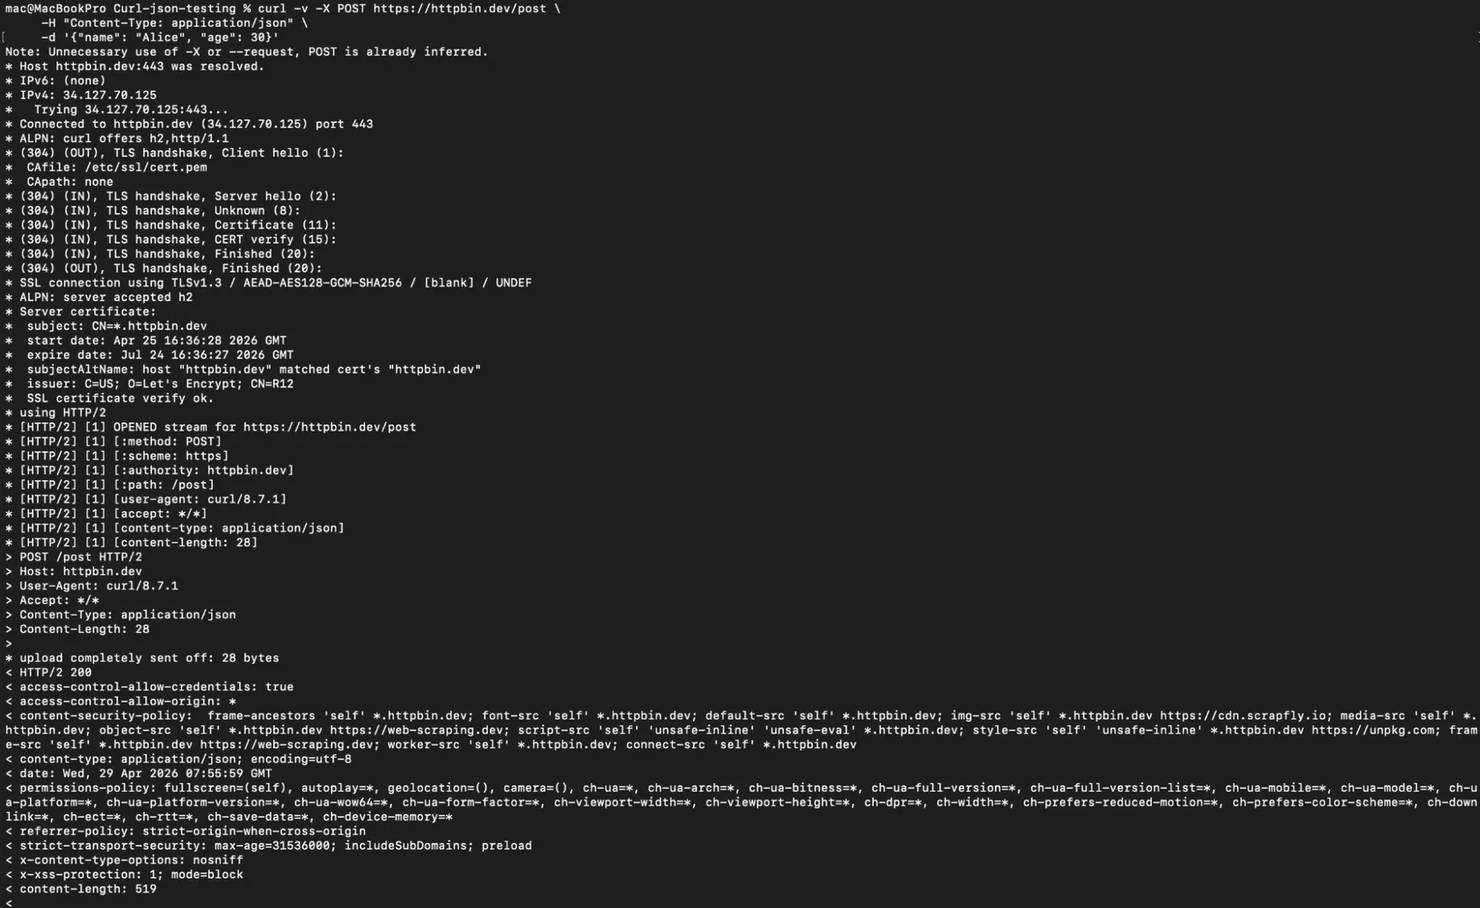
Here’s how to integrate the -v flag in your cURL requests with JSON:
The command above will give you access to the request headers you sent, the response headers from the server, as well as connection details like TLS handshake and redirects. So you can use this information to confirm that your JSON payload was sent correctly and the server accepts that request:
2. Using --trace or --trace-ascii
Sometimes you might not get all the necessary information you need to solve your problem from the -v flag, especially when you’re dealing with encoding issues or your JSON payload becomes malformed on the server side, even though it looks good on your end. This is the point where you now employ the --trace or --trace-ascii flags to help you log everything that happens during the request, including the raw data being sent and received.
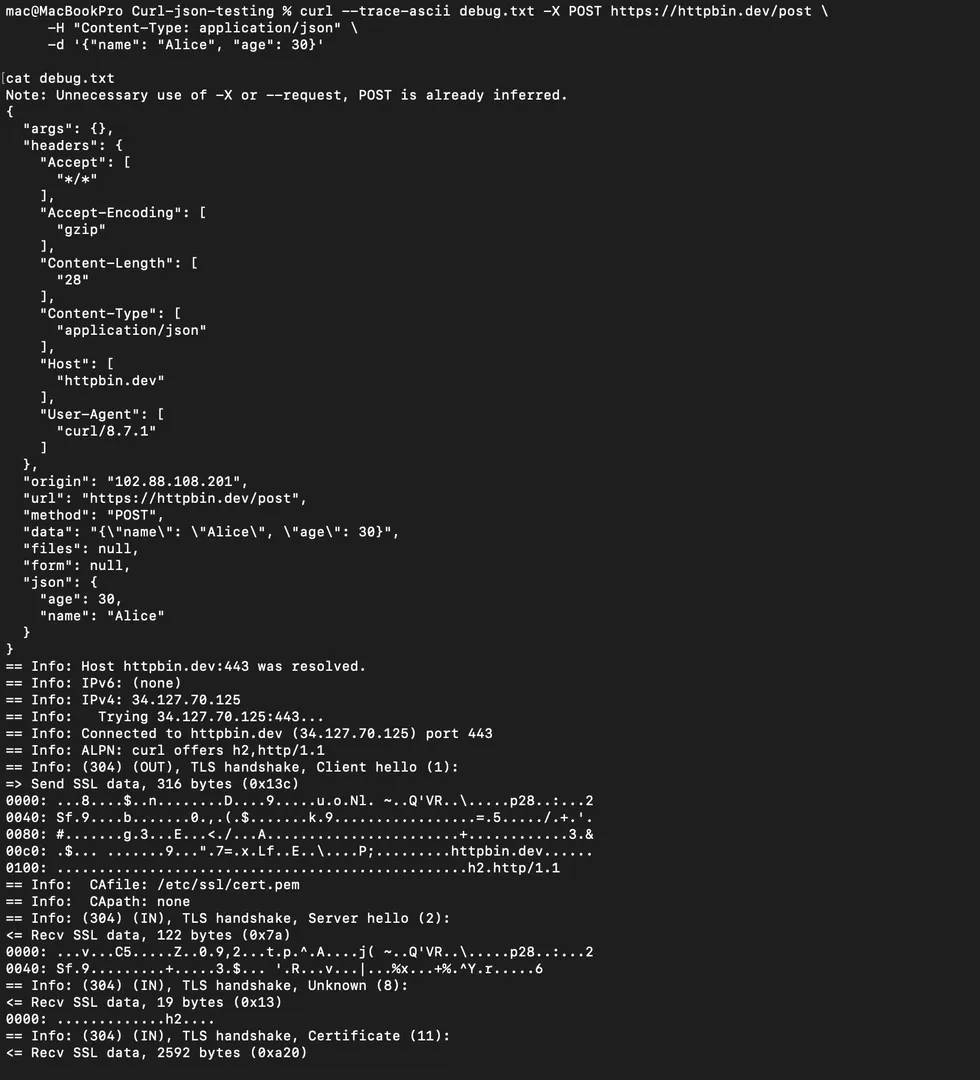
Here’s how you can use the --trace-ascii flag within your cURL request with JSON:
After the request finishes, simply open the debug.txt file; that’s where you'll see every byte cURL sent and received, including the raw body. The --trace-ascii version is easier to read because it renders printable characters as text instead of hex codes. If you need the full hex dump for binary data, you can use the --trace flag instead.
3. Checking HTTP status codes
Every time you send a cURL request, the server will always return with an HTTP status code that indicates whether the request failed or not.
Here are the common status codes you’ll likely run into when sending cURL requests with JSON data:
- 400 (Bad Request). Status code 400 usually means that your JSON is malformed. You're probably missing a comma, have a trailing comma, or used single quotes instead of double quotes somewhere in the values so the server wasn't able to parse what you sent.
- 401 (Unauthorized). In this case, you either didn’t send the authentication credentials that the server required or the details you sent were wrong. Either way, you will get this 401 error until you pass the correct details with your cURL requests.
- 415 (Unsupported Media Type). The server probably expected application/json in the Content-Type header, and you didn't include it. It’s easy to miss this when you’re sending cURL requests with JSON payloads, so you will run into this status code when you do.
- 422 (Unprocessable Entity). You can run into this status code in situations where your JSON syntax is technically valid, but the data inside doesn't match what the API expects. Might be wrong field names, or you didn’t include some required fields, or you set the values in the wrong format in your JSON payload.
When you understand what these status codes are about, you will be able to easily identify where the problem in your cURL request is coming from.
4. Checking status codes in your cURL scripts
When you're running cURL requests inside automation scripts or CI/CD pipelines, you're not going to be sitting there watching verbose output. Sometimes you might just want to know whether the requests have been sent successfully, so you just need the status codes to come out clean without you having to sift through the response headers and bodies.
Here’s how you can do that in your cURL request with JSON:
If the request is sent successfully, you should get a 200 status code:

Then you can wrap it in a simple check to catch failures like this:
This conditional is really useful when you need to send a cURL request inside a cron job or a deployment pipeline where nobody's watching the terminal.
5. Formatting responses with jq
When the API does respond with JSON, the raw output is usually one long compressed line that's hard to read. You can pipe it through jq to get a clean, indented version that you can easily read.
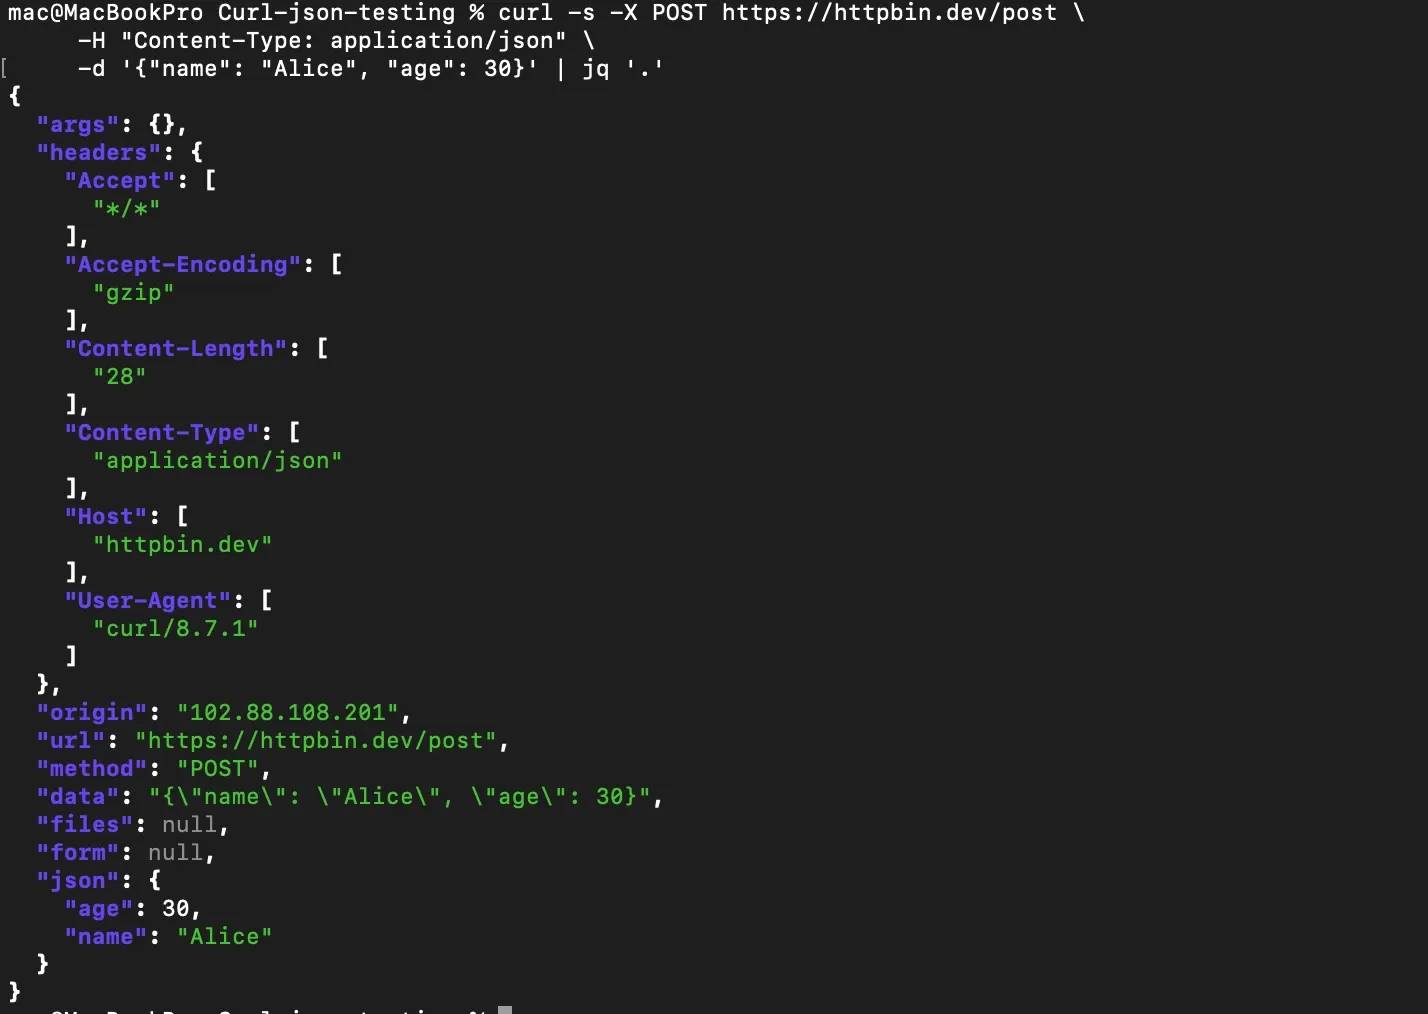
Here’s how to do that:
The command above formats the response into structured JSON output so you can clearly see what the server returned after your JSON payload was processed:
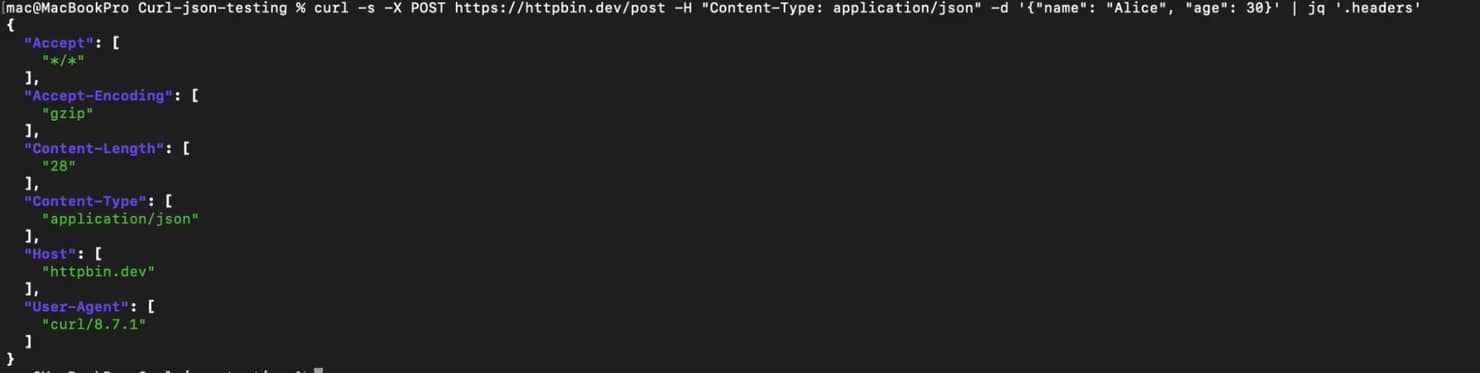
You can also pull out specific parts with jq '.headers' to help you check what headers the server actually received:
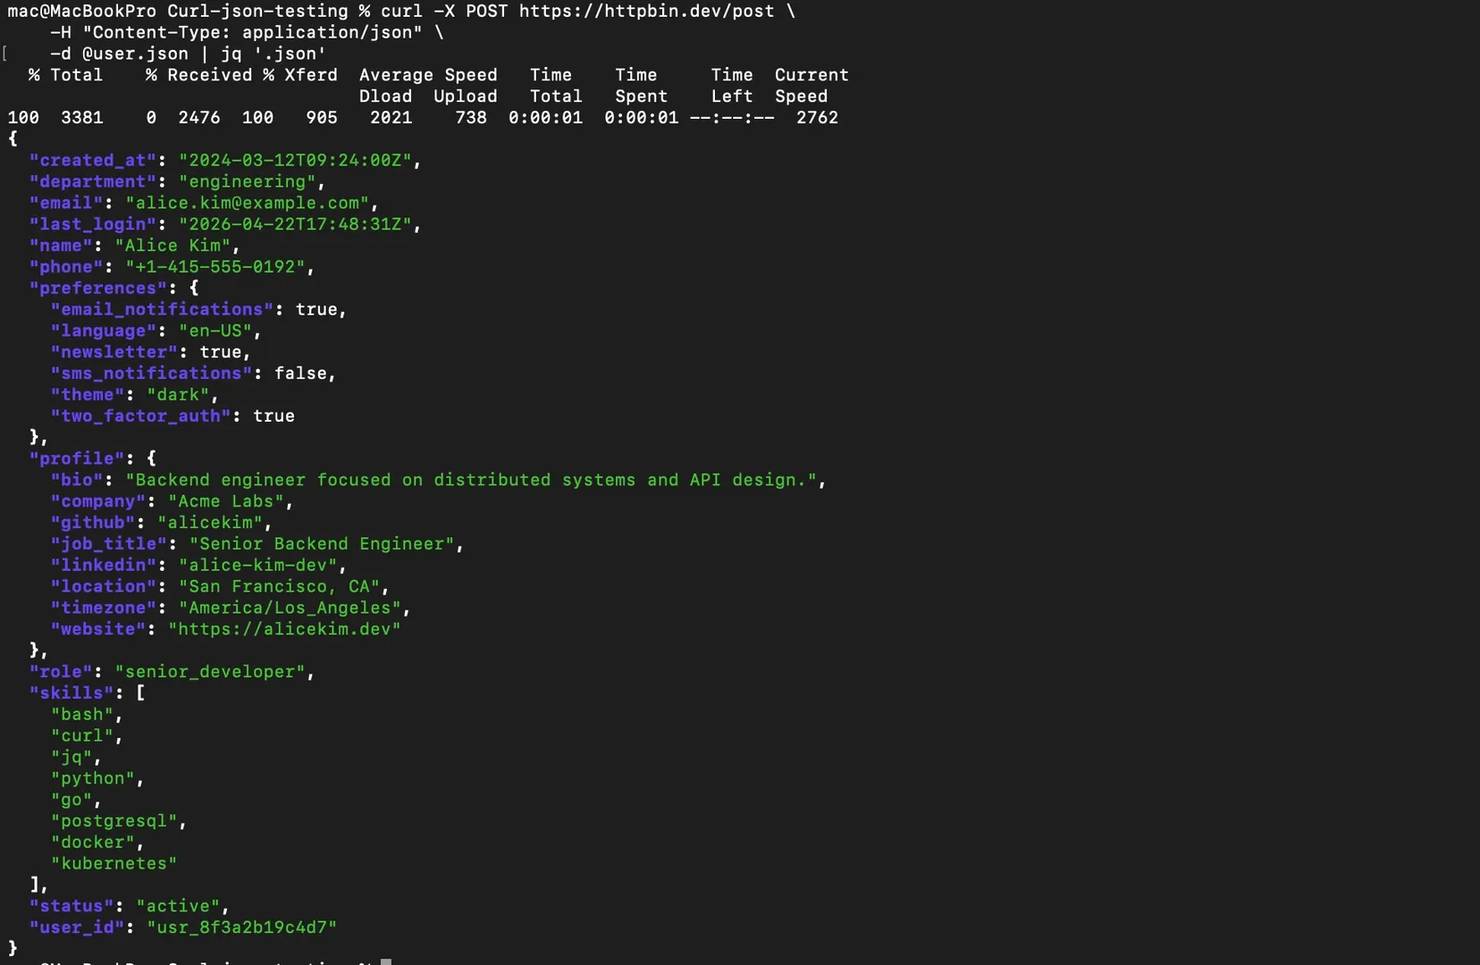
Alternatively, you can use jq '.json' to confirm that the server parsed your JSON payload the way you expected it to:

Validating JSON before sending
Before you send JSON data along with your cURL requests, you need to make sure it's valid. That means two things: the payload has to be formatted in a way the receiving server accepts, and the actual fields inside need to match what the server is expecting. Read the relevant API documentation first so you know exactly what shape your JSON should take, otherwise you'll end up chasing 400 Bad Request errors that could've been avoided upfront.
There are a few techniques you can use to validate your JSON payloads before you send them. Here they are:
1. Validating with jq
The fastest way to check if your JSON is well-formed is with jq empty. It will parse the input and return nothing if the syntax is valid, so if something's broken, it will tell you exactly where.
If you saved your payload in a JSON file, you can validate it like this:
If data.json has valid syntax, you will not get any output, but if there's a problem, jq will throw an error pointing to the bad line and character position.

If you wrote your JSON payload inline with your cURL request, you can validate it like this:
Once again, if you don’t get any output, that means you’re good, but if you get an error, then there is something for you to fix before you send the JSON with the request.
2. Chain validation with your cURL request
Another way you can validate your JSON payloads is by chaining the action of validating the JSON data in line with sending the request, i.e., you will include a JSON data validation step in your cURL request script before the request is actually sent to the target server.
Here’s how to do that:
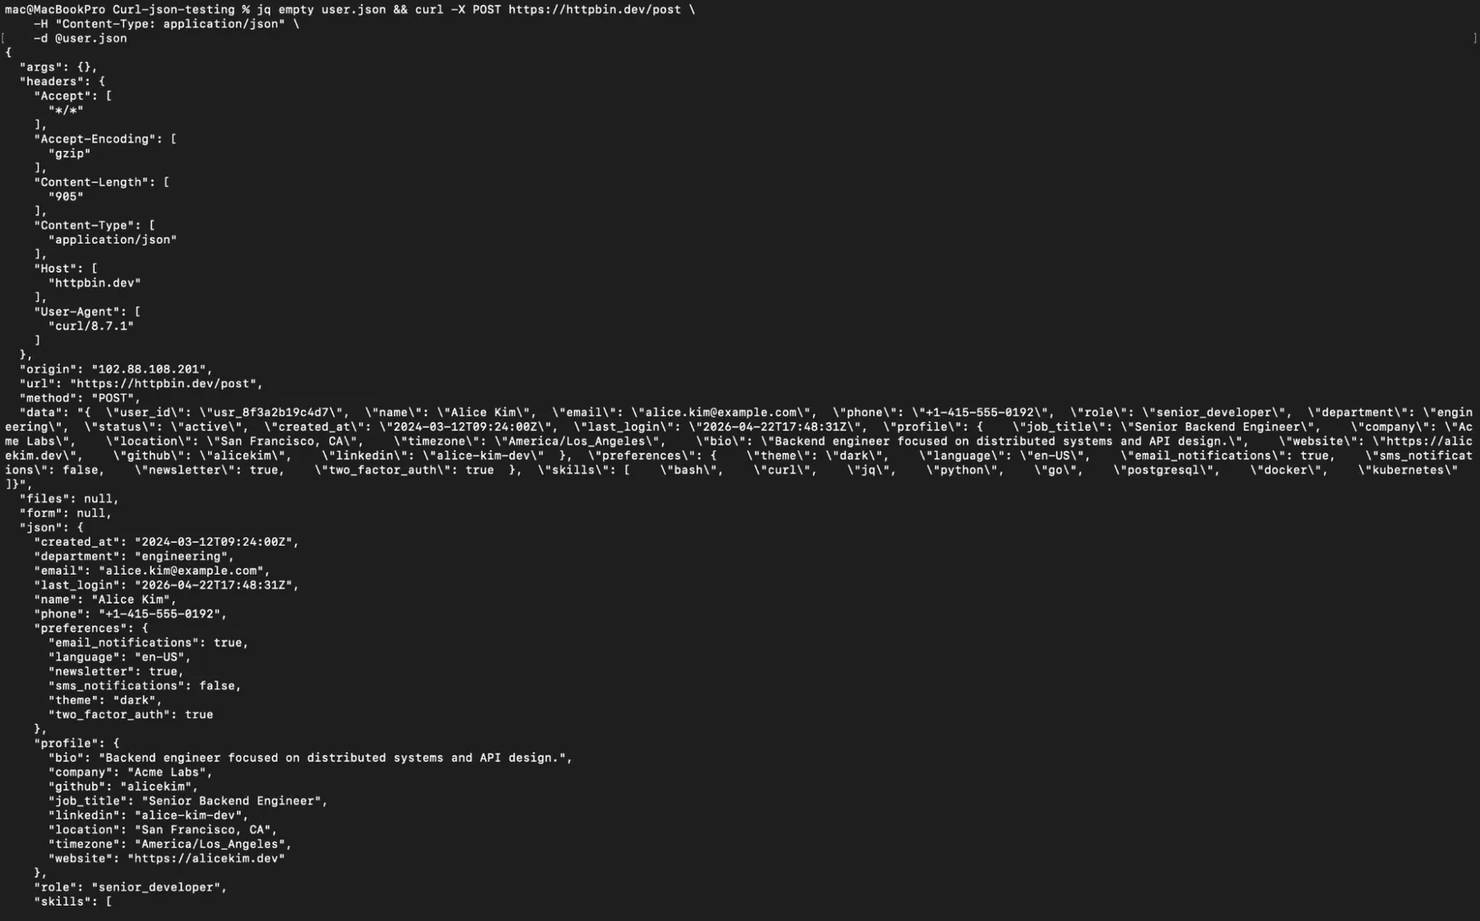
This command will send the request in a way that the JSON payload will have to pass a validation test before cURL sends the request to the server. This pattern is especially useful in scripts and CI/CD pipelines where you're building the JSON payload dynamically so you avoid sending wrong JSON data with your requests.
3. Using Python as an alternative validator
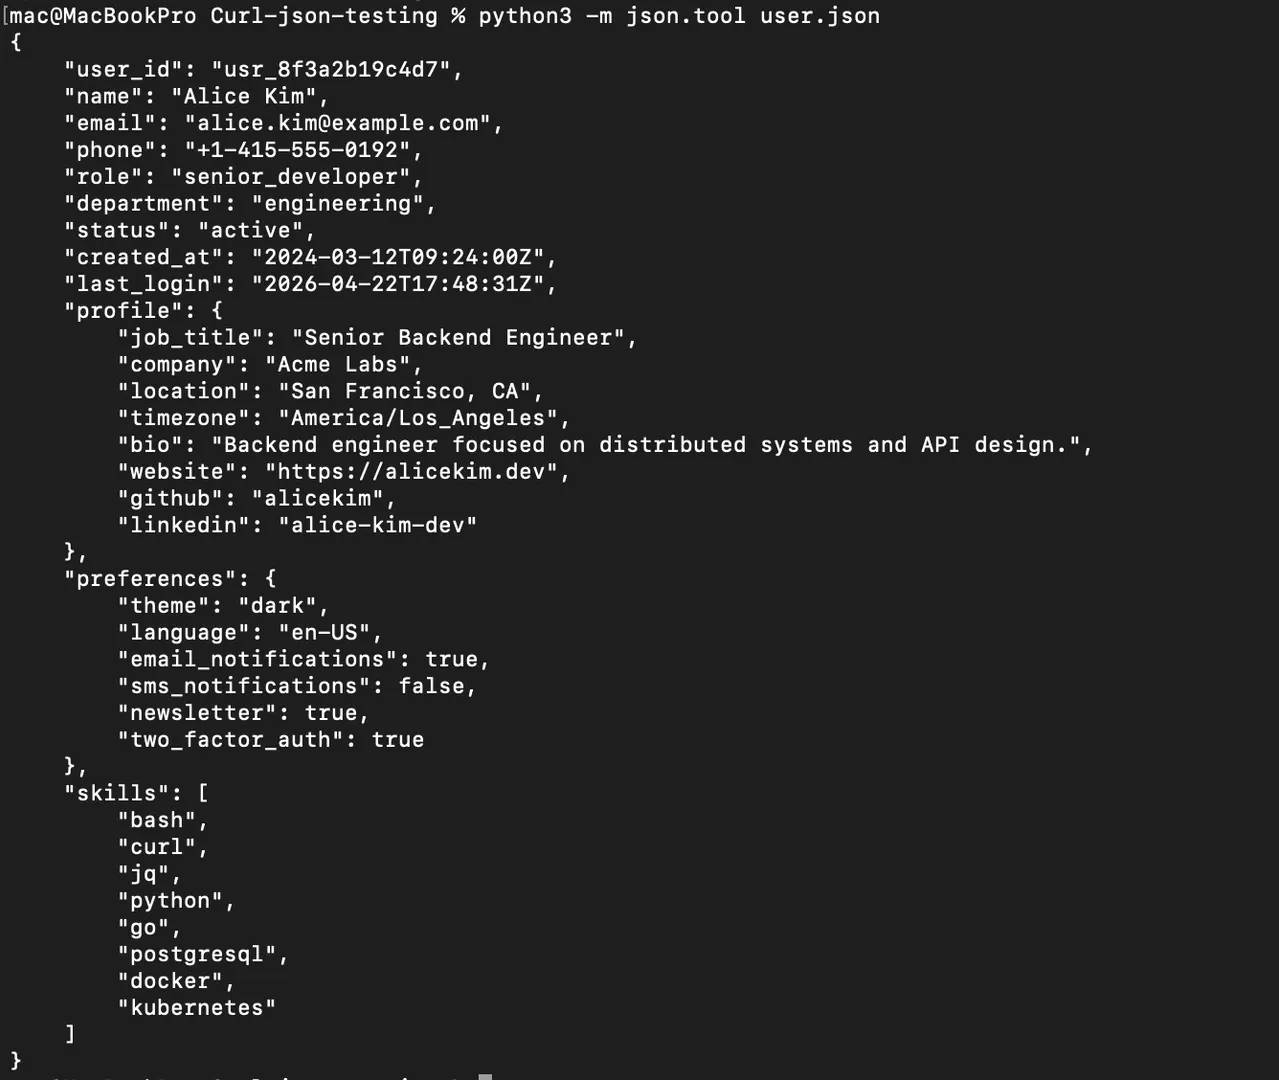
If you don’t have jq installed, you can use Python’s built-in json.tool module like this:
Python will format the JSON if it’s valid, or throw an error if it’s not. It's not as fast as jq, but it's available on almost every system that has Python installed.
4. Testing your payload with a test endpoint
Validating your payload’s syntax will tell you the JSON has a good structure, but it doesn't tell you if the structure is what the API actually expects. You need to test your JSON payload against a test endpoint like httpbin.dev/post in development before you send the payload with your cURL request on production.
httpbin.dev/post will simply give you back everything as the server sees it, that’s why it’s great for testing.
Sending JSON requests through a proxy
Every time you send cURL requests to certain APIs or web services, you will always run into rate limiting because these services have built-in rate-limiting rules that stop you from sending too many requests in a short time. You might also be trying to send requests to API endpoints in regions that reject traffic from your current location.
This is the point at which you employ proxies in your cURL requests with JSON. Routing your cURL requests through a proxy effectively changes the IP the server sees, so your traffic looks like it's coming from an allowed region, and you can spread requests across multiple IPs to reduce the chance of hitting rate limits.
Routing a JSON request through a proxy
You can use the -x (or --proxy) flag to route any request through a proxy, whether POST, PUT, or PATCH requests.
Here’s what that looks like:
If your proxy requires authentication, you've got 2 options. You can use the -U flag like this:
Or you can embed the credentials directly in the proxy URL like this:
Both approaches work for sending cURL requests with JSON payloads and any other method where you need to send JSON data.
Routing through Decodo residential proxies
When you’re trying to send cURL requests with JSON data at a production level, you need to ensure you route them through a reliable residential proxy that will assign real IPs to your requests instead of weak datacenter addresses that APIs and rate limiters can flag easily. Decodo's residential proxies is one of the most reliable tools around that can help you rotate IPs automatically and let you target the specific countries that your target server can easily recognize.
To get started, head over to the Decodo dashboard, create an account, pick a residential proxy plan that fits your needs, or opt for a free trial. Then, you'll find your proxy credentials and the gateway address. That's all you need to start routing your cURL JSON requests through residential IPs.
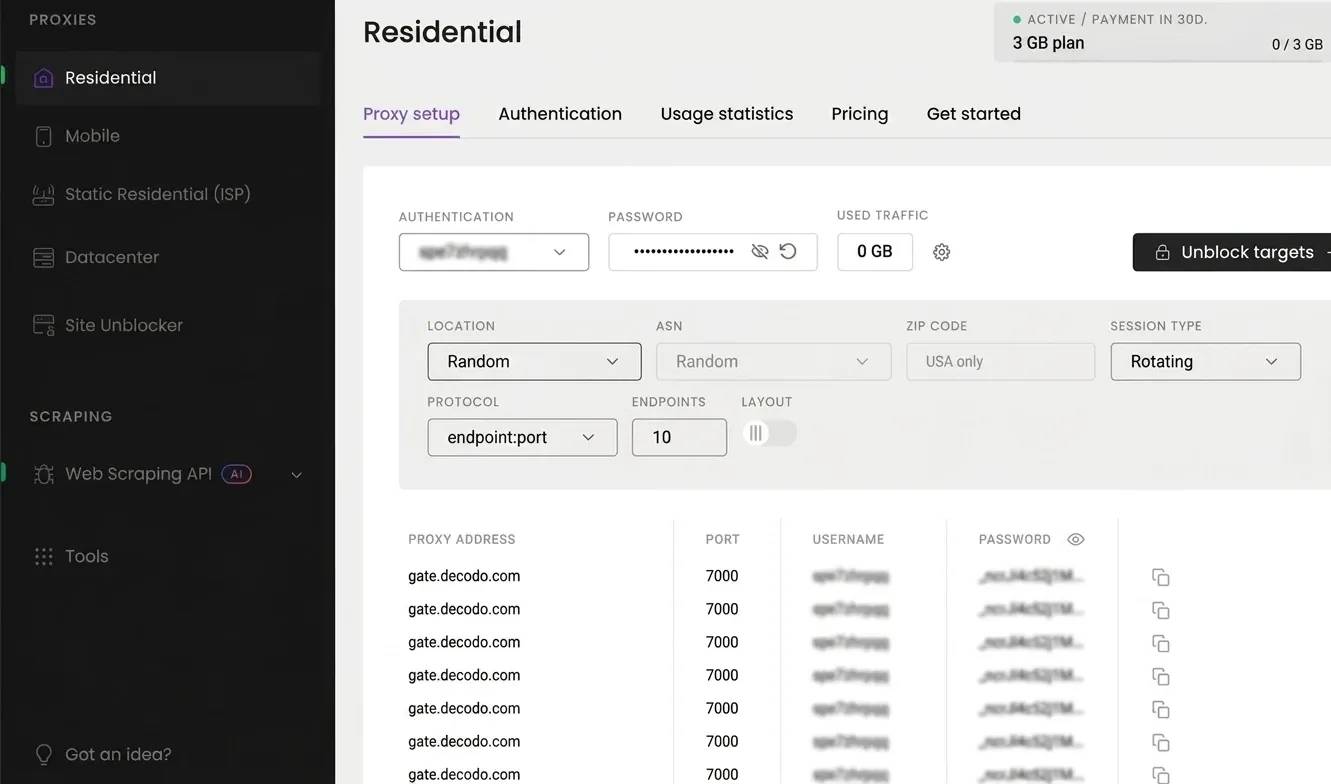
Here's how you'd send a JSON request through a Decodo residential proxy once you’ve gotten your credentials:
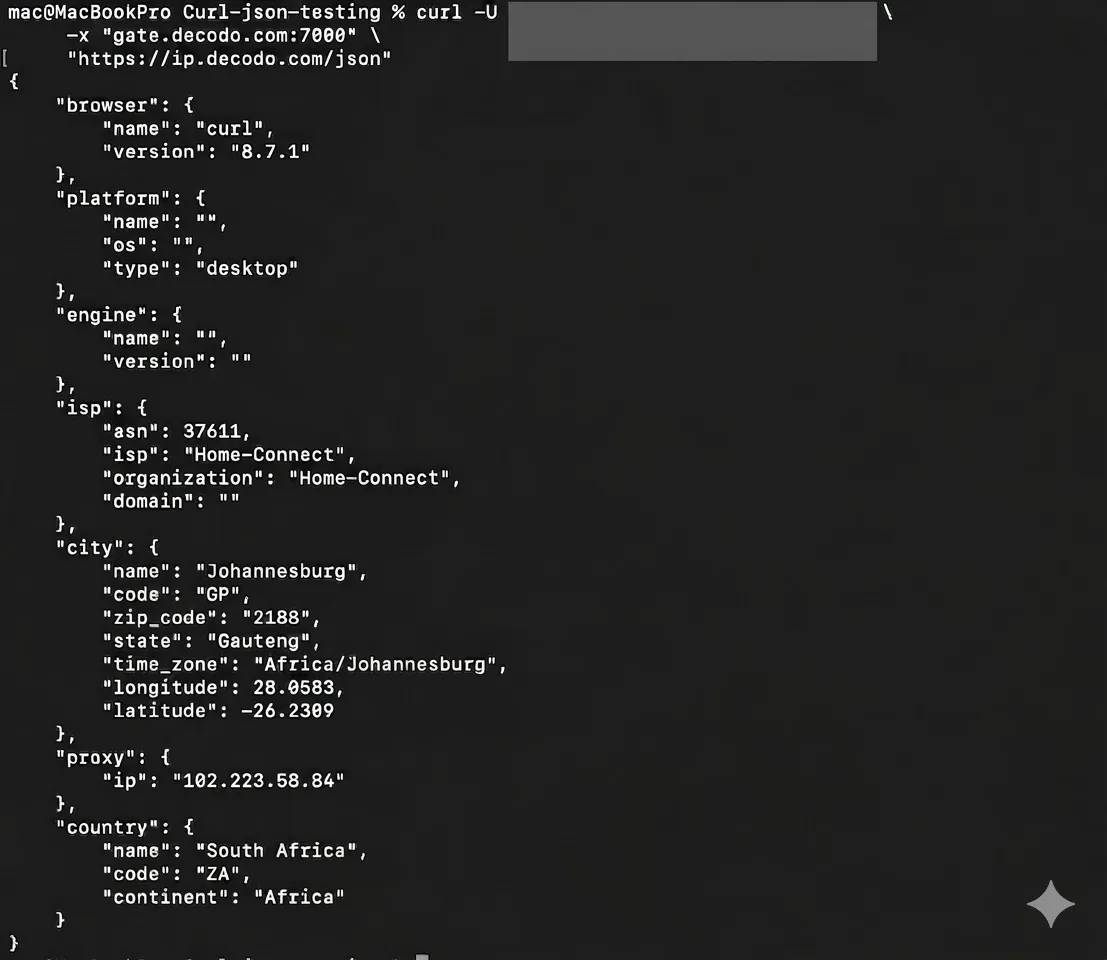
You pass in your Decodo proxy credentials with the -U flag, and the -x flag tells cURL which proxy gateway to route the request through. Every time you run this command, Decodo's gateway will assign a new residential IP from a random location, so your requests look like they're coming from real users on different networks.
If you want to target a specific country (like, Germany), you add the country-xx parameter directly to the username, with user- as the prefix:
Decodo will route your request through a German residential IP, so the target server sees traffic that looks like it's coming from a real user in Germany. You can use any 2-letter country code (us, fr, jp, etc.) in the username string.
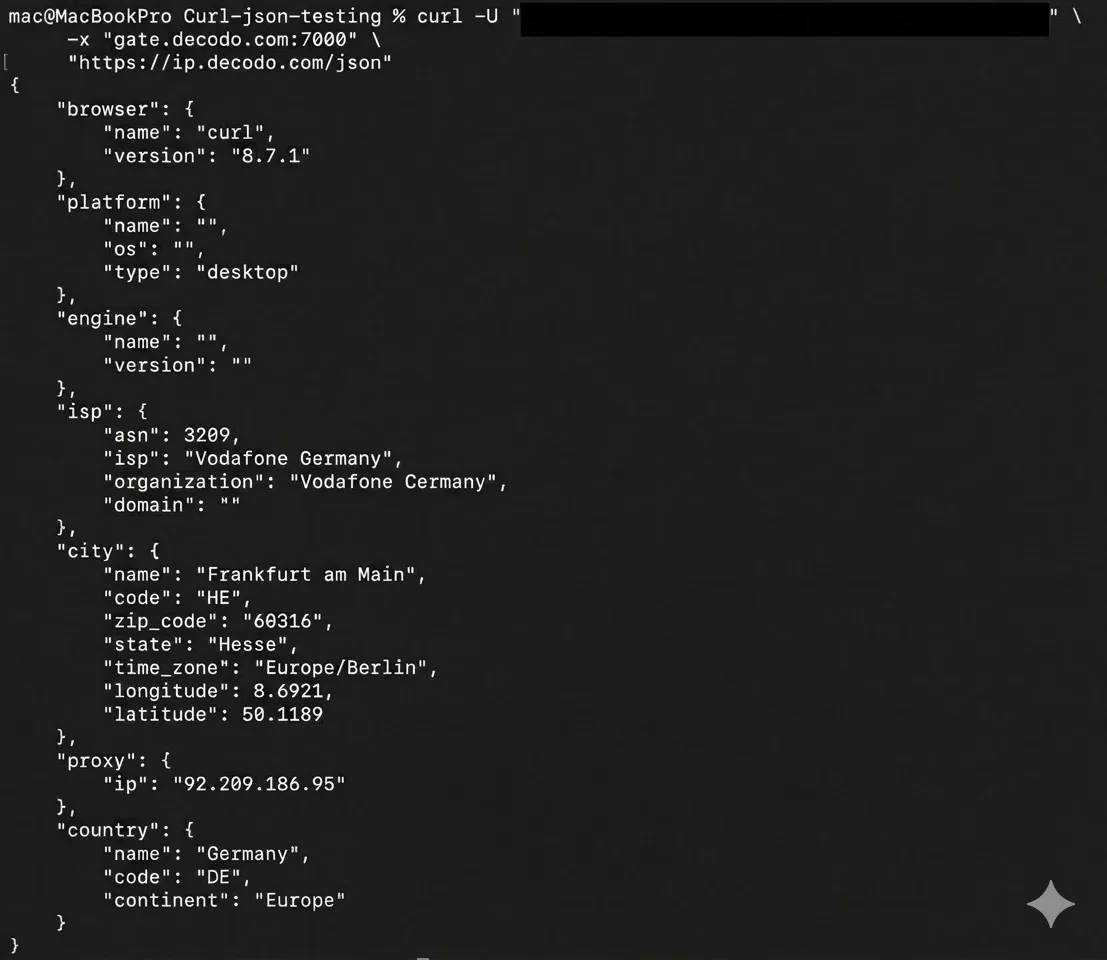
You can also verify that your request is actually going through the proxy by checking the exit IP, like this:
This will show you the rotated IP that your target server will see when you send your cURL request with JSON.
Remember that it’s always best practice to save your authentication credentials in a .env file like this:
You can then import them into your cURL request script with JSON, like this:
HTTPS proxy considerations
When you're routing HTTPS traffic through a proxy, cURL needs to trust the proxy's certificate. If you're working in a development environment and you hit SSL errors, you can bypass the check with --proxy-insecure, like this:
This will skip any certificate verification for the proxy connection. It's fine for quick testing, but in production, you should configure proper certificates instead of disabling validation altogether. For a deeper walkthrough on how to configure proxies with cURL, check out Decodo’s guide on using proxy with cURL in 2026.
Common mistakes and troubleshooting
Even when you've got the right syntax and structure, sending JSON with cURL has a handful of recurring traps. Here are the ones you'll most likely run into and how to fix them fast.
1. Missing Content-Type header
If you send a JSON body with your cURL requests without setting a Content-Type, cURL will default that payload to _application/x-www-form-urlencoded._You will then get a 415 Unsupported Media Type error or a response that doesn’t make sense.
Make sure you always include the header explicitly with your JSON payloads, like this:
If you're getting a 415 and your request looks correct otherwise, you’re probably missing the Content-Type header.
2. Malformed JSON payload
If your JSON payload has a syntax error, the request will still go out but the server will reject it. Some of those syntax errors include:
- Single quotes around keys or values inside the JSON (JSON requires double quotes)
- Trailing commas after the last item in an object or array
- Unescaped double quotes inside string values
For example, this JSON payload is not a valid one:
This is how it should be:
Your JSON payload values must be enclosed by double quotes not single quotes and there shouldn’t be any trailing commas after the last item in the object. You can run your payload through jq empty to test its validity, like this:
If it doesn’t return anything, then your JSON is valid, but if there are errors in your payload, you will get the information right there and then.
3. Escaping issues on Windows
Sending cURL requests with JSON payloads on Windows is a little trickier than when you're operating on Linux and macOS. That is because Linux and macOS let you wrap your JSON in single quotes, so the inner double quotes pass through easily. CMD (Windows), on the other hand, doesn't support single quotes the same way, which means you have to wrap the whole payload in double quotes and escape every inner double quote with a backslash, like this:
PowerShell adds another layer of problem with its own escaping rules using backticks(``) or triple double quotes(“”””””). The best way to avoid these complexities on Windows is to skip inline JSON entirely and load your payload from a JSON file.
4. Forgetting the HTTP method
The -d, --data-raw, and --data-binary flags all send request data and will make cURL use the POST method by default unless you explicitly override it with -X. The main difference between them is how they handle the payload itself. -d treats @ as a file reference and may alter line endings in some cases, --data-raw sends the data exactly as typed without special handling for @, and --data-binary preserves the payload exactly as provided, including newlines and binary data.
To avoid this, always explicitly define a method flag when you’re using --data-raw and --data-binary , like this:
Always define the method when you’re sending JSON data with cURL requests, especially when you’re switching between POST, PUT, or PATCH.
5. Large payload issues
If you're sending a big JSON file and the request fails or comes back truncated, you've probably hit one of two size limits on the server side. You may also run into issues with how the data is transmitted with the -d flag, so you have to switch to --data-binary to safely load your larger JSON payloads, like this:
--data-binary will send your JSON file exactly as it is; it won’t remove formatting or newlines like the -d flag sometimes does.
If your request still fails, check the API docs because many servers limit how big your request body can be, usually around 1 MB to 10 MB.
6. Character encoding problems
If your JSON includes special or international characters, encoding them inline can break your request. Always specify UTF-8 in the Content-Type header when your payload includes international characters, like this:
This ensures your data is interpreted correctly across different systems and APIs.
cURL JSON cheat sheet
You've covered a lot of ground in this article. Here's a quick-reference table you can bookmark for whenever you need to send JSON with cURL. Each row maps a common task to the exact cURL command that gets it done.
Task
cURL command
POST JSON inline
curl -X POST <SERVER_URL> -H "Content-Type: application/json" -d '{"name":"Churchill","age":24}'
POST JSON from file
curl -X POST <SERVER_URL> -H "Content-Type: application/json" -d @user.json
PUT JSON (replace resource)
curl -X PUT <SERVER_URL> -H "Content-Type: application/json" -d @user.json
PATCH JSON (partial update)
curl -X PATCH <SERVER_URL> -H "Content-Type: application/json" -d '{"name":"Bob"}'
DELETE with JSON body
curl -X DELETE <SERVER_URL> -H "Content-Type: application/json" -d '{"ids":[1,2,3]}'
With Bearer token auth
curl -X POST <SERVER_URL> -H "Authorization: Bearer YOUR_TOKEN" -H "Content-Type: application/json" -d @user.json
With API key auth
curl -X POST <SERVER_URL> -H "X-API-Key: YOUR_KEY" -H "Content-Type: application/json" -d @user.json
With basic auth
curl -X POST <SERVER_URL> -u username:password -H "Content-Type: application/json" -d @user.json
With proxy
curl -U "YOUR_PROXY_USERNAME:YOUR_PROXY_PASSWORD" -x "gate.decodo.com:7000" -X POST <SERVER_URL> -H "Content-Type: application/json" -d @user.json
Verbose mode for debugging
curl -v -X POST <SERVER_URL> -H "Content-Type: application/json" -d @user.json
Validate JSON with jq
jq empty user.json && echo "Valid JSON"
Validate then send
jq empty user.json && curl -X POST <SERVER_URL> -H "Content-Type: application/json" -d @user.json
Build JSON dynamically with jq
curl -X POST <SERVER_URL> -H "Content-Type: application/json" -d "$(jq -n --arg name "Alice" --argjson age 30 '{name: $name, age: $age}')"
Pipe JSON from stdin
echo '{"key":"value"}' | curl -X POST <SERVER_URL> -H "Content-Type: application/json" -d @-
Parse JSON response with jq
curl -s <SERVER_URL> | jq '.headers'
Check the response status code
curl -s -o /dev/null -w "%{http_code}" -X POST <SERVER_URL> -H "Content-Type: application/json" -d @user.json
Set Accept header for JSON response
curl -X POST <SERVER_URL> -H "Content-Type: application/json" -H "Accept: application/json" -d @user.json
When you’re sending cURL requests with JSON payloads, most tasks come down to these three things:
- Setting the correct header
- Passing the JSON payload (inline or from a file)
- Choosing the right HTTP method (POST, PUT, PATCH)
You don’t need to memorize everything, just pick the row that matches your use case and adjust the URL or payload.
Final thoughts
cURL handles every method of sending JSON you’ll probably come across. You can send payloads inline with the -d flag, load larger ones from a JSON file, and stack on headers, authentication, or proxy routing with dedicated flags. You can also use jq to build and parse the JSON data as part of the same command.
That being said, sending cURL requests manually has its own limits. Once you start sending JSON requests at scale, dealing with anti-bot protection, or need geo-targeting, you will have to employ tools like the Decodo Web Scraping API and Decodo residential proxies to help you handle routing, retries, and location-based requests at a production level.
Reviewed by Churchill Doro
Scraping shouldn't be this hard
Replace proxy configs, retry logic, and fingerprint workarounds with a single API call that returns clean data.
About the author

Mykolas Juodis
Head of Marketing
Mykolas is a seasoned digital marketing professional with over a decade of experience, currently leading Marketing department in the web data gathering industry. His extensive background in digital marketing, combined with his deep understanding of proxies and web scraping technologies, allows him to bridge the gap between technical solutions and practical business applications.
Connect with Mykolas via LinkedIn.
All information on Decodo Blog is provided on an as is basis and for informational purposes only. We make no representation and disclaim all liability with respect to your use of any information contained on Decodo Blog or any third-party websites that may belinked therein.