How to Set Up an Apache Proxy Server: Forward, Reverse, and Scraping Use Cases
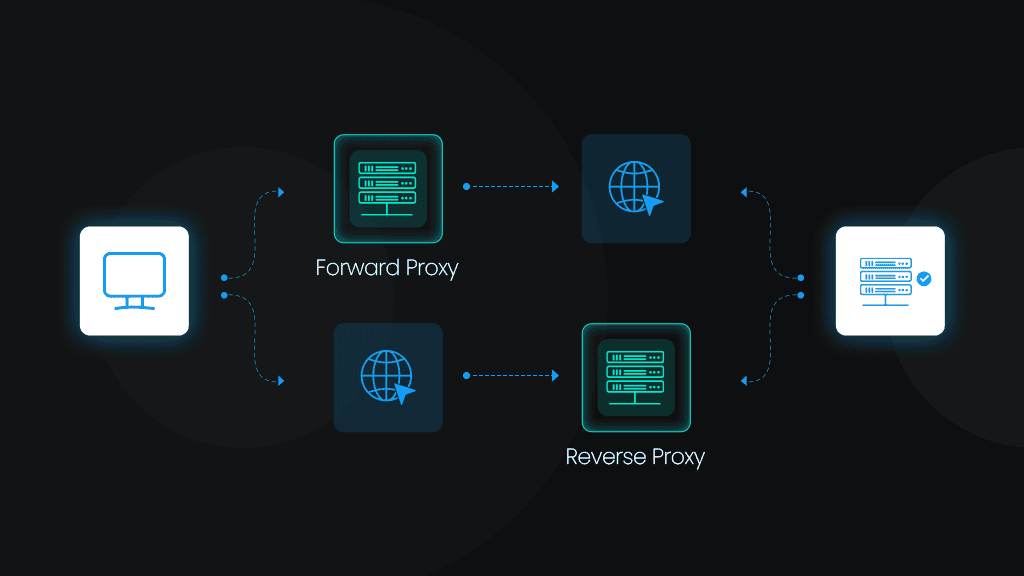
An Apache proxy server can work in two directions. As a forward proxy, it sits between your client and the internet, hiding who's making the request. As a reverse proxy, it sits in front of your backend servers, hiding what's running behind them. Apache HTTP Server handles both well, and it's already installed on most Linux boxes, has a mature module ecosystem, and costs nothing. This guide walks you through setting up both modes from scratch, configuring a reverse proxy in front of Tomcat, and routing Selenium scraper traffic through your forward proxy.

Zilvinas Tamulis
Last updated: Jul 21, 2026
19 min read

TL;DR
- A forward proxy hides the client's IP from the destination server; a reverse proxy hides backend servers from clients.
- Apache handles both modes through mod_proxy and its protocol-specific companion modules (mod_proxy_http, mod_proxy_connect, mod_proxy_balancer).
- ProxyPass and ProxyPassReverse are not interchangeable: one forwards requests, the other rewrites response headers to prevent internal URLs from leaking to clients.
- Always lock down a forward proxy with IP restrictions and authentication before exposing it beyond localhost.
- A self-hosted Apache proxy has one outbound IP, which makes it easy to rate-limit and block under sustained scraping load.
- For scraping at scale, pair Apache with Decodo's rotating residential proxies or switch to Site Unblocker for built-in CAPTCHA bypass and JS rendering.
Forward proxy vs. reverse proxy: Which Apache setup do you actually need?
The simplest way to think about it: who is being hidden?
Forward proxy (client-side)
A forward proxy hides the client. The destination server sees the proxy's IP, not yours. Traffic flows from the client to the proxy to the internet.
Common uses: outbound traffic filtering, web scraping, bypassing IP rate limits, and corporate gateways that control what employees can access.
Apache modules involved: mod_proxy, mod_proxy_http, and mod_proxy_connect (required for HTTPS tunneling via the CONNECT method).
Reverse proxy (server-side)
A reverse proxy hides the backend. Clients connect to Apache, and Apache forwards the request to your application server. The client never sees the backend directly.
Common uses: load balancing across multiple app servers, TLS termination, sitting in front of Tomcat/Node/Python services, and response caching.
Apache modules involved: mod_proxy, mod_proxy_http, and optionally mod_proxy_balancer for distributing traffic across multiple backends.
Which one do you need?
You want to...
Setup
Route your scraper's traffic through a proxy
Forward proxy
Hide your IP when making outbound requests
Forward proxy
Put Apache in front of Tomcat or a Node.js app
Reverse proxy
Load balance across multiple backend servers
Reverse proxy
Terminate TLS at Apache and forward plain HTTP to your app
Reverse proxy
If you want the full conceptual breakdown beyond what's covered here, the comparison of forward vs. reverse proxies goes deeper into the differences.
Prerequisites and Apache installation
Before touching any proxy configuration, you need Apache running on a Linux server. This section covers both major distribution families so you can follow along regardless of what you're running.
What you need:
- A Linux server. Ubuntu 22.04+ or RHEL 9/Rocky 9+ are recommended for command consistency with this guide.
- Root or sudo access.
- An available listening port. The forward-proxy example uses port 8888. Reverse-proxy setups typically require ports 80 and 443
If you're running this on a fresh VPS or cloud instance, you're probably fine on all three. If you're on a shared server or a machine that already runs a web app, check that nothing is already listening on port 80 before proceeding:
If something shows up, you'll need to either stop that service or configure Apache on a different port.
Installing on Debian/Ubuntu
Apache starts automatically after installation. The configuration lives in /etc/apache2/, and sites are managed through the /etc/apache2/sites-available/ and /etc/apache2/sites-enabled/ directories.
Installing on RHEL/CentOS/Rocky
On RHEL-family systems, the package is called httpd instead of apache2, and the configuration lives in /etc/httpd/. The enable --now flag starts the service immediately and sets it to start on boot.
One thing that catches people on RHEL-family systems: the firewall is usually active by default. Open port 80 before testing:
Verifying the installation
Regardless of distribution, confirm Apache is running:
You should see something like:
If you get a connection refused error, Apache isn't running. Check the service status with:
While you're here, check which modules are currently loaded:
You'll see a long list. Don't worry about it yet. The next section covers which proxy modules you actually need and how to enable them.
Enabling Apache proxy modules: mod_proxy and its relatives
Apache's proxy functionality isn't a single switch you flip. It's split across several modules, each handling a specific protocol or scenario. Enabling the wrong combination is the most common reason for "no protocol handler" errors and broken proxy configs.
What each module does
- mod_proxy. The base module. Required for any proxy functionality, forward or reverse. Does nothing on its own but loads the framework that the other modules plug into.
- mod_proxy_http. Handles proxying HTTP and HTTPS traffic to backend servers. You need this for virtually every proxy setup.
- mod_proxy_connect. Enables the CONNECT method, which is how clients tunnel HTTPS through a forward proxy. Without it, your forward proxy only handles plain HTTP, and every HTTPS request fails.
- mod_proxy_balancer + mod_lbmethod_byrequests. Load balancing across multiple backends. Only needed if your reverse proxy distributes traffic to more than one application server.
- mod_ssl. Handles TLS termination at Apache. Required if you want Apache to serve HTTPS to clients, regardless of what the backend speaks.
Enabling modules on Debian/Ubuntu
One command covers the essentials:
If you're planning to set up load balancing as well:
Then reload Apache to pick up the changes:
Enabling modules on RHEL/CentOS/Rocky
On RHEL-family systems, proxy modules are typically loaded by default through /etc/httpd/conf.modules.d/00-proxy.conf. Open that file and check that the relevant LoadModule lines are uncommented:
You should see lines like:
If any of them are commented out (prefixed with #), remove the #, save the file, and reload:
Verifying modules are loaded
Confirm everything is active:
You should see output like:
If a module you enabled doesn't show up in the list, Apache either didn't reload cleanly, or there's a typo in the config. Check the error log:
With the modules loaded, you're ready to start configuring. The next two sections walk through forward proxy and reverse proxy setups, each in a clean, dedicated VirtualHost file.

One IP won't last long
Your Apache proxy has one outbound address. Decodo's residential proxies rotate through 115M+ IPs across 195+ countries, so your scraper doesn't get burned after the first batch.
Configuring Apache as a forward proxy server
This is the setup for routing outbound traffic through Apache, whether that's for scraping, testing, or controlling what a network can access. We're going to create a dedicated VirtualHost file rather than editing the default site config. That way, the setup is clean and reversible.
Creating the VirtualHost
Create a new file:
Add the following configuration:
A few things to note:
- Port 8888. We're using a non-standard port to keep the forward proxy separate from any web server running on port 80. You can use any open port, but 8888 and 3128 are common conventions for proxy servers.
- ProxyRequests On. This is the directive that makes Apache act as a forward proxy. Without it, Apache ignores forwarding requests entirely. This directive is off by default, and for good reason. Turning it on without access controls creates an open proxy.
- ProxyVia On. Adds a Via header to every proxied request, which makes it easier to trace traffic through proxy chains. Optional but useful for debugging.
- Require ip. Restricts proxy access to specific IP ranges. In this example, only clients on the 192.168.1.0/24 subnet and localhost can use the proxy. Replace this with your actual network range.
Since we're using a custom port, tell Apache to listen on it. Open /etc/apache2/ports.conf and add:
Enabling and reloading
If the reload fails, check the config syntax first:
This catches typos and missing modules before they break anything.
Testing with cURL
Start with a simple HTTP request through the proxy:
If you get HTML back, the forward proxy is working for HTTP traffic.
Now test HTTPS (this confirms modproxyconnect is working):
If this also returns HTML, HTTPS tunneling through the CONNECT method is functional.
To verify the Via header is being added, run a verbose request:
You should see a Via header in the response identifying the proxy hop and HTTP protocol version.
Testing from a remote machine
If your proxy server has a public or LAN-accessible IP, test from another machine to confirm the access controls work:
The first should return HTML. The second should return a 403 Forbidden response. If both work, your Require ip rules aren't restricting correctly. Double-check the IP range in your VirtualHost config.
Security warning
This matters enough to call out explicitly. A forward proxy with Require all granted and a public IP is an open proxy. Anyone on the internet can route traffic through your server. That means spam, scraping of unrelated targets, and potentially illegal traffic, all attributed to your IP address.
Before exposing a forward proxy to anything beyond localhost:
- Restrict by IP range as shown above
- Add basic authentication (covered in the security section)
- Monitor your access logs regularly
If your use case is specifically web scraping and you need to understand how HTTP proxies work at a protocol level, the HTTP proxy guide covers the mechanics and common error codes in more depth.
Understanding ProxyPass and ProxyPassReverse directives
These two directives are the core of every Apache reverse proxy setup. The names make them look related, but they're not. Each does something different, and skipping either one creates problems that are annoying to debug.
ProxyPass: Forwarding requests to the backend
ProxyPass maps an incoming URL path on Apache to a URL on your backend server. When a client requests a path that matches, Apache forwards the entire request (body, headers, query string) to the specified backend.
This tells Apache: any request that starts with /app should be forwarded to http://localhost:8080/app on the backend. The client never sees the backend address. As far as they know, Apache is serving the content itself.
ProxyPassReverse: Rewriting response headers
ProxyPassReverse handles the return trip. When your backend sends a redirect (a Location header pointing to http://localhost:8080/app/login), the client would receive that internal URL directly without ProxyPassReverse. That's a problem because the client can't reach localhost:8080. That's Apache's internal network.
ProxyPassReverse rewrites Location, Content-Location, and URI headers in the backend's response, replacing the internal address with the proxy's public address. So http://localhost:8080/app/login becomes http://your-proxy.com/app/login before the client ever sees it.
Without it, the first redirect from your backend leaks the internal address and breaks navigation for the client.
Using them together
In practice, you almost never use one without the other:
Keep in mind that these are always two separate lines.
Order matters
When you have multiple ProxyPass rules, Apache evaluates them in order. More specific paths must come before less specific ones, or the broader rule swallows requests meant for the narrower one.
Correct: Specific path first
Wrong: /api matches first, /api/v2 never reached
In the wrong example, a request to /api/v2/users matches /api first and gets sent to the v1 server. The v2 rule never fires.
Trailing slashes
Trailing slashes are one of the most common sources of broken reverse proxy setups, because the behavior is significant and not always obvious.
Apache's key rule: the local path and the backend URL should either both end in a slash or both omit it. Mixing them (one with, one without) is what causes broken mappings.
The two matched forms behave differently, and the difference is in how the matched prefix gets replaced:
With the slash form (/app/), Apache matches the prefix /app/ and swaps it for the backend's /app/. A request to /app with no trailing slash won't match that rule, so the client can end up with a 404 unless a redirect adds the slash.
Without the slash form (/app), both /app and /app/whatever match.
The practical guidance is consistency, not omission: pick one form and keep both sides matching. If you need the slash form to serve /app without a trailing slash too, add both variants explicitly:
Excluding paths
Sometimes you want Apache to proxy everything except certain paths. The ! syntax excludes a path from proxying:
Exclusions must come before the catch-all rule. If the catch-all appears first, it matches everything and the exclusion never fires. Same ordering principle as specific-before-general.
Multiple backends
You can route different URL paths to entirely different backend servers:
A single Apache instance acts as the entry point, routing requests to the right backend based on the URL path. The client sees one domain, while three separate services handle the work.
Connection tuning
For production setups, the default timeout and connection settings are worth adjusting. ProxyPass accepts optional parameters:
- connectiontimeout. How long Apache waits to establish a connection to the backend (in seconds). The default is the global Timeout value, which is usually 60 seconds. For a backend on localhost, 5 seconds is plenty.
- timeout. How long Apache waits for a response from the backend after the connection is established. Set this based on your slowest expected response. Too low and legitimate slow requests get cut off. Too high and hung backends tie up Apache workers.
- keepalive. Reuses the connection to the backend for multiple requests instead of opening a new one each time. Reduces latency and resource usage under load.
These go on the ProxyPass line only, not on ProxyPassReverse. The reverse directive only rewrites response headers and doesn't manage connections.
Securing the proxy: Authentication, HTTPS, and access control
Before exposing your proxy beyond localhost, configure authentication, access control, and HTTPS.
Basic authentication for a forward proxy
Create a password file:
You'll be prompted to set a password. To add more users later, drop the -c flag (it overwrites the file):
Now add the auth requirement to your forward proxy VirtualHost:
Reload Apache and test:
The first request should fail with 407 Proxy Authentication Required. The second should work.
Combining IP restrictions with authentication
For extra security, require both a valid IP and valid credentials using RequireAll:
This means even if someone has the username and password, they can't use the proxy unless they're on the allowed network. Belt and suspenders.
HTTPS termination for a reverse proxy
If your reverse proxy faces the public internet, it should serve HTTPS. The easiest way is Let's Encrypt with Certbot:
Certbot automatically creates a :443 VirtualHost with your certificate and sets up a redirect from :80 to :443. If you'd rather configure it manually, here's what the VirtualHost looks like:
And the :80 redirect:
Make sure modssl_ is enabled:
HTTPS through a forward proxy
Forward proxies handle HTTPS differently from reverse proxies. The proxy doesn't decrypt the traffic. Instead, the client sends a CONNECT request, and the proxy opens a raw TCP tunnel to the destination. The TLS handshake happens directly between the client and the target server, with the proxy just passing bytes through.
This is what modproxyconnect handles. The key directive is:
This restricts CONNECT tunneling to port 443 only. Those are the default and almost always what you want. Widening it to other ports (like 8443) is occasionally necessary, but it increases vulnerability to attacks.
If your HTTPS requests through the forward proxy are timing out, the most likely cause is modproxyconnect not being enabled. Double-check:
For a deeper understanding, have a look at how SSL and HTTPS proxying work under the hood, including the differences between TLS termination and TLS tunneling.
Using your Apache proxy for web scraping with Selenium
Now that you have a working forward proxy, let's route a Python scraper through it and extract some data.
Project setup
You'll need Python 3.10+ and a virtual environment:
webdriver-manager handles downloading the correct ChromeDriver binary so you don't have to manage it manually.
Configuring Selenium to use the proxy
The simplest approach is Chrome's --proxy-server flag. This tells the browser to route all traffic through your Apache forward proxy:
If your proxy requires authentication (as configured in the previous section), Chrome's --proxy-server flag doesn't support inline credentials. You'll need Selenium Wire instead:
Then write the code:
Scraping Books to Scrape
Here's a complete script that navigates to Books to Scrape through the proxy and extracts book titles and prices:
Expected output:
Verifying that the proxy is being used
To confirm traffic is actually routing through your Apache proxy and not going directly, hit a service that returns your IP:
The returned IP should be your Apache server's address, not the computer running the script. If it shows your local IP, the proxy configuration didn't take effect. Check that the --proxy-server argument matches your Apache proxy's address and port.
You can also verify from the server side by watching the Apache access log while the script runs:
Each Selenium request should appear in the log as it passes through.
Troubleshooting
- 407 Proxy Authentication Required. Your proxy has authentication enabled, but the credentials weren't passed or are incorrect. Switch to Selenium Wire and pass the credentials in the proxy URL as shown above.
- 502 Bad Gateway. Apache reached the proxy handler but could not get a valid response from the destination. Test the target directly from the proxy server and inspect the Apache error log. If the log reports that no protocol handler is available, verify that modproxyhttp is loaded.
If that works but the proxy doesn't, the module is the issue:
- CONNECT requests are timing out. HTTPS requests hang indefinitely, then fail. This almost always means modproxyconnect isn't enabled. Verify:
If it's missing, enable it and reload:
For more beyond proxy configuration, check out the Selenium scraping walkthrough, or take a deeper look at the Selenium proxy patterns. If you prefer testing your proxy with cURL before involving a browser, the cURL proxy guide covers that approach.
Limitations of a self-hosted Apache proxy
Your Apache forward proxy works, but before you scale it up for production scraping or any sustained workload, it's worth understanding exactly where the ceiling is.
Single outbound IP
Your Apache server has one IP address. Every request that goes through it comes from that same address. Any target site with basic rate limiting will notice and throttle or block you after a modest number of requests. You can spin up multiple Apache instances on different servers to get more IPs, but at that point, you're building and maintaining a proxy fleet, which is a different job entirely. Consider a proxy provider solution if you need more IPs.
No geo-targeting
A proxy hosted in one datacenter can only make requests from that location. If you need search results, pricing, or content localized to a specific country or region, a single-location proxy can't help. You'd need separate servers in each target region, each with its own Apache setup and maintenance overhead.
Datacenter IPs get flagged
Anti-bot vendors like Cloudflare, PerimeterX, and DataDome maintain lists of known datacenter IP ranges. An Apache server running on AWS, GCP, DigitalOcean, or any major cloud provider will be identified as datacenter traffic almost immediately. Residential and mobile IPs avoid this signal, but those can't be self-hosted at scale.
No anti-bot evasion
Apache proxies traffic. That's all it does. It doesn't bypass CAPTCHAs, manage browser fingerprints, or rotate user agents. If the target site uses any form of bot detection beyond IP-based blocking, your proxy doesn't help. You'd need additional tooling on top of Apache to handle those layers.
Operational overhead
You own everything. Uptime monitoring, security patches, log rotation, disk space, scaling when traffic increases. For a corporate gateway or internal routing, that overhead is justified. For scraping at scale, you're spending engineering time on proxy infrastructure instead of on the data you're trying to collect.
Cloud provider restrictions
Most cloud providers restrict or prohibit running open proxy services. Heroku's free tier shut down in 2022, and even paid plans on AWS, GCP, and Render have acceptable use policies that can flag proxy workloads. If your account gets suspended, your scraping pipeline goes down with it.
When to move to a managed solution
When these limitations start costing you more time than they save, the upgrade path is straightforward. Decodo residential proxies give you 115M+ rotating IPs from real household computers, eliminating the proxy detection signal. Rotating proxies handle IP rotation automatically without you maintaining a server fleet. And for targets with heavy anti-bot stacks where a forward proxy alone isn't enough, Site Unblocker combines CAPTCHA bypass, JS rendering, and fingerprint rotation in a single endpoint.
Learn how residential proxies differ from datacenter proxies and why the distinction matters for scraping in How Residential Proxies Work guide.
Final words
Apache handles both forward and reverse proxy setups well, and the module ecosystem gives you enough flexibility for most configurations. The mental checklist before going live: modproxy_ plus the right protocol module, access control via IP or authentication, and HTTPS termination if the proxy faces the public internet. For internal routing, load balancing, or sitting in front of application servers, a self-hosted Apache reverse proxy is a solid, proven choice. For scraping, it works as a starting point, but a single-IP forward proxy has a short shelf life against any site with rate limiting or bot detection. When you hit that wall, managed residential proxies and Site Unblocker pick up where Apache stops.

Self-hosted proxy, managed IPs
Keep your Apache setup for internal routing. Let Decodo handle the part where target sites block IPs on sight. Residential rotation, anti-bot bypass, zero infrastructure to maintain.
About the author

Zilvinas Tamulis
Technical Copywriter
A technical writer with over 4 years of experience, Žilvinas blends his studies in Multimedia & Computer Design with practical expertise in creating user manuals, guides, and technical documentation. His work includes developing web projects used by hundreds daily, drawing from hands-on experience with JavaScript, PHP, and Python.
Connect with Žilvinas via LinkedIn
All information on Decodo Blog is provided on an as is basis and for informational purposes only. We make no representation and disclaim all liability with respect to your use of any information contained on Decodo Blog or any third-party websites that may belinked therein.



![desired_capabilities['proxy'] = { "httpProxy":PROXY, "ftpProxy":PROXY, "sslProxy":PROXY, "noProxy":None } with 'Se' logo](https://decodo.com/cdn-cgi/image/width=1480,quality=75,format=auto/https://images.decodo.com/proxies_for_selenium_4e066d8f0b/proxies_for_selenium_4e066d8f0b.png)