Puppeteer Form Submit: A Practical Guide to Reliable Form Automation
Submitting forms with Puppeteer goes beyond just clicking a button on the browser or typing text into an input box. Puppeteer is a Node.js library that can control a headless or headful Chromium (browser) instance through the DevTools Protocol. That means you can use Puppeteer to automatically locate form fields, fill input boxes with necessary values, trigger the action of submitting a form, and confirm whether that form submission actually worked. If you’re into web scraping, or you’re testing your own product, or even automating anything in a browser with JavaScript, you’ll inevitably run into form fields and submit buttons that you will need to get passed programmatically with Puppeteer.
Justinas Tamasevicius
Last updated: Jun 04, 2026
25 min read
TL;DR
- In this article, you will learn how to set up Puppeteer and build a reliable automated submit form workflow from scratch.
- You can trigger form submissions with Puppeteer in 3 ways; by clicking the Submit button, pressing Enter on a focused field, or by calling the form.requestSubmit() function for forms that are hidden or wired in certain frameworks.
- Always pair your submit action with a real wait condition like waitForResponse, waitForSelector, or waitForNavigation, never set a fixed timeout.
- You can use proxies with Puppeteer along with proper wait logic to reduce the amount of blocks and rate limits you run into when you’re automating form submissions.
- At the end, you will discover the necessary tools that will make your life easier when you're trying to submit forms with Puppeteer in a way that your workflow can scale. So if you're a JavaScript developer, a QA engineer, or anyone who automates browser tasks for a living, then this article is for you.
Setting up Puppeteer for form automation
Before you can automate any form submission, you need to set up a working Puppeteer project:
Prerequisites
- Node.js 18 or a newer version
- You should have npm or pnpm installed on your system
Once you confirm that you have those installed in your system, you can create a new folder and initialize the project like this:
The type="module" line will let you use modern ES6 import syntax instead of require().
Choosing between puppeteer and puppeteer-core
You can install puppeteer in 2 ways, and the right one depends on your setup.
Option 1: puppeteer
This one comes with its own matched Chromium build, so you don't have to install a separate browser to run it.
Option 2: puppeteer-core
This one doesn't bundle a browser at all. You can use it when you already have Chrome installed on your system, or you want to connect to a remote browser endpoint.
Headless mode
Once you've installed either package, pay attention to the headless option when you launch the browser. Current Puppeteer versions default to headless: "new", which runs Chromium silently in the background. Leave it like this when you're shipping to production. You can then set it to false when you're building or debugging a form script, so that you can watch the browser window and see exactly how your script is typing into fields, clicking buttons, and catching bugs.
Structuring a form script
Once you start working with multiple files, you need to structure your Puppeteer form scripts properly. Here's what a clean project structure looks like:
Here's what each file does:
- selectors.js – stores all your CSS selectors: every input, button, and confirmation element
- actions.js – stores your reusable Puppeteer fill form helpers that actually interact with form fields
- waits.js – stores all your post-submit checks and wait conditions separately
This separation pays off the day the target page redesigns its form. Instead of hunting through your whole script for a changed selector, you can simply update one constant in selectors.js and you're done.
Run a quick sanity check
Confirm Puppeteer is installed correctly with this small test script. Save it as sanity.js:
If you installed puppeteer:
Alternatively, if you installed puppeteer-core, you can point it to your local Chrome browser instead of a bundled Chromium. Here's how to do that:
Your Chrome path will differ depending on your OS. Here are the default locations. Make sure to edit this if it doesn’t fit your system setup.
- macOS — /Applications/Google Chrome.app/Contents/MacOS/Google Chrome
- Windows — C:\Program Files\Google\Chrome\Application\chrome.exe
- Linux — /usr/bin/google-chrome
Swap out the executablePath value for whichever one matches your system. Then run it:
You'll see a Chromium window open and close, and your terminal should print something like this:

Note: For the working examples in this guide, I'll be using puppeteer-core since I already have Chrome installed on my system. If you don't have Chrome installed, use puppeteer instead, it spins up its own headless browser automatically. If you're targeting a static HTML page and don't need a full browser, a lighter tool like Cheerio is a better fit. And if you're still deciding between automation frameworks before setting up your form submission workflow, check out Playwright vs Selenium.
Filling and interacting with form elements in Puppeteer
Filling inputs is usually the easy part of any form automation workflow. The hard part starts when the page uses custom components, hidden fields, async validation, or JavaScript-heavy UI libraries like Headless UI. That's why you need to understand how each input type behaves before you can automate form submission reliably.
Puppeteer gives you multiple ways to interact with form fields, but you shouldn't treat every element the same way. A text input behaves differently from a slider, a file uploader, or a custom dropdown.
Filling text inputs and textareas
For most form automation scripts, locator.fill() is the cleanest option. It sets the value directly in one step, which is exactly what you want when you only care about the value appearing in the field:
This works well for standard login forms, signup pages, contact forms, and search interfaces.
Some sites need to see real keyboard interactions before they register any change in an input field. In cases like this, use page.type() instead, it simulates actual keystroke-by-keystroke typing:
The delay option will put a short pause between each keystroke so the site will see keydown, keypress, input, and keyup events just like a real person typing. It's slower, but that's the point.
Working with checkboxes
Checkboxes need clicks, so the fill() method won’t apply here. You have to click the element and then verify the state before you submit.
Here’s a quick representation of how that works:
That extra validation step will help you avoid silent failures because a checkbox that's already ticked is supposed to get unticked by your click script, so you always have to check the checked property.
Selecting radio buttons
Radio buttons are a group, so you target the specific value you want and click it. Here’s how you can do that:
Target the value attribute directly, do not rely entirely on clicking labels unless the page uses proper for and id relationships. Clicking labels can break on websites that have a custom UI setup.
Handling native select dropdowns
For standard <select> elements, you can use the page.select()function, like this:
It also accepts multiple values for select elements with multiple options, and it returns the array of values that were actually selected. This can come in handy when you need to check if your script selection worked.
Handling Custom dropdowns (React-Select, Headless UI, Radix)
Many modern frontend frameworks don't use native <select> elements anymore. Libraries like React-Select, Radix, and Headless UI build dropdowns out of plain <div> elements, so page.select() won't work here. You need to interact with the UI the same way a real user would.
Here’s a quick representation:
Click the dropdown trigger first:
Then wait for the listbox to appear:
Then click the option you want:
This pattern works across many modern frontend frameworks that power multi-step forms and dynamic onboarding flows.
Updating range and slider inputs
Sliders rarely respond properly to typing or standard clicking. You need to update the value directly and dispatch the events manually, like this:
The input and change events matter here because most JavaScript frameworks listen for those before updating the UI. Without them, the page may never register the new value during your form submission.
Uploading files
For standard file uploads, grab the input element and call uploadFile():
Some sites hide the actual file input behind a custom upload button. In those cases, you need to set a wait for the file chooser event before the click event is triggered:
This approach works better for heavily styled upload components and enterprise dashboards. You register the file chooser listener before the click() function triggers it.
Filling date and color inputs
Native date and color pickers usually work with locator.fill(), but your format string has to match the spec. Date inputs expect the YYYY-MM-DD format. Time inputs expect HH:MM.
If you get the format wrong, the field may silently reject the value, and that will later break your form submission process.
Build helper functions for repeated actions
As your form automation scripts grow, repeating the same interaction logic everywhere becomes ineffective and difficult to maintain. It’s better to wrap those repeated actions in helper functions.
Now your main script reads like business logic rather than raw DOM manipulation:
When you write your form submission script like this and the target page redesigns its form, you can easily fix the selector in one helper function instead of hunting through every line that touches that field. This structure will help you when you start handling multi-step forms, dynamic validation, and larger puppeteer submit form workflows.
If you want to understand selectors better before scaling your scripts further, check out Decodo's guide on XPath vs CSS selectors.
Submitting Forms Programmatically with Puppeteer
Once you finish filling the form fields, the next step is to trigger the actual puppeteer submit form action. Your script needs to be able to handle buttons that stay disabled until validation passes, forms with no visible button at all, and forms built with Headless UI components that don't expose a native submit button.
Here are 4 ways to trigger a form submission and when you'd reach for each one:
Method 1: Click the submit button
This is still the most common way to submit forms with Puppeteer. You locate the submit button, click it, and wait for the next state. The wait condition has to be attached before the click fires, if not, Puppeteer will miss the navigation event or response entirely.
Wrap the click and the wait condition in Promise.all so both can register at the same time:
Your wait condition depends on what the form does. Use the waitForNavigation function when the submit triggers a full page load, use waitForResponse when it fires an XHR, or waitForSelector when a success message appears on the same page. The point is you should never let the click action run untethered from a wait.
Method 2: Press Enter on the focused field
Some websites never expect users to click a visible submit button. Search bars are a good example, you type the query, press Enter, and the form submits. In cases like this, it’s better to trigger the keyboard event.
This helps when the target site has a form button that doesn’t necessarily do anything.
Method 3: Use form.requestSubmit()
Some forms hide their submit button, disable it until client-side validation passes, or wire the whole thing up through a framework that expects a real submit event. In those cases, you call the form's own submit handler directly:
requestSubmit() will trigger the form's submit handler exactly the way a real browser click would, it will run validation and fire the submit event. This is different from the older form.submit() approach, which skips both validation and the submit event entirely. When you need the form to behave like a genuine submission, requestSubmit() is the one to reach for.
Method 4: Submit through a custom JavaScript handler
Some single-page applications never fire a native form submission event at all. React, Vue, and Headless UI components all do this. Instead, they listen for an onClick event on a custom element like this:
When that happens, your only option is to click the actual element the framework is listening to, usually a div with role="button" rather than a real button, and then wait for the resulting network request:
The waitForResponse predicate matches the API endpoint, so your script knows the submission actually went through, regardless of whether the page navigates. This is the best pattern to use on modern forms that render dynamically with JavaScript.
Handling multi-step forms
Multi-step forms are several form submissions stacked together. Each step is its own isolated submit action. If you skip a wait condition once, the next selectors will fail because the next screen hasn't been rendered yet.
To handle these types of forms, you have to separate each step into its own function and wait for the next step's root element before you continue.
Here’s what I mean:
Confirm that each step actually appeared before you move on. That will save your multi-step form automation from breaking in ways that are painful to debug.
Note: You'll see both page.click() and page.locator().click() in older tutorials. Here's the difference: the Locator API auto-waits for the element to be visible, enabled, and stable before it acts. page.click() does none of that, it fires immediately, which is exactly how you get "node is not visible" errors on elements that haven't finished rendering. For any production Puppeteer submit form script, it’s better to use the locator path. It does the waiting for you and will remove a whole category of race conditions you'd otherwise have to handle by hand.
Waiting for and validating the Puppeteer submit form result
Most websites these days don’t always reload after form submission. Some forms send an XHR request in the background, some update the UI without navigation, and some show inline validation errors while still returning a 200 response. If you only rely on page.waitForNavigation(), your form automation script will eventually break. You need to wait for the right condition based on how the target website behaves.
So let's walk through the 4 wait strategies and when each one is the right pick for your target.
waitForNavigation(): for full page reloads
Use waitForNavigation only when the form submission triggers a full page load. This applies to classic login forms or checkout pages that post and redirect.
The waitUntil option really matters here, so pick it deliberately:
- "domcontentloaded" is usually the best default for puppeteer form submit workflows
- "networkidle0" can become unreliable on pages with analytics scripts or long-polling requests
- "networkidle2" is often the safer middle ground for busy pages
The click and the wait are wrapped in Promise.all so the navigation listener registers before the click fires. If you skip that, you'll sometimes miss the navigation event entirely.
waitForResponse: for SPA form submissions
When the form submits through a JavaScript framework and the page never reloads, waitForNavigation will just sit there until it times out. This is where waitForResponse comes in handy. You pass it a predicate that matches the API endpoint and the status code you expect, like this:
This resolves the moment the backend acknowledges the submission — whether or not the page navigates. It's the right pick for any modern form wired through React, Vue, or a similar framework.
Always register a page.on("response") listener before the click and log every response with its status code. When your data doesn't show up where you expect it, that log will surface the real submission URL.
waitForSelector() when success appears in the UI
Some websites never redirect after a successful puppeteer form submit. They simply render a success message like “Form submitted successfully” or “Thank you for your submission.” In such cases, you can wait for that success element to show up like this:
You should also check for visible error states:
This matters for multi-step forms where one invalid field can silently block the next screen from loading. Without this check, your script may keep running against the wrong page state without you knowing.
waitForFunction: for derived page state
Some websites signal success through JavaScript state instead of visible DOM changes. You’ll see this in dashboards, internal admin panels, and heavily interactive frontend apps. waitForFunction lets you wait on any condition you can express in JavaScript:
This is the catch-all for cases where none of the other 3 strategies match how the page reports success.
Validating the actual response after form submission
A successful HTTP response doesn’t always mean your form automation worked. Some forms return 200 OK while still rendering validation errors inside the page. Always verify the result you get.
Here’s how you can validate the confirmation text directly:
You can also validate URL parameters after redirects like this:
This extra validation step will help you catch form submissions that failed early before they affect the rest of your automation flow.
Avoid page.waitForTimeout()
The biggest anti-pattern in puppeteer form submission scripts is leaning on a fixed pause like page.waitForTimeout(3000) and hoping the form finishes in time because it works fine on your system while you're testing. The problems start the moment you push to production, a fixed timer will hide race conditions during development, then break under real network conditions. 3 seconds might be plenty on a fast connection and nowhere near enough on a slow one.
That’s why you should endeavour to set real wait conditions and always wait for something that actually tells you the form went through, whether that's a navigation, a response from the server, a success element showing up, or a state change on the page. Never wait on a stopwatch.
If your target is a single-page app with async-rendered confirmations, our guide on how to scrape websites with dynamic content digs deeper into handling content that loads after the initial response.
Handling advanced input types: iframes, shadow DOM, and date pickers
Some websites and form types get more complicated than the usual process of typing in values, clicking the submit button, and waiting for a response. These sites place their forms inside iframes, wrap their inputs in shadow DOM elements, and swap out native inputs for custom UI components. Your normal Puppeteer submit form workflow will not work on a website like this, so you need different strategies to automate the form submission. Here's how you handle these edge cases
Working with forms inside iframes
Puppeteer doesn't automatically interact with elements inside iframes. The iframe runs its own document, so any selector you pass to the page object will never find an element living inside that frame. You need to get access to the frame itself first.
Start by waiting for the iframe to load:
Then grab the frame handle:
You can also locate the frame dynamically from its URL like this:
Once you have the frame, every fill, click, and submit action has to go through frame.locator() instead of page.locator():
Here's a full working example using the W3Schools iframe form demo:
Save the file as iframe-form.js and run it in your terminal using the following command:
Puppeteer will open the W3Schools iframe form demo, switch into the iframe, fill both fields, and trigger the submit form action.
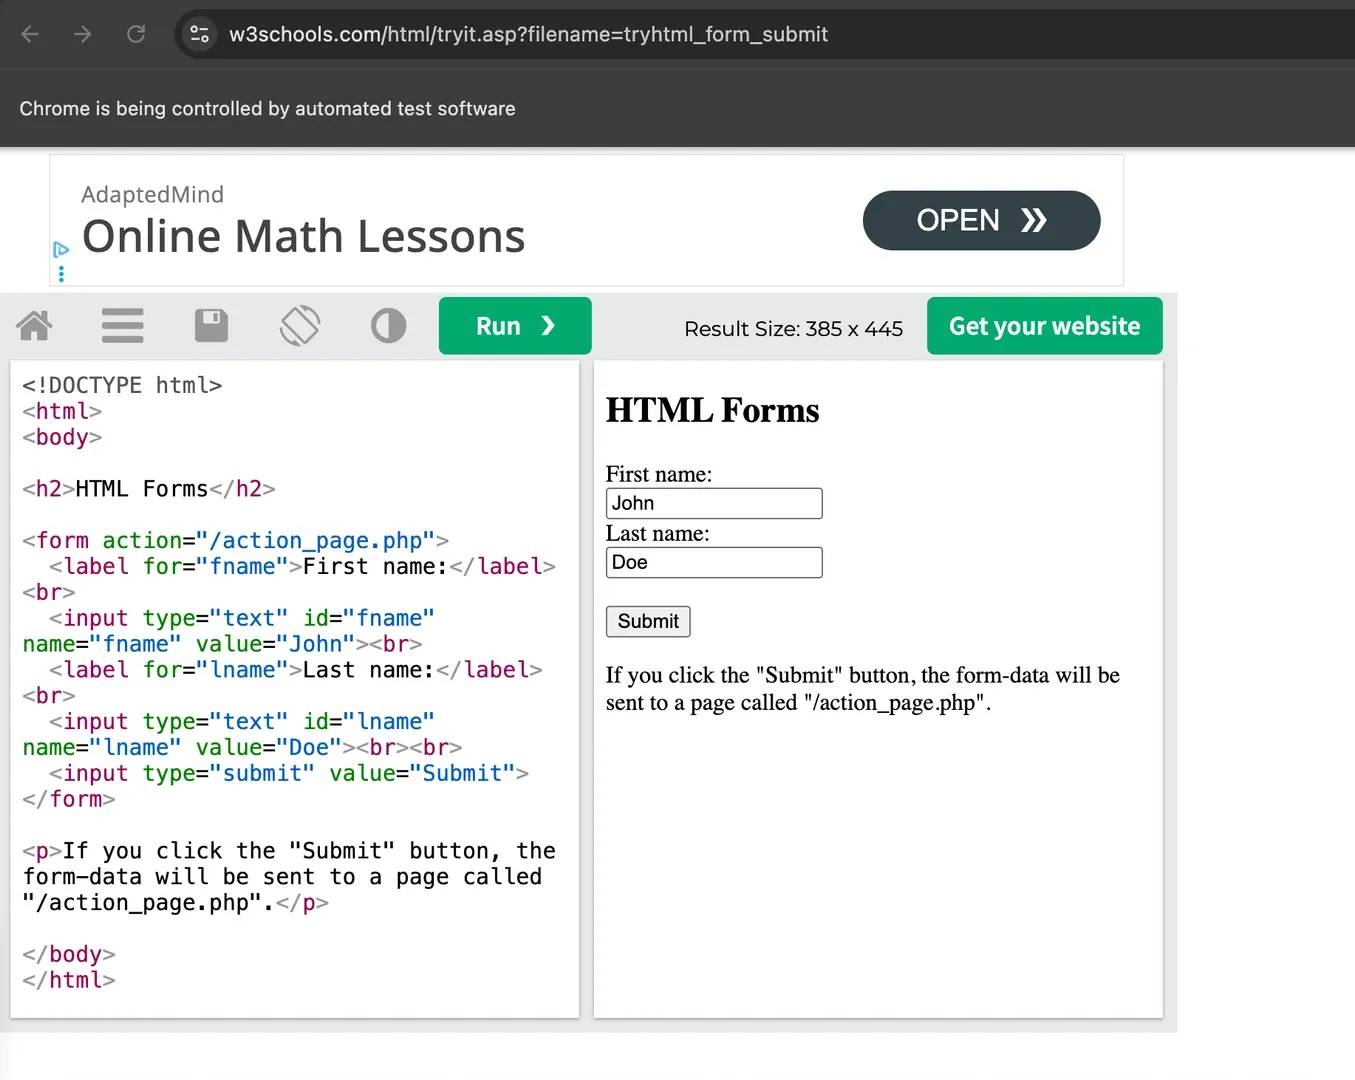
You should see a confirmation URL printed in your terminal like this:
![Terminal: [Running] node "/Users/mac/Desktop/puppeteer-forms/iframe-form.js" and https://www.w3schools.com/action_page.php?fname=Onome&lname=Developer](https://decodo.com/cdn-cgi/image/width=1480,quality=70,format=auto/https://images.decodo.com/puppeteer_submit_form_3_png_84097edd56/puppeteer_submit_form_3_png_84097edd56.webp)
Open that URL and you'll see the confirmation message that the form was submitted successfully.

You need to understand how to work with forms in iframes like payment forms, embedded support widgets, and multi-step forms that load external content from another service. If you skip the frame handling step, Puppeteer will keep throwing selector errors even though the input clearly exists in the browser.
Working with native and custom date pickers
Native date inputs are easy to automate with Puppeteer because any browser will accept the fill() function as long as your string matches the format the spec expects (YYYY-MM-DD):
Custom calendar widgets are a different story entirely. Libraries like Flatpickr, react-datepicker, and MUI DatePicker render their own calendar grid, so you can't just type a date in. In cases like this, you have to interact with the calendar itself.
Start by opening the custom calendar like this:
Then Wait for the calendar grid to render:
Then click the correct date cell by its aria-label or data-date attribute:
Try to avoid keyboard navigation inside calendar grids as much as possible. Different date picker libraries handle focus and arrow keys differently, so that makes those scripts(with keyboard navigation) brittle over time. Stick to clicking the cell directly.
Here's a full working example using the Flatpickr examples page:
The above script opens the Flatpickr demo page, triggers the calendar, then clicks the first valid day cell from the current month using its aria-label just like a real user would. The screenshot runs immediately after the click so you can clearly see the selected date highlighted inside the calendar grid.
Here it is:
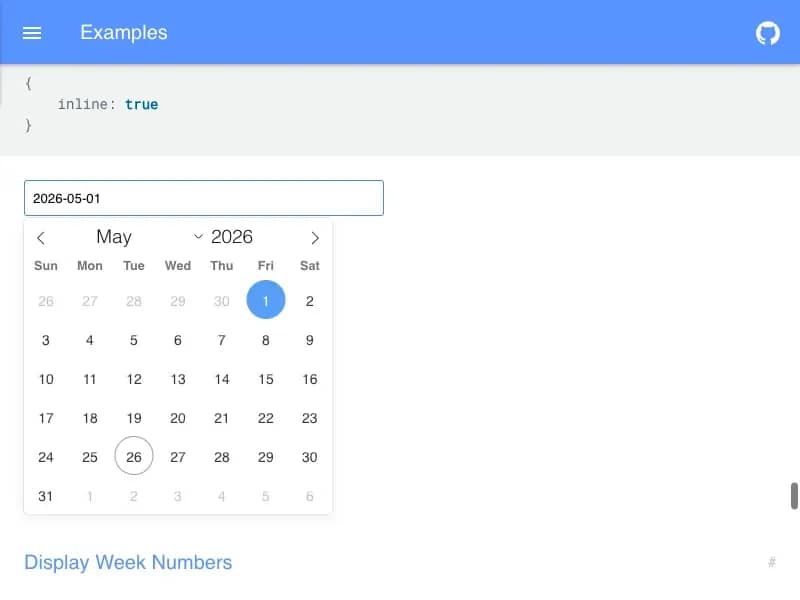
You should also see this in your terminal:
![Terminal output: [Running] node "/Users/mac/Desktop/puppeteer-forms/date-picker.js" Clicking date: May 1, 2026 Selected date: Screenshot saved to: date-picker-result.png](https://decodo.com/cdn-cgi/image/width=1480,quality=70,format=auto/https://images.decodo.com/puppeteer_submit_form_6_png_0b47d063f1/puppeteer_submit_form_6_png_0b47d063f1.webp)
Handling drag-and-drop file uploads
Drag-and-drop dropzones are tricky because the dropzone listens for the drop event, not for a file input. There are 2 approaches that work, and the one you pick depends on how the dropzone was built.
For standard file uploads, target the file input directly:
Other dropzones wrap their hidden file input inside a styled upload button. In such cases, you have to use the page.waitForFileChooser() method:
Some drag-and-drop systems don't expose a file input at all, they listen directly for drop events. For those, you need to dispatch a synthetic DataTransfer drop event through page.evaluate() to simulate the drop directly.
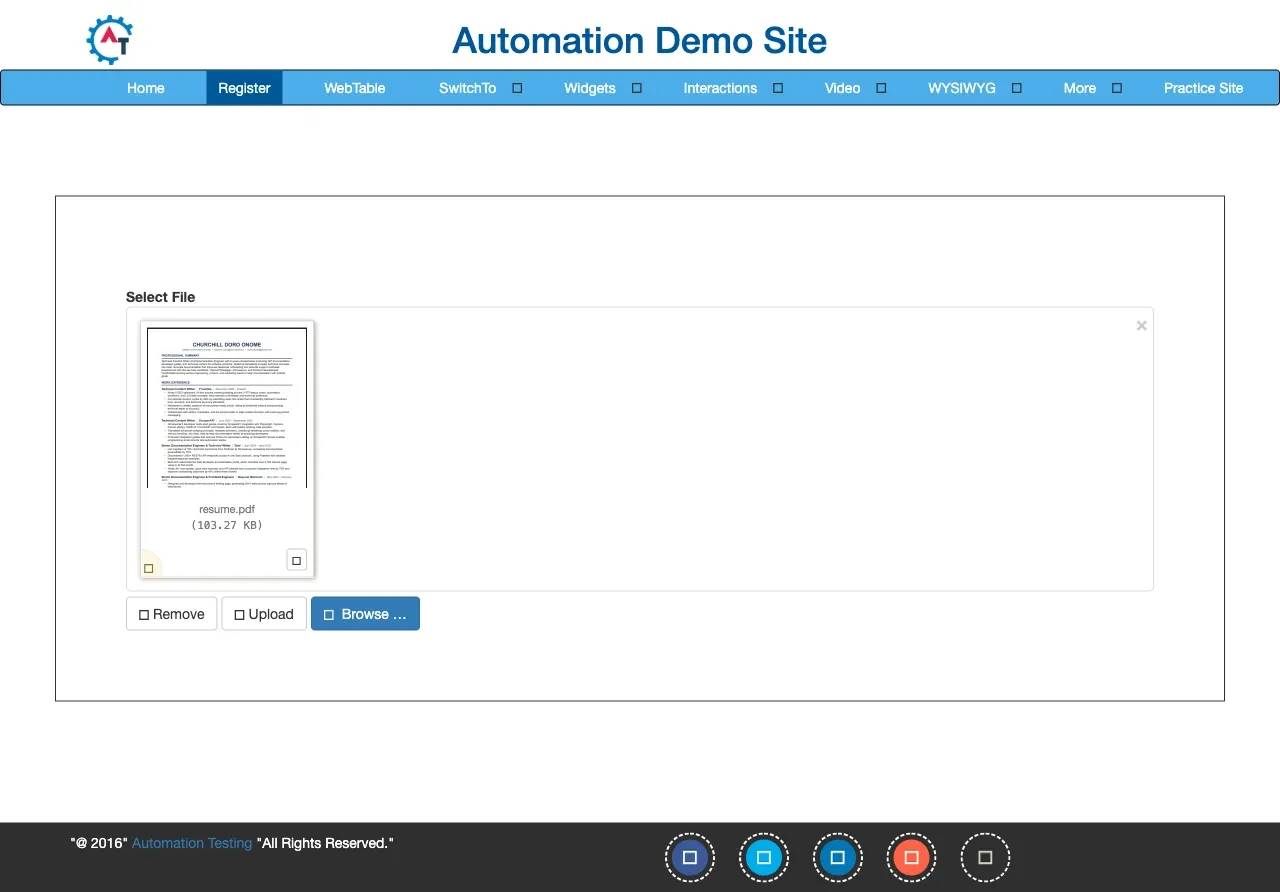
Here's a full working example using the Automation Testing demo site. First, save a file called resume.pdf in your project folder, that's the file the script will upload.
The script above targets the file input directly and uses uploadFile() to attach the file without opening the OS upload window. The short pause gives Chromium enough time to register the upload before the screenshot captures the selected filename.
Here’s the screenshot the script took:
You should also see this in your terminal:
![Terminal showing '[Running] node "/Users/mac/Desktop/puppeteer-forms/file-upload.js"' and lines 'File attached: resume.pdf' 'Screenshot saved to: file-upload-result.png'](https://decodo.com/cdn-cgi/image/width=1480,quality=70,format=auto/https://images.decodo.com/puppeteer_submit_form_8_png_e78af11632/puppeteer_submit_form_8_png_e78af11632.webp)
One thing you need to know is the uploadFile() function does not validate that the file path actually exists. If you make a mistake with the path, your script will fail silently and el.files[0] will come back undefined. Double-check your path if the terminal prints No file selected instead of the filename.
Handling forms inside shadow DOM
Many modern frontend frameworks use shadow DOM to isolate components from the rest of the page and they used to be so difficult to reach. Now you can use Puppeteer to access these shadow roots automatically with the >>> deep selector to reach an input sitting inside a custom element.
The >>> selector tells Puppeteer to cross the shadow boundary and reach the nested input element. There's one limitation here though: closed shadow roots are not accessible. Puppeteer can't pierce them because the browser itself blocks external access, and there's no stable workaround from inside a normal Puppeteer form submit workflow. So if a site uses closed shadow DOM for critical form fields, your only reliable option is to interact directly with the elements on the UI because automation will most likely not work here.
Typing into content-editable fields(rich text editors)
Rich text editors like Slate, ProseMirror, and TipTap are not regular inputs. They render their own DOM and manage their own state, so that fill() method will not work here because these editors reject straight value assignment.
Instead, you can click to focus the editor, then type into it with the keyboard API, like this:
For multi-paragraph content, send an Enter keypress between paragraphs. The editor will handle the rest the same way it would for a person typing.
This produces much more reliable form submission behavior because the editor will receive the same keyboard events as a real user.
Handling auto-save forms(no explicit submit)
Some forms have no submit button at all, they save each field as you change it. There's nothing to click, so instead of submitting, you wait for the network request that fires after each field edit. This is common in dashboards, admin panels, and collaborative editors.
In cases like this, you have to use the same waitForResponse pattern from the previous section to confirm your form inputs:
This way you know each edit was saved before your script continues, instead of assuming it worked and finding out later that half your changes never made it through.
If you want to go deeper into selector strategy for any of these cases, especially deciding whether to target attribute, role, or text, then check out our guide on XPath vs. CSS selectors.
Bypassing anti-bot measures and CAPTCHAs during Puppeteer submit form workflows
Once you start automating form submissions at scale and you start targeting real world websites, you'll definitely run into antibot systems because these websites have put them in place for security and business reasons. These security protocols always check the traffic and the requests that come into the website and try to ascertain whether it’s from a real browser or a bot trying to spam or scam.
They inspect your browser fingerprint, interaction patterns, network behavior, and session consistency before they even process your form submission. You can find yourself in a situation where your script fills every input correctly, clicks the submit button, and still gets blocked before the request reaches the backend.
Anti-bot systems like Cloudflare Turnstile, DataDome, PerimeterX/HUMAN, and Akamai Bot Manager inspect much more than visible browser actions. They check the following:
- TLS and JA3 fingerprints,
- navigator.webdriver,
- installed plugins,
- language settings,
- deviceMemory,
- WebGL rendering,
- canvas fingerprints,
- mouse movement behavior,
- and even the order of DOM events during your form automation process.
Most default Puppeteer setups will fail several of these checks and your form submission script will get blocked immediately. So, here are some of the ways you can side-step some of these antibot systems and reduce the amount of blocks you get on your scripts.
Start with stealth plugins – but don't rely on them completely
You can start with puppeteer-extra and puppeteer-extra-plugin-stealth. This is usually the first layer for reducing detection when you’re automating form submissions with Puppeteer:
The stealth plugin patches several browser properties that anti-bot systems inspect frequently. It modifies values tied to automation signals like navigator.webdriver, browser plugins, languages, and some APIs that work on Chrome. The Stealth plugin helps, but it is not invisible. Cloudflare and DataDome can still detect the stealth-plugin patterns themselves. You should treat stealth plugins as a baseline improvement, not a guaranteed bypass layer.
Apply human-like interaction patterns
Behavioral analysis is another major signal these anti-bot systems watch for. Some systems track how you type, how you move the cursor, and how you interact with form fields. Fast robotic actions stand out and get flagged immediately. That’s why you need to slow things down slightly and make your interactions look closer to real user behavior:
A few other things that help:
- Randomise your typing delays into a realistic range of 60-180 ms per keystroke.
- Move the mouse to an input field area before clicking and filing it.
- Add short pauses between filling form fields
These small changes will help with behavioral checks when you’re automating form submissions. They do not solve fingerprint-based detection, but they reduce obvious automation patterns.
Use realistic headers and viewport settings
A mismatched browser fingerprint is another common problem. If your Chromium version is Chrome 124 but your User-Agent reports Chrome 109, anti-bot systems will catch that mismatch and block your form submission instantly. The same goes for unrealistic viewport sizes. Set your User-Agent to match your actual Chromium version and your viewport to a real desktop resolution:
Using residential proxies to reduce IP blocking
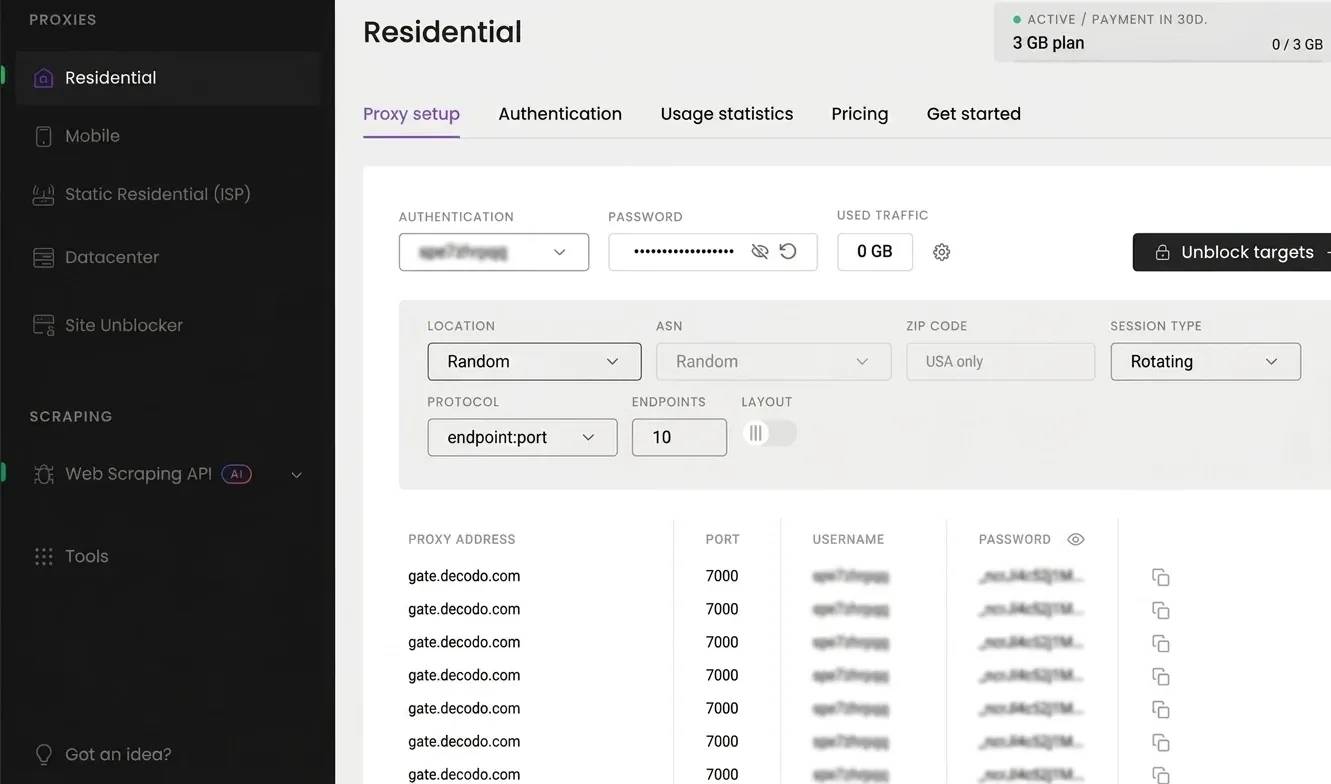
IP reputation is another thing these antibot systems check regularly. If your puppeteer submit form script sends repeated requests from a single datacenter IP, that IP will get rate-limited and eventually blocked. Routing your requests through residential proxies makes your traffic look like it's coming from real households instead.
Decodo residential proxies are a solid option here, you get the choice between sticky sessions for multi-step flows and rotating sessions for one-off requests. Head to the Decodo dashboard, create an account, and pick a plan that fits your needs. You'll find your credentials and gateway address right there.
Enhance your web scraper with proxies
Claim your 3-day free trial of residential proxies and explore 115M+ ethically-sourced IPs, advanced geo-targeting options, a 99.92% success rate, and more.
Here's how to use proxies with your Puppeteer form submission workflow:
Save it as test-proxy.js, replace the placeholder credentials with your actual Decodo username and password, then run it:
You should see something like this in your terminal:
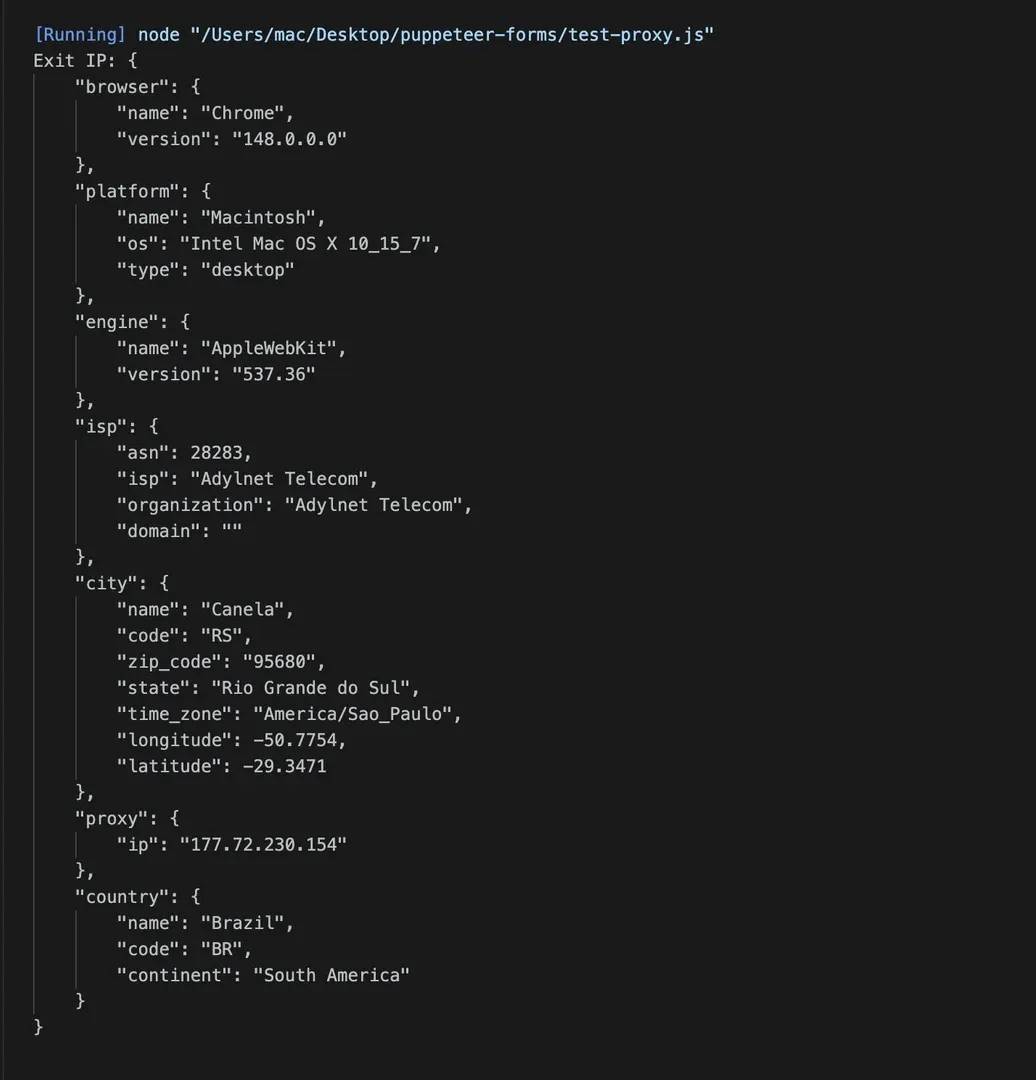
That JSON response confirms the proxy is routing your traffic correctly. The IP should be different from your real system’s IP.
The --proxy-server flag takes just the host:port (no http:// prefix and no credentials in the URL). Pass your credentials through page.authenticate() instead. For multi-step forms and login flows, use a sticky session so the same IP will carry you through the entire submit form action. For single-step submissions where session continuity doesn't matter, rotating sessions on port 7000 work fine. If rotation strategy is new to you, our guide on rotating proxies breaks down when to use each approach.
When stealth and proxies aren't enough
If you've added stealth plugins, rotated residential proxies, and your Puppeteer script is still getting blocked, the target is likely doing aggressive fingerprinting, serving CAPTCHAs, or blocking headless browser traffic entirely before your form automation even gets a chance to run. At that point, you can't fill a form you can't load.
This is where Decodo's Web Scraping API becomes useful in your workflow. When a site's anti-bot stack is blocking Puppeteer from loading the page at all, the API can fetch and render that same page for you, effectively bypassing the fingerprinting, rotating proxies, and solving CAPTCHAs automatically. You can then use the rendered HTML it returns to inspect the form structure, confirm your selectors work, and understand exactly what you're dealing with before you build your Puppeteer interaction script around it.
Skip the boilerplate
Decodo's Web Scraping API handles proxies, CAPTCHAs, and anti-bot detection so your code stays short and your requests actually land.
Here's what that looks like:
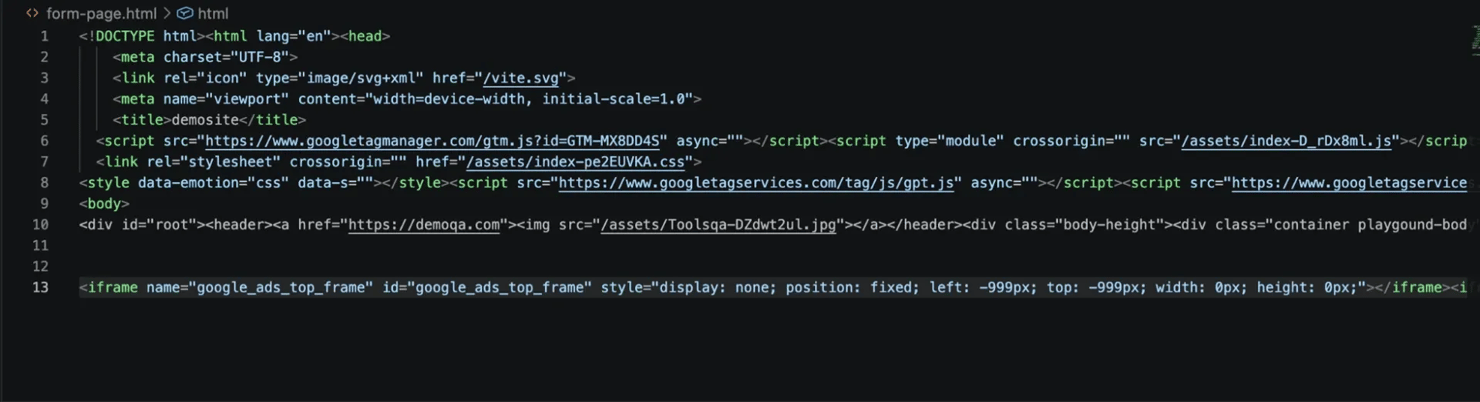
Replace YOUR_API_TOKEN with the token from your Decodo dashboard, you'll find it under the API Playground tab after logging in. Then run it:
You'll see this in your terminal:
![Terminal showing: [Running] node "/Users/mac/Desktop/puppeteer-forms/test-api.js" Status: 200 Full HTML saved to form-page.html [Done] exited with code=0 in 14.819 seconds](https://decodo.com/cdn-cgi/image/width=1480,quality=70,format=auto/https://images.decodo.com/puppeteer_submit_form_11_png_efa6764820/puppeteer_submit_form_11_png_efa6764820.webp)
Open form-page.html in VS Code or your browser and you'll see the fully rendered form page with all the field selectors visible. You can then go back into Puppeteer and write your form automation script with confidence.
For teams who want to stay in Puppeteer but keep hitting IP-level blocks, Decodo residential proxies give you rotating residential IPs without you having to touch any of your browser or form interaction logic. Decodo's Site Unblocker can also help with unblocking and proxy rotation transparently while you handle the Puppeteer code.
If you want to go deeper on the CAPTCHA side specifically, our tutorial on bypassing CAPTCHA with Puppeteer. For the wider picture, the guide on navigating anti-bot systems surveys the full landscape, and antiscraping techniques and how to outsmart them covers the strategic side of detection versus evasion.
Best practices for a reliable Puppeteer submit form script
Puppeteer form submission scripts fail for a few common reasons – weak selectors, missing wait conditions, or session handling that doesn't match what the target site actually needs. These habits will make your scripts more reliable from the start.
1. Use stable selectors
Selectors are one of the biggest failure points in Puppeteer form automation. A selector that worked today might not work tomorrow because the frontend team may have shipped a CSS refactor and your entire submit form action doesn't work anymore.
When choosing selectors to use to target a form element, you choose based on the following order:
- data-testid
- id
- name
- a semantic role with an accessible name like page.locator('role=button[name="Submit"]')
Stay away from nth-child and long class chains generated by frameworks like React, Tailwind, or Headless UI because they will break your script the moment anything changes in deployment.
Here’s an example of a bad selector:
Here’s a good selector:
2. Keep all your selectors in one file
As I mentioned earlier, when your form submission scripts start getting larger and larger and you need to scale, then it’ll be better for you to save all your selectors in one file so that even if there is a change to the UI from your target website’s end, you can easily adjust the necessary selectors in one file without you having to do that all across your entire codebase.
This one habit will save you hours the first time your target page changes its UI.
3. Always pair an action with a wait
One of the main things that can make your Puppeteer form submission script fail is a lack of wait conditions. Every click, fill, or navigation action needs a wait condition to go with it:
- Click goes with waitForResponse.
- A fill that triggers validation goes with waitForFunction that checks the value landed.
- A navigation goes with waitForSelector on the next page's root element.
Untethered actions will always cause your Puppeteer form submission workflows to fail.
4. Set realistic timeouts at the page level
If your script pauses for 30 seconds (default timeouts) before failing, that can make debugging slower and more frustrating. That’s why you have to set explicit timeouts like this instead.
Something like this will give you feedback much faster when your form submission hangs, an API request stalls, or a selector never appears.
5. Manage browser sessions deliberately
You need to handle sessions effectively if your Puppeteer form submission script is going to be successful. If you are submitting forms in batches, it’ll be better to reuse the same browser context so that the cookies and authenticated session can be preserved and you can use it for as long as you can.
When sessions need to stay isolated, you can use a fresh incognito context instead. This is useful when you’re testing multiple accounts or preventing session overlap during Puppeteer fill form workflows.
You should also close pages and contexts properly like this:
If you skip this, you'll leak browser processes that will pile up and eventually choke your system.
6. Save cookies and localStorage between runs
Re-logging into the same platform before every Puppeteer form submission will only waste your time and increase your chances of getting detected by these antibot systems. Instead of logging in every time, it’s better you set up a persisting authentication state and try to save cookies before you close the browser, like this:
Then restore them during the next run, like this:
You can also persist localStorage values for applications that rely heavily on client-side authentication. This will help reduce the amount of times your script has to log into a website each time you want to automate form submissions on that site.
7. Block the resources you don't need
A typical Puppeteer submit form workflow usually doesn’t need images, fonts or videos. Loading unnecessary assets will only slow down your script’s execution and increase the chances of that script being noticed, rate limited, and eventually blocked.
You can block those requests with request interception like this:
8. Log every important interaction with timestamps
If you always log your process when automating form submissions with Puppeteer, you can easily debug when you start encountering issues in the CI overtime. It’s through the logs that you will know whether the cause of your script breaking was a changed selector, a slow response, or a flat network failure. Without those timestamped logs, you’ll be debugging blind and wasting time.
9. Capture screenshots and HTML when failures happen
Always try to capture the age state immediately anytime your Puppeteer form submit script fails.
Here’s how to take a screenshot in your script:
Then save the HTML like this:
A screenshot plus the saved markup will show you exactly what the page looked like the instant things went wrong. This will save you time and energy when you need to debug.
10. Use headless: "new" in production
Debugging in headless: false is fine, you can watch the form automation happen in real time. But when you're shipping to production, always switch to headless: "new". Modern Puppeteer versions already use it by default.
One thing worth checking before you deploy: some sites render different markup or trigger different anti-bot checks when they detect headless Chromium. A script that works perfectly in headed mode can fail the moment you ship it. Always re-run your form submission in headless mode before deploying to confirm it still passes.
Integrating Puppeteer submit form scripts with testing frameworks and CI/CD
There are times when you want to automate your form submission process without having to run the script manually every time. Once your Puppeteer form submit workflow reaches this stage, it's always better to set up a real test structure that validates each run so your script doesn't quietly submit the wrong data or fail without you ever knowing.
When you set up a proper test structure, you make your life easier. Debugging will become simpler because you can now track problem areas effectively, and also get access to retries, assertions, scoped reports, and isolated test runs. A form automation script on its own will get the job done, but it won’t tell you anything useful when it breaks if you don’t set up a proper test structure.
You can use a testing framework to set up this structure so when your puppeteer submit form flow breaks, you know straight away whether the submit button selector changed, the response came back slow, or the backend rejected your payload.
Using jest-puppeteer for form automation
jest-puppeteer is the easiest way to set up a testing framework for your form automation workflow.
Install these 3 packages to get started:
Then create a jest-puppeteer.config.js file to control how the browser launches:
Point Jest at the preset in your jest.config.js:
Now you get the global page and browser objects inside your describe blocks without any extra boilerplate.
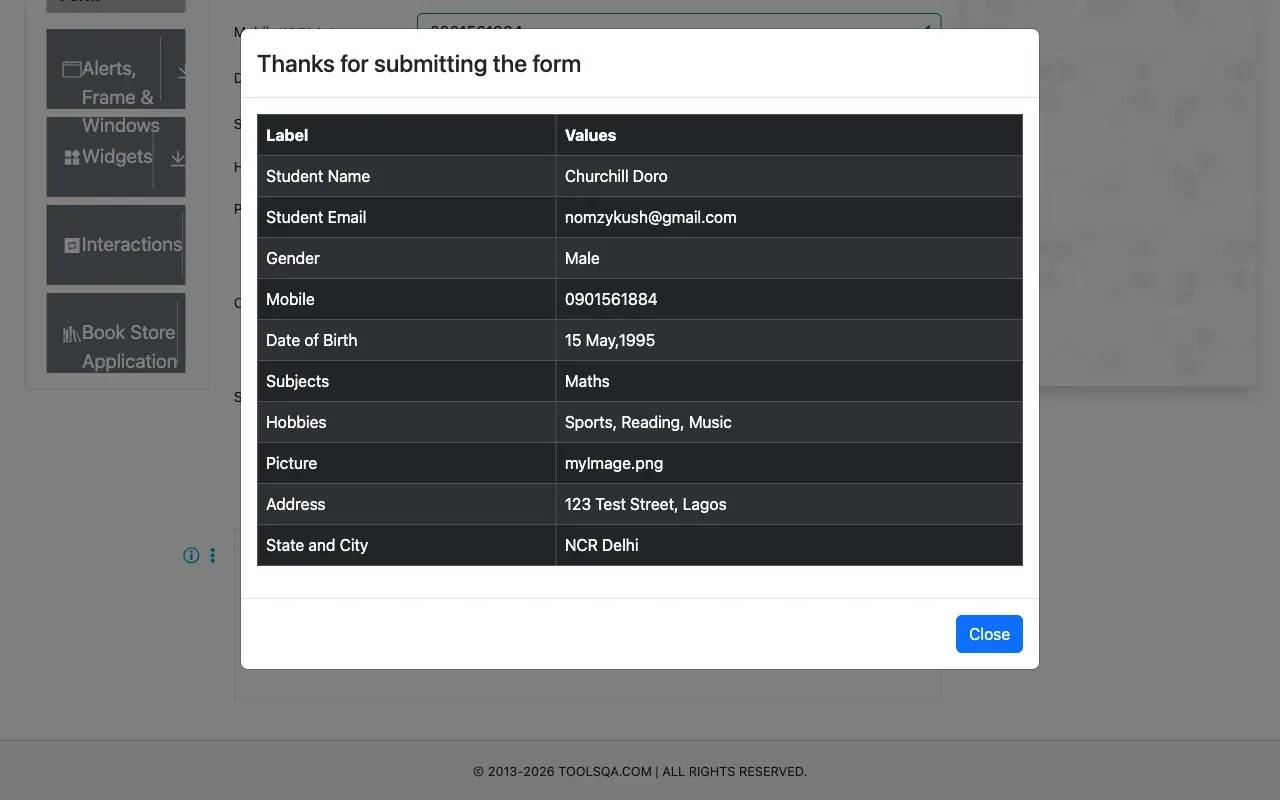
Here's a full form submission test using the DemoQA practice form, a real student registration form with name, email, phone, gender, and a submit button. You can save the following test code in a file named form.test.js:
This test opens the DemoQA student registration form, fills every field, name, email, phone, gender, date of birth, subjects, hobbies, file upload, address, state, and city, takes a full page screenshot of the completed form, then clicks submit and asserts that the confirmation modal appears with the expected text.
Run the test with the following command:
Here’s the screenshot the script took:

The test script also clicked the Submit button and took a screenshot of that too:
You should also see this in your terminal if your script passes the test successfully:

Structure every form test as Arrange / Act / Assert
This pattern will make your tests readable as your form submission script grows. Split each test into 3 clear phases:
- Arrange – navigate to the page and reset any leftover state from a previous run.
- Act – run the actual fill and submit sequence. This is your puppeteer fill form and submit logic.
- Assert – check the result. That could be a success element appearing, a 200 response status, or a new row in your database.
Here’s what I mean:
When you read the test back months later, those 3 blocks will tell you the whole story without you having to trace the logic line by line.
Using Mocha or Vitest with Puppeteer
If your codebase already runs on Mocha, you don't need to pull in Jest just for form tests. Mocha will work fine. The only thing you need to change on the Puppeteer side of things is to launch and close the browser in the right hooks, like this:
Vitest also works well for lighter Node.js setups, especially if your frontend stack already uses Vite. The actual Puppeteer submit form logic will stay mostly the same across all 3 frameworks.
Running Puppeteer form tests in CI/CD
A form script that works perfectly on your laptop can fail inside GitHub Actions because the runner is slower, the browser behaves differently, or your waits aren't solid enough. Here's what you need to get right before you push your puppeteer form and submit tests to a CI pipeline.
Run headless mode correctly
Most CI runners don't have a display server, so a headless browser won't launch at all. You have to use headless: "new" in your launch config. If you need to debug a CI-only failure visually, wire up Xvfb to fake a display or connect to a remote browser endpoint instead.
Cache Chromium in CI
Every Puppeteer install pulls in a browser binary of roughly 150MB. If you don't cache it between runs, your pipeline wastes 30 to 60 seconds downloading it every single time. Add a cache step for the Puppeteer browser path in your CI config and you cut that overhead immediately.
Pin your Puppeteer and Node versions
A form script that runs clean on Puppeteer 22 can silently break on Puppeteer 24 because APIs change between versions, page.waitForTimeout was removed in newer releases, for example, and you now have to use waitForFunction instead. Pin both Node.js and Puppeteer versions in your package.json so your CI environment stays predictable.
Isolate your test data
Every form submission test should write to a unique record. The simplest way to do this is to drop a timestamp or a run ID into the email field. Something like this:
This way, parallel test runs won't collide on the backend because every submission comes with its own unique identifier.
Quarantine flaky tests instead of deleting them
If a test fails intermittently, don't remove it, tag it with @flaky, and move it to a separate non-blocking CI job instead. Then go back and fix the root cause. That keeps your main puppeteer from the submit pipeline stable without losing test coverage.
Note: Puppeteer is a great fit when Chromium coverage is enough. But if you need to run your form submission tests across Firefox and WebKit too, Playwright is the better tool for that. Check out this Playwright vs Selenium comparison if you're weighing your options.
Troubleshooting Puppeteer submit form issues
Every puppeteer form submit script must break at some point because selectors do change over time, page navigations also change, or your CI setup exposes a vulnerability, and your form script just stops at a point.
Here are some debugging tips that will help you solve certain errors that you might run into when automating form submissions with Puppeteer.
1. "Error: No element found for selector"
This error means the element isn't in the DOM yet, or your selector is wrong. You'll see it when a form field renders after a delay, or when a selector you copied from DevTools no longer matches the page.
To diagnose it, dump the raw HTML right before the failing line:
That tells you whether the element exists at all at that point in the script.
To fix it, add an explicit wait before you interact with the element:
Or switch to the Locator API, it auto-waits for the element to be present and visible before acting, which removes this error for most form fields:
2. “Node is either not visible or not an HTMLElement”
This one means the element exists in the DOM but isn't visible yet. You'll mostly run into it when you’re working on modal forms that the form mounts in the background on page load, hidden with display: none or opacity: 0, until the modal opens.
To fix this, you need to wait explicitly for the visible state before interacting, like this:
If the element is off-screen rather than hidden, scroll it into view first, like this:
This issue comes up often in Puppeteer fill form workflows, where long forms render content progressively as you scroll.
3. "Execution context was destroyed, most likely because of a navigation"
This happens when the page navigates immediately after a submit form action. Your script clicks the submit button, the page redirects instantly, and Puppeteer destroys the current execution context before the next line runs.
To fix this, you should always pair navigation-triggering actions with their wait conditions to avoid this race during form submission:
This applies to any puppeteer form submit action that triggers a full page load.
4. "Navigation timeout of 30000 ms exceeded"
This doesn't always mean the site is slow. A few things can cause this — an analytics script keeping the network busy so networkidle0 never triggers, or the form submission is returning JSON instead of redirecting, or a real network failure.
To fix this, switch from networkidle0 to domcontentloaded, it's faster and doesn't hang on background requests:
If your form submission sends an XHR instead of redirecting, which is common in single-page apps, drop waitForNavigation entirely and use waitForResponse instead:
To catch actual network failures, add a listener before you submit the action:
5. Form submits, but data doesn't appear
This issue is frustrating because the Puppeteer submit form workflow looks successful even though nothing shows up on the confirmation screen or in your database.
It usually means one of 3 things:
- The frontend validation fails silently
- The form hit a different endpoint than you expected
- The script moves too fast past the response
You can log all network responses before the submit form action:
This will show you the real submission URL right away. Once you know the actual endpoint, write a proper waitForResponse condition against it. This comes up a lot with React apps and headless UI form automation workflows where JavaScript intercepts the native form submission.
6. Script works headed but fails headless
Some sites check for headless indicators and serve a different version of the page. Others render slightly differently because a missing font or animation shifts the layout enough to break your selectors.
To fix this, you need to first check which headless mode you're running. If you're still on headless: "shell", switch to headless: "new":
You should also set a realistic User-Agent that matches your Chromium version:
And make sure your headless viewport matches what you used in headed mode:
7. Intermittent failures only in CI
If your form automation script only fails in GitHub Actions or CI pipelines, you probably have race conditions. CI environments usually run slower than local development machines so you will typically run into timing issues that pass locally.
To fix this, you have to go through your form automation script and replace every waitForTimeout(N) with a real wait condition:
Give slower machines more headroom with higher default timeouts:
You can also reproduce the failure locally by running your tests in a loop with --runInBand to serialize execution and expose the race condition.
8. Debugging tools that will help you
When the error message alone isn't enough, these will get you to the root cause of a problem fast.
Launch with visual debugging on:
This slows interactions down enough for you to see exactly where the workflow breaks.
You can also surface browser console logs directly inside your terminal like this:
You can also take a full-page screenshot and save the HTML on failure like this:
This exposes frontend validation errors, failed requests, and JavaScript exceptions affecting the submit form action.
If network behavior is the issue, like wrong endpoint, missing headers, or unexpected status codes, simply use the puppeteer-har package to capture a full HAR file and inspect the traffic in Chrome DevTools.
For long-running Puppeteer scripts that crash unexpectedly with memory errors, check out our blog post on JavaScript heap out of memory. If your proxied requests fail during form submission workflows, our guide to proxy error codes covers the most common proxy-related failures.
To sum up
Puppeteer is a genuinely capable tool for form automation, but how reliable your scripts are depends entirely on how you build them. Use stable selectors that survive website redesigns, pair every action with a proper wait condition, and keep your browser sessions and timeouts managed deliberately. Get those fundamentals right, and your puppeteer form submit workflow will be significantly easier to maintain over time.
When your scripts start running into IP-level blocks or aggressive bot detection, Decodo residential proxies will keep your Puppeteer setup running without you having to rewrite your form automation logic. And if a target site is blocking headless browser traffic before your form even loads, Decodo's Web Scraping API can fetch the rendered page for you so you know exactly what you're working with before you automate against it.
This article covered the full puppeteer form submit workflow, from filling form fields and handling advanced input types, to submission methods, wait strategies, anti-bot mitigations, testing with jest-puppeteer, and debugging real failures. You now have everything you need to build form automation scripts that actually hold up on real websites.
Reviewed by Churchill Doro
Scraping shouldn't be this hard
Replace proxy configs, retry logic, and fingerprint workarounds with a single API call that returns clean data.
About the author

Justinas Tamasevicius
Director of Engineering
Justinas Tamaševičius is Director of Engineering with over two decades of expertise in software development. What started as a self-taught passion during his school years has evolved into a distinguished career spanning backend engineering, system architecture, and infrastructure development.
Connect with Justinas via LinkedIn.
All information on Decodo Blog is provided on an as is basis and for informational purposes only. We make no representation and disclaim all liability with respect to your use of any information contained on Decodo Blog or any third-party websites that may belinked therein.