Crawlee Python: Complete Tutorial with Beautiful Soup, Playwright, and Proxies
Building reliable web scrapers can get complex and difficult to maintain, but Crawlee aims to simplify the process. As project needs grow, developers often encounter challenges that require multiple tools and configurations. Crawlee eliminates the need to build these configurations from scratch or migrate to a different tool mid-crawl, allowing you to focus on your scraping logic instead. In this guide, you'll learn how to scrape using Crawlee's 3 main crawler classes. We'll also explore the routing architecture, proxy integration with Decodo, and data storage.
Kipras Kalzanauskas
Last updated: Jun 16, 2026
15 min read

TL;DR
- Crawlee is an open-source Python framework that wraps Beautiful Soup, Playwright, and Parsel behind a unified async API.
- It's not just a wrapper. Crawlee abstracts core crawling features, including automatic request queue management, built-in concurrency, proxy rotation, and data storage, to name a few.
- Use BeautifulSoupCrawler for fast, lightweight scraping of static HTML pages, and switch to PlaywrightCrawler when the target site requires JavaScript rendering. ParselCrawler is memory-efficient and is a great option for cases where XPath selectors are required.
- Because Crawlee's crawler classes share a common architecture, switching between them usually requires only minor changes to your scraper. In most cases, you'll mainly need to adapt the crawler class, context object, and page selection logic.
- Avoid IP bans by passing a ProxyConfiguration class to any crawler and enabling SessionPool, which automatically rotates proxies, ties cookies to consistent IPs, and retires blocked sessions.
What is Crawlee for Python?
Crawlee for Python is an open-source web scraping and browser automation library built by Apify to simplify the process of building reliable, large-scale web scrapers. It was originally released as a Node.js library in 2022 and quickly became popular among JavaScript developers. It wasn't until 2024 that a stable Python port was released, bringing the already popular features to the Python web scraping community.
At its core, Crawlee is built upon well-known Python libraries, including HTTPX, Beautiful Soup, Playwright, and Parsel (Scrapy's selector library), wrapping their functionalities behind a unified async API. But Crawlee isn't just a wrapper. Its architecture abstracts all the necessary crawling implementations, including automatic request queue management, built-in concurrency, proxy rotation, and structured data storage.
Rather than building these configurations from scratch, you can set up your scraper in fewer than 10 lines of code with Crawlee.
Crawlee's main user-facing component is the crawler, which manages the crawling process using 3 core concepts: the request queue, the router, and the storage layer. These concepts work the same way, regardless of which crawler class you choose.
There are 3 main crawler classes:
- BeautifulSoupCrawler for static HTML (HTTP requests + BS4 parsing)
- PlaywrightCrawler for JavaScript-heavy sites (headless browser), and
- ParselCrawler for XPath/CSS users (Scrapy's selector library without the full Scrapy overhead).
These crawler classes are classified under two main groups: HTTP crawlers and browser crawlers. BeautifulSoupCrawler and ParselCrawler classes fall under HTTP crawlers because they use HTTP clients to fetch pages and parse them with the corresponding parsing libraries. They're fast and efficient for sites that don't rely on JavaScript.
Browser crawlers use Playwright-controlled browsers to render pages and interact with on-page elements. They often require more resources than HTTP crawlers, but are necessary when dealing with dynamic websites.
Since each crawler class shares a common interface, you can quickly switch between crawler groups according to your project needs. For example, you can start your crawl with a lightweight HTTP client and switch to a PlaywrightCrawler class when you discover that newly found URLs rely on JavaScript. You don't need to rewrite your entire scraper or migrate to a standalone automated browser mid-crawl.
Installation and setup
Before you install Crawlee, ensure you're running Python 3.10 or higher. You can download Python from the official Python website.
Using Crawlee CLI
The quickest way to get started with Crawlee is to run the Crawlee CLI, which can generate a ready-to-run project from a template. First, make sure you have uv installed. You can find installation instructions in the official documentation. Once that's set up, run the command below:
This command launches the Crawlee CLI and prompts you to select a crawler template. Choose the one that best matches your use case and press Enter.
You'll also be asked to select an HTTP client and package manager. For this tutorial, we'll use Beautiful Soup, Impit, and Poetry.
To follow along, ensure you have Poetry installed. You can find installation instructions on the Poetry website.
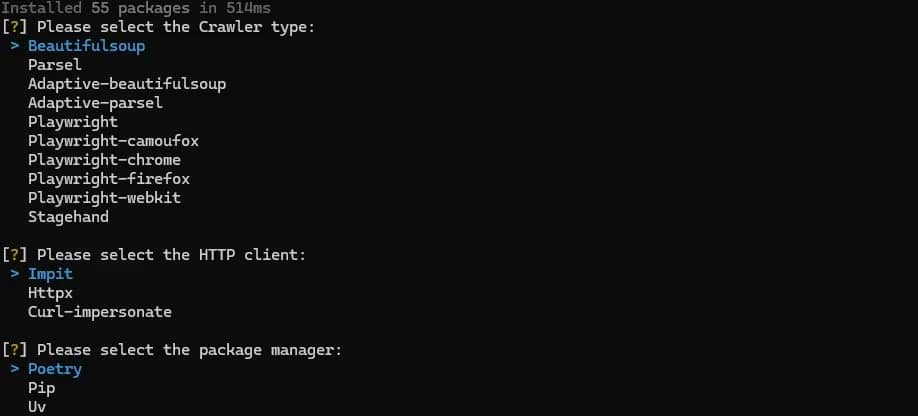
Answer the succeeding questions according to your preference and hit Enter to create your first Crawlee project (my-crawler).
If everything goes smoothly, you'll receive a note similar to the one below, notifying you of your project creation and how to run it:
Open your project directory in your preferred editor, and you'll notice Crawlee's file structure, with 3 main files: routes.py, main.py, and __main__.py. These files contain some fully functional boilerplate code you can run by following the instructions in the note at the end of your project installation.
We'll run our first Crawlee project using the command below:
Using pip
Run the following command to install Crawlee's core package:
This installation doesn't include any crawler-specific dependencies, so you'll need to install extra ones for additional functionality:
To use the PlaywrightCrawler class, install the necessary Playwright dependencies:
You can also install multiple extras at once by separating them with a comma:
If you don't care about package size, you can install Crawlee with all its optional features and dependencies using the command below:
After a successful installation, you can start a new Crawlee project using the CLI directly by running the command below:
Just like before, follow the interactive prompts to set up and create your project.
If you'd prefer a plain pip workflow or you're integrating into an existing codebase, you don't need the CLI. The recommended structure for any Crawlee project is: __main__.py (entry point, crawler init, run), routes.py (handler definitions), and .env (proxy credentials). As you scale, routers can be split into multiple routes and imported to a central router.
Core concepts: Request queue, router, and storage
Every Crawlee crawler is built on 3 core components: the request queue, the router, and the storage. Understanding how they work is key to building scalable scrapers that can handle real-world scenarios, such as multiple page types and large URL sets.
Request queue
The request queue manages the state and order of URLs to visit. It maintains a persistent log of each URL's current status, ensuring automatic URL deduplication: if the same URL is added multiple times, it's crawled at most once unless otherwise specified.
Even when running concurrent crawler workers, URLs are assigned dynamically, such that separate workers don't act on the same page. For more information on Crawlee's asyncio foundation, check out this concurrency vs. parallelism guide.
Once the queue receives or discovers a new URL, it checks if it has been crawled. If not, it adds to the queue. When a crawler worker becomes free, it requests the next URL from the queue, which serves it and locks it so no other worker can request the same URL.
There are 3 ways to add URLs to the queue:
- crawler.run([url1, url2, …]) seeds the queue with the initial list of URLs. This is always the entry point.
- context.enqueue_links() extracts all anchor links from the current page and adds them to the queue.
- context.add_requests([]) adds specific URLs programmatically. It's useful when the target URL is extracted from page content rather than a link element.
Standalone example: The following script demonstrates how Crawlee's request queue works outside the generated project structure.
This example seeds the queue with the homepage and automatically queues pages based on the defined selector. These queued URLs persist to disk at storage/request_queues/. If a crawl is interrupted by a crash or a timeout, it resumes from where it left off on the next run. The URL where the failure occurred is unlocked and re-added to the queue to continue crawling, but previously visited URLs aren't revisited.
Note that this example doesn't use the default Crawlee project structure. It's a basic standalone script that shows how URLs are added to the queue, using the same handler (the functions that define what happens when a page is visited).
In real-world projects, not every page has the same goal. You might want one handler to process pagination pages, another to scrape product details, and a third to extract category information. The request queue methods accept a label as a keyword argument. This label defines requests as they enter the queue, so the router can pass them to the corresponding handler.
Here's an example:
Router
The router assesses a request, reads its label, and determines which handler should process it, based on the label. It does this using 2 decorators: @crawler.router.default_handler, which processes every unlabelled request, and @crawler.router.handler("label_name") that handles requests whose label matches the string argument.
In your project directory, you'll notice a routes.py file containing boilerplate code: this is a default handler for Crawlee's website, based on your selected crawler template. Right now, your crawler will process any request using that handler.
Suppose we want to scrape author information from Quotes to Scrape. We can use a default handler to discover author pages and then assign a corresponding label to each.
Generated project: The following code assumes you're working inside the Crawlee project created by the CLI and are editing the generated routes.py file.
Next, in main.py, replace the seed URL with https://quotes.toscrape.com, then run your project.
Once your crawler runs:
- Crawlee starts at the seed URL and adds it to the request queue.
- Since this request has no label, it goes to the default handler.
- When this handler discovers author links, it adds them to the queue with the author label.
- Crawlee processes the author links using the author_handler, which just logs the author name.
Your terminal will look like this:
Storage
The storage manages request and response data during the crawling process, allowing you to save data without setting up a database or manually writing files.
To save data, use context.push_data({}) inside a request handler. Each call saves a Python dictionary to a numbered JSON file in storage/datasets/default/, with records stored in the following format: 000000001.json.
While this storage format can be useful in development, for data analysis, or other use cases, you'll want to consolidate records to a single file. You can export all records to a CSV or JSON file using crawler.export_data():
BeautifulSoupCrawler: Scraping static pages
Let's put everything in the previous section together by building a real-world scraper using the BeautifulSoupCrawler class. The scraper will follow Quotes to Scrape pagination links to discover additional listing pages. Then, extract the quote text, author name, and tags from each listing page.
But before we go any further, we need to examine our target page to figure out how to instruct our scraper.
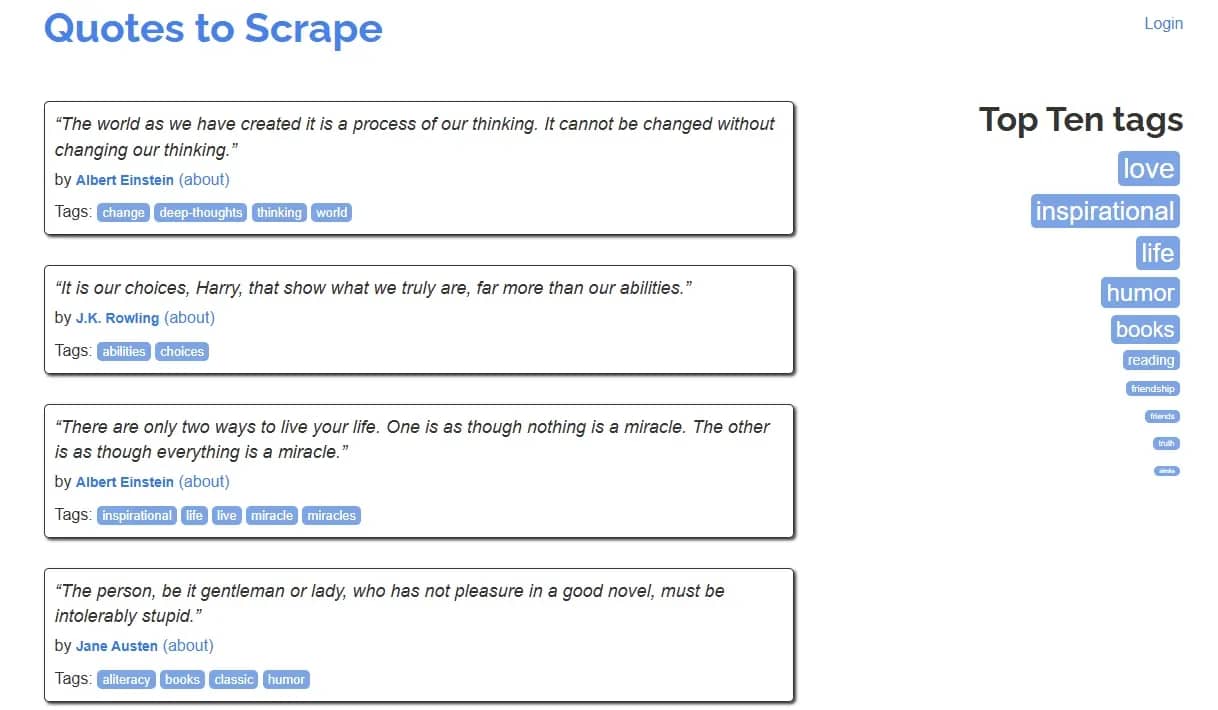
From the image above, you'll notice that the data we're after is immediately present in the listing pages. Each page has a "next" button that links to the next page. That means we only need a single handler that will extract quote data and follow pagination links.
Define your router
Generated project: Add the following handler to your routes.py file.
Initialize your BeautifulSoupCrawler class
Generated project: This example updates the main.py file created by the Crawlee CLI.
Navigate to your main.py file. Crawlee's boilerplate code already initializes the BeautifulSoupCrawler class. What's left is to replace the seed URL in crawler.run() with (https://quotes.toscrape.com/):
You'll also notice that max_requests_per_crawl is set to 10. This is more like a safety cap on the total number of requests. In development, it's useful for preventing an infinite crawl. You can raise or remove it for production.
The request_handler=router line links the router we defined earlier to the BeautifulSoupCrawler class.
When you run your crawler, it extracts data from the homepage and follows pagination links to retrieve additional data from each page.
Your terminal output will look like this:
Every time the crawler calls the context.push_data() function, the data we extract is stored as a record (JSON) in the storage/datasets/default directory. The scraper above yielded 100 records (10 per page). Here's an example:
ParselCrawler: XPath and CSS with Scrapy selectors
Like Beautiful Soup, the ParselCrawler class falls under Crawlee's HTTP crawler group. It uses Scrapy's Parsel library, which supports both CSS selectors and XPath. This library was originally part of the Scrapy architecture but was later released as a standalone module. It wraps lxml (for XPath) and cssselect (for CSS selectors) behind an easy-to-use API. Both selector options work on the same object, allowing you to mix or switch between CSS and XPath within the same handler.
The main differences between the Beautiful Soup API and Parsel are their memory efficiency and XPath support. Parsel is more memory-efficient and a better option for scraping large HTML documents or for cases where XPath is required. It's also a good option for teams already using Scrapy, since ParselCrawler uses the same selector syntax.
Recall that Crawlee's crawler classes share a common interface, and the crawl architecture remains the same. The only things that change are how you select data from the page and your crawler class. That means we can switch to ParselCrawler by changing a few lines of code.
To get started, ensure you have the Parsel extra installed. If you followed this guide's installation process (Crawlee CLI), add Parsel as a dependency in your pyproject.toml file. Then, run the poetry install command to install other necessary dependencies.
Define your router
Generated project: Replace the existing Beautiful Soup router from the previous section with the code below.
This code block replaces BeautifulSoupCrawlingContext with ParselCrawlingContext and changes soup selectors to Parsel's XPath selectors. CSS selectors would yield the same result; the selector type you use largely depends on your needs. For more information on when to use which, check out this guide on how to choose the right selector for web scraping
Initialize your ParselCrawler class
Generated project: Replace the existing BeautifulSoupCrawler configuration in main.py with the code below.
That's it. Run your crawler, and you'll get the same output and JSON records as in the previous section.
PlaywrightCrawler: Scraping JavaScript-heavy sites
BeautifulSoupCrawler and ParselCrawler classes both download the targets' static HTML to extract data. This approach is fast and efficient and, in a vacuum, could be the best option for large-scale crawling. However, most modern websites rely on JavaScript, and you need a browser engine to render said pages to access the data you want.
That's what the PlaywrightCrawler class offers. Built on top of the Microsoft Playwright library, it provides a high-level API for controlling and navigating Chromium, Firefox, and WebKit. It renders JavaScript pages and can simulate user interaction. That said, it can get resource-intensive, so only use this crawler class if your target is dynamic, requires user interactions, or blocks basic HTTP clients.
PlaywrightCrawler shares the same API as other crawler classes, and the overall crawl architecture remains the same. The main difference is the context object in each handler.
The context object within a PlaywrightCrawler handler gives you access to a Playwright page object. All browser interactions go through this object using Playwright's async API. That means you can navigate pages, click elements, fill forms, etc., using the same methods you'd use in a standalone Playwright script.
To see this in practice, let's switch to the PlaywrightCrawler class and target books.toscrape.com. Although we're scraping a different target, we don't necessarily need to rewrite everything from scratch. Continuing from the previous ParselCrawler example, we only need to update our crawler configuration and modify the extraction logic to adapt the existing Parsel scraper to use Playwright.
Generated project: Replace the previous crawler configuration with the Playwright version below, remove the HTTP client configuration, and update the seed URL to the new target.
Generated project: Replace the previous router implementation with the Playwright version below.
To keep things simple, this PlaywrightCrawler extracts only product data (title and price) from the listing page, keeping the router structure the same as the Beautiful Soup and Parsel scrapers.
Run your crawler, and you'll get the following output.
Navigate to storage/datasets/default to access the JSON records. The target page has 50 pages and 20 books per page, so the Playwright scraper produced 1000 JSON records. Here's an example:
Proxy configuration and IP rotation
Crawlee also provides an intuitive way to manage proxies and route requests through proxy servers. You configure them once at the crawler level using the ProxyConfiguration class, and they apply automatically to every request, regardless of the crawler type.
To specify a Crawlee proxy, import the ProxyConfiguration class, create a proxy object, and pass it to the crawler constructor. Crawlee rotates through the proxy list in a round-robin order by default.
Crawler configuration example: The snippet below shows only the crawler initialization logic. It assumes that router has already been defined elsewhere. Here's an example using the BeautifulSoupCrawler:
Note that Crawlee doesn't automatically track cookies. When session persistence is required, enable use_session_pool and persist_cookies_per_session in the crawler configuration so Crawlee can keep cookies tied to each session while using the configured proxy pool.
Together, these settings instruct Crawlee to map each proxy to a persistent session object. All requests using proxy IP A will share the same cookies, allowing your crawler to appear as a consistent user. However, maintaining a consistent cookie session isn't always enough. Websites also evaluate IP quality and reputation. Datacenter IPs are often easy to detect and can halt your crawl.
For more human-like traffic, residential proxies are often recommended because they use IP addresses associated with real users' devices and locations. Decodo residential proxies provide access to a large pool of residential proxies via a single gateway endpoint.
Enhance your scraper with proxies
Claim your 3-day free trial of residential proxies and explore 115M+ ethically-sourced IPs, advanced geo-targeting options, a 99.86% success rate, and more.
Pass the endpoint as a single entry in proxy_urls, and Crawlee will automatically assign a new IP per request through the Decodo pool. Here's an example:
When session persistence is required, Decodo also offers the sticky sessions feature, which, when combined with Crawlee's session pool, persists the same residential proxy and cookies for the duration of the session.
If you're unsure whether to use rotating or sticky sessions, check out our sticky vs. rotating sessions guide for more information on which is best for your use case.
Handling pagination and multi-depth crawls
So far, the examples in this article have focused on single-depth crawls, essentially scraping data from listing pages. However, real-world use cases often involve handling pagination and multi-depth crawls, where your scraper must parse a discovery page, follow paginated links, extract individual URLs, and enqueue deeper detail pages for further processing.
Crawlee provides various features that simplify this process, including a request queue, URL deduplication, and a request-handler architecture.
Adding requests to the queue
Crawlee provides 2 enqueuing methods for adding URLs to the request queue: context.enqueue_links() and context.add_requests(),
context.enqueue_links() takes 2 keyword arguments: the anchors CSS selectors and label. It selects all matching anchors on the current page and adds their href values to the queue. If the href values are relative URLs, the method automatically resolves them to absolute URLs before adding to the queue.
context.add_requests() accepts a list of Request objects constructed with Request.from_url(). This method comes in handy when the target URLs need to be computed: for example, URL pattern pagination, where you know the page structure in advance.
Separating page types using request handlers
Crawlee's request handler allows you to keep each page type's logic clearly separated. The 3-handler structure (default, listing, and detail) is the most common and efficient handler system for multi-depth crawls, especially for sites like eCommerce stores, job boards, and real estate listings.
The default handler receives the seed URL and discovers paginated listing pages using the enqueue_links() method. The listing handler receives listing pages and enqueues detail pages for processing by the detail handler, which extracts and stores data from each detail page. Each handler can be read, tested, and debugged independently of the others.
Preventing infinite crawls
When handling pagination and multi-depth crawls, it's important to define the scope of your crawl to avoid an infinite loop. A Crawlee crawl ends when a request queue is empty or a configured limit is reached. The max_requests_per_crawl parameter caps the total number of requests processed per crawl.
For pagination, if enqueue_links() doesn't find a matching selector, nothing is added to the queue, and the crawl ends naturally.
Concurrency control
Crawlee scales concurrency based on available system resources, allowing crawlers to maximize throughput without manual configuration. For more control, use min_concurrency and max_concurrency on the crawler constructor to limit the number of crawler workers running simultaneously.
Data storage and export
Crawlee provides 3 types of persistent storage: datasets, key-value stores, and request queues, each serving different purposes.
Dataset
The dataset is Crawlee's primary output store for structured data. Every call to context.push_data() writes a Python dictionary as a numbered JSON file to storage/datasets/defaults. The first call creates 000000001.json, the second, 000000002.json, and so on.
Crawlee also provides functions for exporting datasets. After crawler.run(), call crawler.export_data() to write all records to a single file. This function accepts a filename with a .csv or .json extension.
Here's an example using BeautifulSoupCrawler:
Key-value store
The key-value store is Crawlee's storage type for arbitrary data such as screenshots, PDFs, or cached API responses. It stores key-value pairs where the value can be any file type.
You can access the key-value store using context.key_value_store() inside any handler. When the handler runs, files are written to the storage/key_value_stores/default directory.
Here's an example using a PlaywrightCrawler handler:
This handler takes a screenshot with Playwright, opens the key-value store, and stores the screenshot by setting the key, value, and content_type.
Request queue
We used the request queue a lot in our examples throughout this article. It's Crawlee's default storage mechanism for URLs to visit. Each time you call enqueue_links() or add_requests(), Crawlee adds the discovered URL to the queue and worker processes and passes it to the appropriate request handler.
The request queue supports dynamic addition of URLs, and like datasets, it persists in the storage/datasets/default directory.
Error handling and retries
If there's one common occurrence in web scraping, it's crawlers failing: websites can block you, rate-limit you, or randomly drop your connection. Rather than forcing you to handle error cases manually, Crawlee offers built-in mechanisms to handle common failures automatically.
Automatic retries
Crawlee's built-in retry feature retries failed requests up to 3 times by default. You can increase or reduce the number of retries using the max-request_retries parameter. Setting that parameter value to 0 (zero) disables retries entirely.
If the set retry limit is exceeded, Crawlee moves it to the failed request list. You can optionally define a failed-request handler to debug or store such requests for future analysis.
Handling HTTP errors
Automatic retries are great, but it's important to check the response status in your handler. That way, you can react accordingly before attempting to extract data. A request may establish a successful network connection but return unwanted responses, such as 403 Forbidden or 429 Too Many Requests.
For "429 Too Many Requests" responses, Crawlee's autoscaler automatically slows the crawl when it detects a high error rate. However, some cases may require additional handling, such as adding a delay via asyncio.sleep() before retrying.
Handling extraction errors
Crawlee's retry mechanism only handles request-level failures, and not errors in your extraction logic. Malformed HTML, unexpected pages, or missing elements can lead to a TypeError or AttributeError. To prevent a single page or element from halting your entire crawl, wrap extraction logic in try/except blocks and validate elements before accessing their attributes.
Authenticated crawls
Crawlee also provides mechanisms for handling authenticated crawls. Using the PlaywrightCrawler class, add a login handler that fills and submits the form, then enable persist_cookies_per_session=True so the authenticated session cookie carries over to all subsequent requests in that session. This allows your crawl to maintain human-like consistency and navigate anti-bot systems.
Crawlee vs. alternatives: When to choose each
Crawlee is an impressive framework that abstracts almost every aspect of a crawl infrastructure, but there are no one-size-fits-all tools in web scraping. The right solution often comes down to the project's scale, the target website's structure (static or dynamic), and the overall use case. Below is a quick overview of how Crawlee for Python compares to other libraries.
Crawlee vs. Scrapy
Scrapy is a mature, crawling framework with built-in middleware, pipelines, feed exports, and a large ecosystem. It's better suited for large-scale crawling projects where the middleware and pipeline architecture add value. Crawlee is easier to get started with (no Spider class, no settings.py) and better for projects that need to switch between HTTP and headless browser crawling. Choose Scrapy for enterprise-scale crawl pipelines; choose Crawlee for projects that mix static and JS-heavy targets.
Crawlee vs. Playwright (standalone)
Using Playwright directly (without Crawlee) gives more control but requires the developer to build their own URL queue, deduplication, concurrency, retry logic, and storage. Crawlee wraps Playwright's Python bindings and adds all of these automatically. Choose standalone Playwright for targeted automation tasks (filling a form, taking a screenshot); choose Crawlee when crawling multiple pages with structured data extraction.
Crawlee vs. Crawl4AI
Crawl4AI is an LLM-focused web scraping library that extracts content in Markdown format for AI/RAG pipelines, with built-in content summarization and chunking. Crawlee is a general-purpose scraping framework with no LLM-specific features. Choose Crawl4AI when the downstream consumer is an LLM pipeline that needs clean Markdown; choose Crawlee when building a structured data extraction pipeline (CSV, JSON records, database storage).
Crawlee vs. Requests + Beautiful Soup directly
Using Requests + Beautiful Soup without Crawlee is fine for single-page scraping with no state management. For multi-page crawls with URL queues, deduplication, concurrency, and retries, Crawlee provides these out of the box. The break-even point: if the developer would otherwise build a URL set, a loop, and a retry counter, Crawlee is worth adopting.
Final thoughts
Crawlee for Python adds four main features to existing libraries: a request queue with deduplication, a router for multi-handler crawls, automatic concurrency scaling, and structured storage. Developers who have built these things manually using standalone libraries such as requests and Beautiful Soup will immediately recognize Crawlee's value.
If there are two core patterns to internalize from this guide, they're the listing-detail handler architecture for managing multi-depth crawls and the pairing of ProxyConfiguration with session pools to handle scale-sensitive or authenticated scraping.
As you integrate these patterns into your workflow, keep in mind that the Crawlee for Python ecosystem is still young. The Python port was launched only in 2024, so the API may continue to evolve. To avoid breaking changes down the line, make it a habit to pin your Crawlee version in your requirements.txt and carefully review the changelog before upgrading your production environments.
Proxies handled for you
Built-in IP rotation, geo-targeting, and anti-bot bypass – all that with Decodo's single endpoint.
About the author

Kipras Kalzanauskas
Senior Account Manager
Kipras is a strategic account expert with a strong background in sales, IT support, and data-driven solutions. Born and raised in Vilnius, he studied history at Vilnius University before spending time in the Lithuanian Military. For the past 3.5 years, he has been a key player at Decodo, working with Fortune 500 companies in eCommerce and Market Intelligence.
Connect with Kipras on LinkedIn.
All information on Decodo Blog is provided on an as is basis and for informational purposes only. We make no representation and disclaim all liability with respect to your use of any information contained on Decodo Blog or any third-party websites that may belinked therein.