Kimi Code CLI Guide: Setup, MCP, and Kimi CLI Differences
You run kimi mcp add to connect to an MCP server. Kimi Code CLI returns the unknown command 'mcp'. Nothing is broken: Moonshot AI publishes 2 builds that both install a command named kimi, and the mcp subcommand belongs to the other build, where it's documented and works. This guide covers which build to install, how to connect MCP servers, what model access costs, and where the built-in fetch tool stops working on pages with bot detection.

Justinas Tamasevicius
Last updated: Aug 21, 2026
12 min read

TL;DR
- Kimi Code CLI is an MIT-licensed terminal coding agent from Moonshot AI, installed as a single binary by an install script that runs without Node.js.
- Install kimi-code, not kimi-cli. The legacy build has shipped no release since 1.49.0; kimi-code ships several releases a week.
- The built-in FetchURL tool has no rotation or unblocking layer. On a defended Reddit thread, it returned 0 characters and an error that named JavaScript, not bot detection.
- Model Context Protocol (MCP) servers live in mcp.json. Add them by hand, or by asking /mcp-config. The kimi mcp subcommand belongs to the legacy build.
What is Kimi Code CLI?
Kimi Code CLI runs an agent loop in your terminal: it takes an action, observes the result, and picks the next step. Because it reads and edits files, runs shell commands, and fetches web pages, it asks for your approval before acting.
Moonshot AI builds both the CLI and the Kimi model family. Kimi Code CLI ships configured for those models, and config.toml lets you point it at another provider instead, over any of the following protocols: Anthropic, OpenAI, the OpenAI Responses API, Google GenAI, and Vertex AI.
Beyond the terminal, Kimi Code CLI runs in a VS Code extension, and in Zed and JetBrains through the Agent Client Protocol (ACP). kimi web also serves a browser UI from a local server, which binds to 127.0.0.1 unless you pass --host. To compare Kimi Code CLI with the alternatives, see best AI coding tools.
kimi-code vs kimi-cli: Which repo should you install?
Install kimi-code. It's the actively developed build and the one linked from kimi.com/code. kimi-cli's own README states that Kimi CLI is evolving into Kimi Code CLI.
kimi-cli still works, and its main branch still receives commits. But Homebrew has marked the kimi-cli formula as deprecated. The reason field reads deprecated_upstream, and the formula carries a disable date of January 17, 2027.
Before you run an install command, check which repo the instructions point to. Anything written before kimi-code existed is describing kimi-cli.
Side by side
ACP support, MCP support, and the kimi command name are common to both, so none of those tell you which build you're running. The install location does: the current build sits under ~/.kimi-code/.
kimi-cli (legacy build)
kimi-code (current build)
Language
Mostly Python
Almost entirely TypeScript
License
Apache-2.0
MIT
Install path
PyPI via uv, or Homebrew (deprecated)
Install script, npm, or Homebrew
Runtime prerequisite
Python 3.12–3.14
None via the install script; Node.js via npm or Homebrew; Git for Windows (Windows only)
Latest release
1.49.0
0.34.0
Releases since kimi-cli 1.49.0
0
13
Stars
11,145
6,228
Only here
Zsh plugin, kimi mcp subcommands
Single binary, plugin marketplace, AgentSwarm
Lifecycle hooks
13 events, marked beta
20 events
kimi-cli is the older project, and the 2 version numbers belong to separate series, so 0.34.0 isn't behind 1.49.0.
How the installer handles an existing kimi command on your PATH
Both builds install a command called kimi, so the obvious worry is a collision. The installer handles the common case: install.sh walks your PATH, identifies any legacy Python shim by its contents, and renames the first one it finds instead of overwriting it.
With a shim on PATH, the installer prints this:
Any further shims that the installer finds are deleted rather than renamed, so they no longer shadow the new binary. If a shim sits in a directory where you don't have write permission, the script reports it and prints the exact rm command to run.
Only 2 things need manual work. Logging into one build doesn't log you into the other. Sessions and config transfer only through kimi migrate.
Run kimi migrate after the install finishes. It copies config.toml, MCP server entries, Skills, and input history from the legacy ~/.kimi/ directory into ~/.kimi-code/, prompts you about your old chat sessions, and leaves the originals untouched. When the 2 configs collide, it keeps the value already in ~/.kimi-code/ and names what it skipped. If an MCP server already exists under the same name, kimi migrate leaves that entry as you had it.
kimi migrate needs a terminal: there are no flags, and it ignores piped input. OAuth credentials, MCP authorizations, and legacy plugins are outside the command's scope, so migrated remote servers are present but unauthenticated. Log into the new build again, then re-authorize each server.
Installing Kimi Code CLI
Set up model access before you install: the binary runs without it, but your first prompt fails. /login offers 3 routes, and none of them are interchangeable. Kimi membership plans were waitlisted when this was written, leaving you with a Kimi Platform key or a provider you already pay for.
The install script is what Moonshot AI recommends. Homebrew and npm both work, and both pull the Node package instead of the standalone binary. Homebrew's formula also updates on its own schedule, so it can sit 1 or 2 releases behind the script.
If you specifically need the legacy build, install it with uv:
Install the binary
Install on macOS or Linux with the official script:
The PowerShell installer writes the same single binary to %USERPROFILE%\.kimi-code\bin and renames any legacy shim to kimi-legacy.exe. Install Git for Windows before the first launch, because Kimi Code CLI uses the bundled Git Bash as its shell. If Git Bash sits somewhere non-standard, set KIMI_SHELL_PATH to the absolute path of bash.exe.
Control the install in CI
Pin a version instead of tracking latest:
That pin resolves to 0.34.0 on every run. KIMI_INSTALL_DIR and KIMI_NO_MODIFY_PATH control where the install goes and whether your shell rc file is modified. Run kimi upgrade when you want to move a pinned install forward.
In a non-interactive run, 2 things break. Most slash commands don't work with -p, the flag that runs one prompt and prints the response, so configuration has to come from files or subcommands. kimi provider covers the subcommand side. And –yolo can't be combined with -p: the command fails outright rather than degrading gracefully, so pre-approve what CI needs with permission rules instead.
Verify and log in
Open a new shell session, then check the version:
You should see 0.34.0 or later. If you see "command not found" here, the shell is usually stale: it hasn't sourced the rc file the script edited.
Start a session in a project:
Run /login first. If you skip /login and run with -p, Kimi Code CLI fails before the agent starts:
At the /login prompt, pick 1 of 3 routes. Kimi Code OAuth runs a device-code flow and draws on your membership quota, so this route needs an existing membership. Both Kimi Platform options bill per token against a separate balance instead, and they work without a membership. Pick the console where you actually created the key: platform.kimi.ai targets api.moonshot.ai/v1 and platform.kimi.com targets api.moonshot.cn/v1.
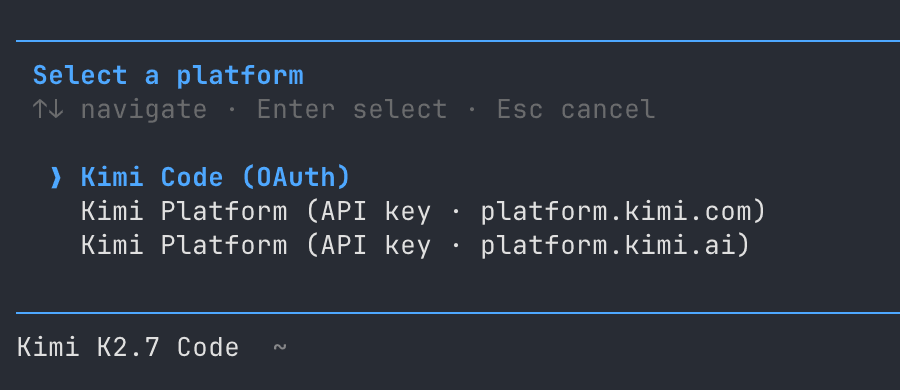
Run /init before your first real prompt. /init reads the codebase and writes an AGENTS.md, which is where you put the conventions you would otherwise repeat in every prompt. The command only works in an interactive session: kimi -p "/init" writes nothing, but the answer suggests it worked.
Keep the Kimi Code Console key and the 2 Kimi Platform keys separate, because mixing them is the quickest way to a 401. The Console key targets api.kimi.com/coding/v1. A key from platform.kimi.ai returns 200 on api.moonshot.ai/v1 and 401 on both the coding base and the separate China base api.moonshot.cn/v1.
Point Kimi Code CLI at a provider you already pay for
You can skip /login entirely. kimi provider catalog add imports a provider from the public models.dev catalog, which lists over 180 providers:
That command writes one entry per model into config.toml, dozens of them for OpenAI, with context limits and capabilities filled in. Add default_model = "openai/gpt-4.1" to the same file, and the agent runs. kimi provider catalog list shows what's available, and kimi provider list shows what you have configured.
Using Kimi Code CLI to build and run scrapers
Kimi Code CLI ships a FetchURL tool, so you can point the agent at a page and ask for the data. That approach works until the target blocks the request.
What FetchURL does and doesn't do
FetchURL takes one parameter, a URL, and returns the page content. For HTML, the fetcher extracts the body text; plain-text and markdown pages pass through as they are, which is why documentation, changelogs, and RFCs come back readable. FetchURL's documentation never describes a scraping stack: no proxy rotation, no rendering guarantee, no CAPTCHA handling, no session management.
FetchURL also has no way to prove what it is. With a Platform key, it doesn't announce itself as an agent at all: the fetcher hardcodes a Chrome/91.0.4472.124 user agent, a browser build from 2021. The product token from the [identity] slug in config.toml goes to model providers and MCP servers, not to a page you fetch.
Cloudflare's verified-bot program covers agents acting on behalf of an end user, and it recognizes them only when they identify themselves in a way it can verify: a Web Bot Auth signature, a published IP list with a stable user agent, or reverse DNS. The fetcher offers none of the 3. To an operator deciding whether to allow user-directed agents, the request looks ordinary and unidentified.
On one Reddit thread, FetchURL returned no content at all, only an error: "Failed to extract meaningful content from the page. The page may require JavaScript to render". The agent received 0 characters. The network was fine. The same URL, fetched with that same user agent, returned HTTP 200 and returned 8,468 bytes of HTML. That HTML held exactly 6 characters of readable text. Reddit served an empty HTML shell.
That failure report is better than it sounds, because the agent is never handed an empty page to reason over. The blocker is bot detection, not client-side rendering. With JavaScript rendering switched off, the same thread, fetched through a proxy, still returned 9,881 characters, so the error points you to a fix that doesn't work. Through Decodo's Web Scraping API, that thread returned 11,779 characters with the post and comments intact.
Elsewhere, the failure is plainer: on g2.com and zillow.com, FetchURL returned Failed to fetch URL. Status: 403. Whether the page returns a shell or a 403, the agent ends up with 0 characters. On an undefended page, FetchURL works: the same call against quotes.toscrape.com succeeded and returned 1,276 characters.

Have the agent write the scraper instead
An MCP data server and a generated scraper solve different problems. Use the server when you want an answer inside the session, once or twice. Write a script when the extraction has to run on a schedule, get code-reviewed, or be tested.
For a generated scraper, the work is steering, not typing. A reviewable script needs a prompt that names the target URL, the fields you want, the output format, and what should happen on a non-200 response. If you leave any of them out, the agent picks for you, usually by printing to stdout and swallowing errors.
Then read the script before you run it, because the agent sounds more certain than its evidence supports. Check 4 things: that a script calling a scraping API unwraps the response envelope rather than parsing it as HTML, that selectors match markup the agent actually fetched, not markup it guessed at, that failures raise instead of returning empty, and that pagination terminates. A first working script usually takes a few turns, and the traceback you paste back is the fastest way to correct it.
Start against a target built for scraping practice, such as quotes.toscrape.com. Move to a production target once your parsing logic is stable. The walkthrough on AI web scraping with Python goes deeper into the generated-code side.
When to route requests through managed infrastructure
A better prompt doesn't help once a target serves challenges, geo-gates its results, or rate-limits by IP. The current build makes rate limiting more likely than the legacy build did. Both run subagents in parallel, but only kimi-code has AgentSwarm, which launches up to 128 subagents from one template. AgentSwarm's concurrency is unbounded unless you set KIMI_CODE_AGENT_SWARM_MAX_CONCURRENCY to a positive integer.
Goal mode pushes the request volume higher by keeping turns running unattended, and a subagent's default timeout is 2 hours. In that setup, a generated scraper sends many concurrent requests to the target from 1 IP address, which is the pattern that rate limits exist to catch. Defended targets need infrastructure the agent can't supply from inside your terminal, and the guide to web scraping at scale covers what that infrastructure has to do.
One fix is to have the agent call a scraping endpoint over plain HTTP, so proxy rotation, rendering, and unblocking happen server-side:
The request retrieves the g2.com page where FetchURL returned a 403 and 0 characters. The snippet also covers 2 of the 4 checks. The HTML comes out of the JSON rather than resp.text. A failed scrape raises instead of returning empty, because the endpoint returns 200 whether the target loaded or not. DECODO_AUTH holds the Basic credential from your Decodo dashboard, the same one Decodo's MCP server takes.
The endpoint above is Decodo's Web Scraping API. And the pool size is 125M+ IPs worldwide, so a 128-subagent run reaches the target from many addresses instead of 1. The API exposes headless, used above; geo, which takes a country name such as Germany; and proxy_pool, which switches between the standard and premium exit pools. The full parameter list has the rest.
For occasional access to a defended page, Site Unblocker handles rotation and challenges behind a single request, though you route through it as an HTTP proxy rather than posting to it. For crawls where you manage rotation yourself, residential proxies give you the exit IPs and leave the logic in your script. Expect to adjust the rendering and geo-targeting parameters your endpoint exposes, because every unblocking service needs tuning on some sites.
Managed infrastructure doesn't decide what you're allowed to collect. If the target publishes an official API, use that first. Check the target's terms and its robots.txt before you point a scraper at the site, and keep personal data out of what you store.
If you're considering an editor-based agent for the same work, see the Cursor AI web scraper walkthrough.
Connecting Kimi Code CLI to external data with MCP
An MCP server exposes tools that the agent doesn't ship with.
Adding a server without editing JSON
Run /mcp-config and say what you want connected. It's a built-in Skill: the agent edits mcp.json for you and handles OAuth logins with /mcp-config login <server>. Use /mcp afterward to see which servers actually connected. That's the whole task.
Editing mcp.json by hand is still worth knowing in 2 cases: a server entry that you want reviewed in a pull request, and a CI run with no terminal.
Where mcp.json lives
In kimi-code, MCP servers are declared in a file named mcp.json, at 2 levels. The user-level file at ~/.kimi-code/mcp.json applies everywhere. A project-level .kimi-code/mcp.json applies to one repository and overrides a user-level entry with the same name. With -p, though, the project file didn't load in testing, over both stdio and HTTP. The user-level file worked. Ask the agent to list its mcp__ tools: if the project server's tools are missing, the file wasn't loaded. Move the entry to the user-level file if you need it under -p.
Kimi Code CLI supports 3 transports: stdio for local child processes, streamable HTTP for remote endpoints, and Server-Sent Events (SSE) for older services that offer no other transport.
Expect the protocol to change. A revision made on 2026 July 28 of the MCP specification replaces the stateful handshake with a stateless request model.
A minimal user-level file looks like this:
An entry with command is a stdio server; an entry with a URL and no transport is a streamable HTTP server. For the SSE transport, add "transport": "sse" alongside the url.
As of kimi-code 0.34.0, there's no kimi mcp subcommand. Running kimi mcp returns unknown command 'mcp', and –mcp-config-file doesn't appear in kimi –help. Both the subcommand and the flag belong to the legacy build.
For the server side of the same protocol, see the guide on how to set up an MCP server.
What each connected server costs you
Every connected server loads its tool definitions into the context window before you type anything, so a server you never call still costs you context on every request. Web data servers justify that overhead when the answer sits on a live page, and the top 10 MCP servers for AI workflows compares the options.
Adding the Decodo MCP server
Add a streamable HTTP entry to ~/.kimi-code/mcp.json with your Basic auth token in a header:
Replace YOUR_BASIC_AUTH_TOKEN with the token from your Decodo dashboard. Keep the entry in the user-level file rather than the project one. The project file sits inside your repository, so a token in it goes into your git history unless you gitignore the file first.
With a real token in place, a new session gives the agent 30 tools from the Decodo MCP server, among them google_search and scrape_as_markdown.
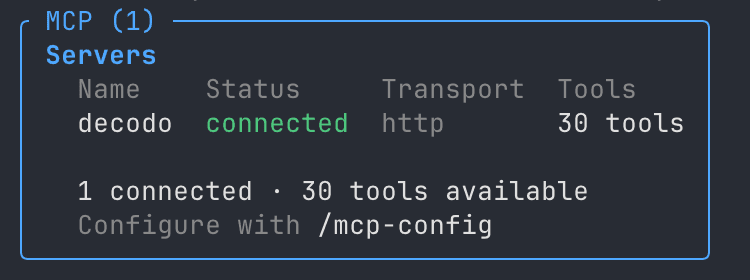
Tools arrive named mcp__decodo__<tool>. A rule in ~/.kimi-code/config.toml can pre-approve a whole server and drop the approval prompt for every tool the server exposes. Pre-approve only servers you trust. YOLO mode, which auto-approves every tool call, already covers MCP, so a wildcard plus YOLO leaves no approval step at all:
decision takes allow, deny, or ask, so the same block can force a prompt on a tool you want to approve manually. –auto goes further than YOLO: the agent won't stop to ask you anything.
kimi doctor validates config.toml, so it catches a malformed rule before your next session starts. It doesn't read mcp.json: even when that file contains invalid JSON, kimi doctor still reports "All checked config files are valid". Validate the file yourself with jq . ~/.kimi-code/mcp.json first.
A server added mid-session doesn't connect until you start a new session, or run /new or /reload.
Subagents and lifecycle hooks
Configure these 2 capabilities before you need them.
- Subagents let one session run many tasks in parallel. Built-in coder, explore, and plan subagents report a result, not a transcript, and AgentSwarm runs up to 128 subagents. /goal <objective> keeps turns going unattended until that objective is met. AgentSwarm and /goal together turn a single prompt into a job that runs on its own. Start a swarm with /swarm <task>: the command enables swarm mode, sends the task, and disables the mode again when the turn completes. A subagent runs for up to 2 hours by default, and KIMI_SUBAGENT_TIMEOUT_MS overrides that ceiling. Once you enable the secondary-model experiment in /experiments, /secondary_model opens a picker that binds spawned subagents to a cheaper model than the one you're talking to.
- Lifecycle hooks run your own commands inside the agent loop. They're configured through a [[hooks]] array in config.toml, and 3 of the 20 events can block: PreToolUse, Stop, and UserPromptSubmit. A script exits 0 to allow the action, and exits 2 to block it.
Add this to ~/.kimi-code/config.toml to run an audit script before every shell command, with timeout in seconds:
Your script then receives the event as JSON on stdin, once per Bash call. The JSON carries hook_event_name, tool_name, tool_input, and cwd. Hooks fail open, so a crashed or timed-out script allows the action. Treat them as friction control, not as a security boundary.
Extending the agent with Skills and plugins
MCP is the heavier of 2 ways to extend the agent. The lighter one is a Skill.
A Skill is a Markdown file: YAML frontmatter with a name and a description that the model reads to decide when the Skill applies, then a body of instructions. Nothing runs, and no new tool appears.
Reach for a Skill when the agent already has the tools and needs to know your conventions, such as a review checklist or a commit format. Reach for an MCP server when the agent needs a capability it doesn't have, such as querying your issue tracker.
Skills load from 4 levels, in order of precedence: project, user, extra directories set through extra_skill_dirs, and finally the built-ins shipped with the CLI.
Project Skills live in .kimi-code/skills/, so they travel with the repository and reach the whole team through a pull request. User Skills live in ~/.kimi-code/skills/, and also load from ~/.agents/skills/, a deliberately tool-neutral path that sits outside the Kimi data directory so several agents can share one library. –skills-dir bypasses that discovery entirely and loads from the directories you name, which is the repeatable option for CI.
Plugins are the distribution layer above both Skills and MCP servers. A plugin packages Skills, custom agents, and MCP server declarations into one unit that you install from the marketplace or any GitHub repository. Treat a plugin install as a supply-chain decision, not a convenience, because a plugin can declare MCP servers. Each install shows a trust level of official, curated, or third-party, and a third-party install prompts you with the cancel option selected by default. For the wider comparison between the 2 approaches, see Claude Skills vs MCP.
Kimi Code CLI pricing: What a membership does and doesn't cover
The CLI is open source and free to install. You pay for model access.
Model access comes from 2 separate products. Kimi Code is a service inside Kimi membership, shared across the CLI, the VS Code extension, and third-party tools. Every plan button on Moonshot AI's pricing page read "Join Waitlist" rather than starting a purchase, which fits the plan changes Moonshot AI has announced. Until that changed, a Kimi Platform key is the one route a new user can start on.
At the bottom of the ladder, tiers gate which models you can reach. From Allegretto up, the model access is identical, and the extra money buys quota instead. These are the published figures:
Tier
Per month, billed annually
Month-to-month
Kimi Code
Model access
Adagio
$0
$0
Not included
None
Moderato
$15
$19
Included
K3 up to 256K
Allegretto
$31
$39
Included
K3 up to 1M, HighSpeed
Allegro
$79
$99
Included
K3 up to 1M, HighSpeed
Vivace
$159
$199
Included
K3 up to 1M, HighSpeed
Adagio shows no check mark for Kimi Code on Moonshot's comparison table, so the cheapest listed way to use the CLI with Kimi models is $15 a month on an annual commitment, once the plans reopen. That same table gates the 1M context window one tier higher, at Allegro. The row reads "Extra Long Chat Capacity" and applies to Kimi chat; Kimi Code's own documentation puts the 1M window at Allegretto and above.
A Kimi Platform key bills per token instead, with no membership involved. The Platform names its models differently from the Kimi Code service: Platform kimi-k3 is the service's k3, and Platform kimi-k2.7-code is the service's kimi-for-coding.
Model
Input, cache miss
Input, cache hit
Output
Context
kimi-k3
$3.00
$0.30
$15.00
1M
kimi-k2.7-code
$0.95
$0.19
$4.00
256K
Prices are per 1M tokens.
A membership doesn't include Platform API calls, so /login with a Platform key bills your API balance rather than the membership you already pay for.
Moonshot AI publishes 3 separate budgets, and a membership is metered against all of them at once. The Kimi Code allowance refreshes every 7 days. It doesn't roll over. A rolling 5-hour window caps bursts at 300 to 1,200 requests, with up to 30 running at once. The monthly total for a Kimi membership sits above the other 2, and exhausting that total freezes Kimi Code until the month resets.
Every logged-in device and API key draws on the same quota, so a membership covers one person across their machines, not a team.
When the quota runs out, you pay from an extra usage balance at rates that Moonshot AI describes as close to its Open Platform API pricing. You can set a monthly spending cap on that balance.
Moonshot AI's plan adjustment notice says that legacy plans remain, that existing subscribers are unaffected, and that the new plans are not yet available for purchase, so check the Kimi membership pricing page before you commit.
Limitations and things to watch
Here are some limitations to look for:
- Release velocity. Flags and behavior move between minor versions, which ship at roughly 4 a week, so pin a version in CI.
- Open issue volume. Both repos carry several hundred open issues, which is normal for a fast-moving project. Don't make either repo a pipeline dependency until the behavior you depend on has stayed the same for a few releases.
- 2 products, 1 command name. A GitHub issue asks what separates kimi-code from kimi-cli. That issue went months without a maintainer answer. Both documentation sites describe their project as "Kimi Code CLI". The quickest way to tell is the data directory: a page describing ~/.kimi/documents the legacy build, and a page describing ~/.kimi-code/ documents the current one.
- 3 credential systems. A Kimi Code Console key and the 2 Kimi Platform keys look alike, target different base URLs, and return a 401 when you mix them. The 2 Platform options in /login differ only by console hostname.
Final thoughts
Kimi Code CLI is a credible open-source terminal agent, and a cheap one to try. Much of what's written above has a shelf life: the version numbers, the tier prices, and the repository split itself, since kimi-cli's Homebrew formula is already scheduled to be disabled in January 2027. But 3 things outlast all of it, because they come from design rather than release notes.
A fetch tool with no rotation or unblocking layer can't read a defended page, whichever version ships it, and the error message names the wrong cause. The 3 credential systems behind 1 command will keep producing 401s until Moonshot AI consolidates them. A hook that fails open is a convenience rather than a security boundary. Re-check the numbers before you quote them, and build on the 3 that don't move.

Scaling agent-driven scraping
Residential proxies keep automated requests reliable once your agent is running at volume.
About the author

Justinas Tamasevicius
Director of Engineering
Justinas Tamaševičius is Director of Engineering with over two decades of expertise in software development. What started as a self-taught passion during his school years has evolved into a distinguished career spanning backend engineering, system architecture, and infrastructure development.
Connect with Justinas via LinkedIn.
All information on Decodo Blog is provided on an as is basis and for informational purposes only. We make no representation and disclaim all liability with respect to your use of any information contained on Decodo Blog or any third-party websites that may belinked therein.