Block Requests in Puppeteer: A Practical Guide to Faster, Leaner Scraping
When you scrape the web with Puppeteer, you almost always pull in data you want alongside extras you don't need, like images, fonts, and tracking scripts that increase your request count, slow your pages, and drain your proxy bandwidth. In this guide, you'll learn how to block unnecessary requests with request interception and Chrome DevTools Protocol (CDP) so your scraper runs faster and scales more efficiently.
Justinas Tamasevicius
Last updated: Jun 16, 2026
16 min read

TL;DR
- You can use page.setRequestInterception() to intercept each request event and decide what to allow or block
- You can block images, fonts, media, and trackers so that your target site can load faster, and you can cut your request count and bandwidth spend
- Switch to CDP-level blocking when you're working with a large URL-based block list and want better performance than request interception can provide
- Keep a single request listener per page, and never block resources the target site needs to render its content correctly
- When request blocking improves performance but still doesn't solve IP bans, CAPTCHAs, and browser fingerprinting, Decodo's Web Scraping API will handle all of that for you
Why block requests in Puppeteer: Use cases and benefits
Before you write any request interception code, you need to understand why you'd want to block requests in Puppeteer in the first place. Every time Puppeteer loads a web page, Chromium fires off dozens of network requests nobody asked for, including font files, hero images, analytics pixels, ad scripts, tracking libraries, and other assets that have nothing to do with the data you're trying to extract.
Most of the time, you only want a few pieces of information from that page, but your scraper still downloads and processes every one of those extra resources. As I mentioned earlier, those resources make web pages load slower, exhaust your proxy bandwidth, and just generally drive up your scraping costs, which is exactly why request blocking is one of the easiest ways to make your Puppeteer scripts faster and more efficient.
Here are some of the main reasons you need to set up request interception strategies in your Puppeteer scripts:
1. For performance
Performance is usually the biggest reason to block requests. When you block images, fonts, media files, and other non-essential assets, Chromium has fewer resources to download and process, and as a result, pages will load faster, and the overall request count will drop.
For example, if your scraper only needs product names, prices, article text, or metadata, there's no reason to download dozens of image requests that your script will never use. The browser still has to request, download, and render those assets, which will just add to the time it’ll take the web page to load and consume more bandwidth. You can significantly increase your scraper’s performance by blocking these assets without having to alter your data extraction logic.
2. To reduce bandwidth and proxy cost
Bandwidth costs add up fast, especially when you're running scrapers at scale. Residential and mobile proxies are billed per GB, so every image, video, and web font your scraper downloads comes straight out of your proxy budget.
A fully loaded product page can easily weigh 2-4 MB. However, if you block unnecessary assets, that same page may load in less than 1 MB. When you're scraping thousands of pages, those savings add up fast and can make a noticeable difference to your proxy bill.
3. For stealth
When it comes to security, most anti-bot systems these days don’t look at just your IP address anymore; they now load tools like Google Tag Manager, Segment, FingerprintJS, and Hotjar that collect browser fingerprints, study mouse activity, and other session data. When your scraper loads those security scripts put in place, it can expose additional signals that the site can use to identify your scraper.
You can limit the amount of data that these security systems can take concerning your scraper when you block those third-party scripts. It won't hide your scraper completely, but it’ll somewhat reduce the signals with which these systems can track your scraper’s activity.
4. To achieve stability
Every third-party resource your script loads potentially adds another point of failure.
Every other third-party resource that your Puppeteer script loads along with your scraping request adds another potential point of failure for your scraping workflow.
Analytics servers can slow down, advertising networks can delay responses, and CDNs can become unavailable. Any of these issues can make a web page load slower or not load at all, even when the content you need is already available.
Setting up block logic with your Puppeteer scripts will essentially remove many of those dependencies. Web pages will behave more predictably with fewer external resources involved, and your scraper won’t waste time waiting for services that have nothing to do with the data you're collecting. Fewer outgoing requests mean fewer failure points, resulting in a more stable scraping workflow.
When to set up request blocking
Request blocking is useful in almost any scraping workflow, but these are some of the scenarios that it applies to the most:
- Large-scale price monitoring. When you're scraping thousands of product pages every day, every image, font, and media file adds extra weight to each request. By blocking these unnecessary assets, you can reduce bandwidth usage, lower proxy costs, and speed up page loads across your entire scraping operation.
- SERP scraping. Search result pages are packed with ads and tracking scripts that carry none of the data you actually need. Blocking them will strip the page down to just the results, so your scraper can spend its time on what matters instead of loading a dozen marketing tags.
- Scheduled crawls. Small inefficiencies won't seem like much during a single run, but they can add up quickly when a scraper runs on a cron job every few hours. You can optimize each crawl to finish faster by setting your script to load only the resources you need. This will allow you to finish months of scraping in weeks.
- AI and RAG ingestion pipelines. When your goal is to collect rendered HTML or clean text for an LLM, then you don’t need those images, videos, and fonts that load with the web page. You need to block them so that your pipeline will grab just the content it needs while using fewer resources.
When NOT to block requests
Blocking requests can speed things up and cut bandwidth usage, but it isn't always the right move for every project. If you block the wrong resource, you can break the page or stop important content from loading altogether.
Here are the cases where you should leave requests alone.
- Running visual regression tests. If you need the page to render exactly as a real user would see it, then blocking assets will only change what the web page loads, which can throw off your scraping results.
- Generating screenshots. Missing images, fonts, and stylesheets can make the web page look bare or broken, thereby making it difficult to screenshot anything useful.
- Scraping a site where critical content is image-based or font-glyph-based. Some websites display product names, prices, and other key details as images or font glyphs instead of plain text. If you block those resources, you inadvertently make that content impossible to extract.
- Working with an SPA that gates rendering behind a tracking script. Many SPAs rely on specific scripts to render their main content. If you block the wrong one, the page may never load past a blank screen.
Only block the resources you're certain your scraper doesn't need.
Implementing Request Interception in Puppeteer
Puppeteer gives you a native API method that you can use to intercept and block requests before the browser processes them. That method is page.setRequestInterception(), and it's the foundation of everything in this guide. Once you enable it, Puppeteer will pause every outgoing network request and give your script a chance to decide what happens next. From there, you can inspect the request, decide whether to allow it through, block it entirely, or even return a custom response instead.
Here's how it works step by step.
Activating interception
You activate request interception per web page, not per browser. That means you must call page.setRequestInterception(true) for every page that you want to inspect or block requests.
Take note of the order of things here, you have to enable interception before calling page.goto(). If you do it vice versa, some requests may already have been sent before your request listener gets attached, and those requests will be sent unchecked and unblocked.
Understanding the HTTPRequest object
That request listener receives an HTTPRequest object every time the browser tries to load something. This object carries all the information about the request, and it gives you the methods you need to control what happens next.
Here are some of those methods:
- request.url() – returns the full URL of the request
- request.resourceType() – returns the type of resource being loaded (image, script, font, xhr, etc.)
- request.method() – returns the HTTP method being sent (GET, POST, etc.)
- request.headers() – returns the request headers being sent
- request.postData() – returns the request body for POST requests
- request.isNavigationRequest() – returns true if you’re on the main document navigation, not a sub-resource.
The 3 ways to handle a request
Every request that enters your listener must be resolved with exactly one of these 3 methods:
- request.continue() – Use this method when you want the request to proceed normally. You can add relevant headers here according to what the request requires to go through.
- request.abort() – Use this when you want to block request traffic completely. You can pass an optional error code like "blockedbyclient" or "failed" to control what the browser reports back.
- request.respond() – Use this when you want to return a custom response you construct yourself instead of contacting the original server network. This comes in handy when you’re mocking API calls during testing.
You have to call one of these on every single request. If you don't, the request will hang indefinitely, and your page will never finish loading.
Putting it all together
Here's a quick illustration of how you can implement request interception in your Puppeteer script:
This script above enables request interception in Puppeteer and blocks all image, media, and font requests before they load. As the page loads, it logs which requests were allowed or blocked, then extracts the page title and prints a summary showing the total number of allowed and blocked requests.
Save the file as index.js and run it with node index.js
When the script runs, your terminal will stream every outgoing request tagged with either [BLOCKED] or [ALLOWED], followed by the resource type and URL. Image and font requests will get blocked immediately, while essential resources like HTML, CSS, and JavaScript continue loading so the page can render and parse normally.
Here’s the result you will see on your terminal:
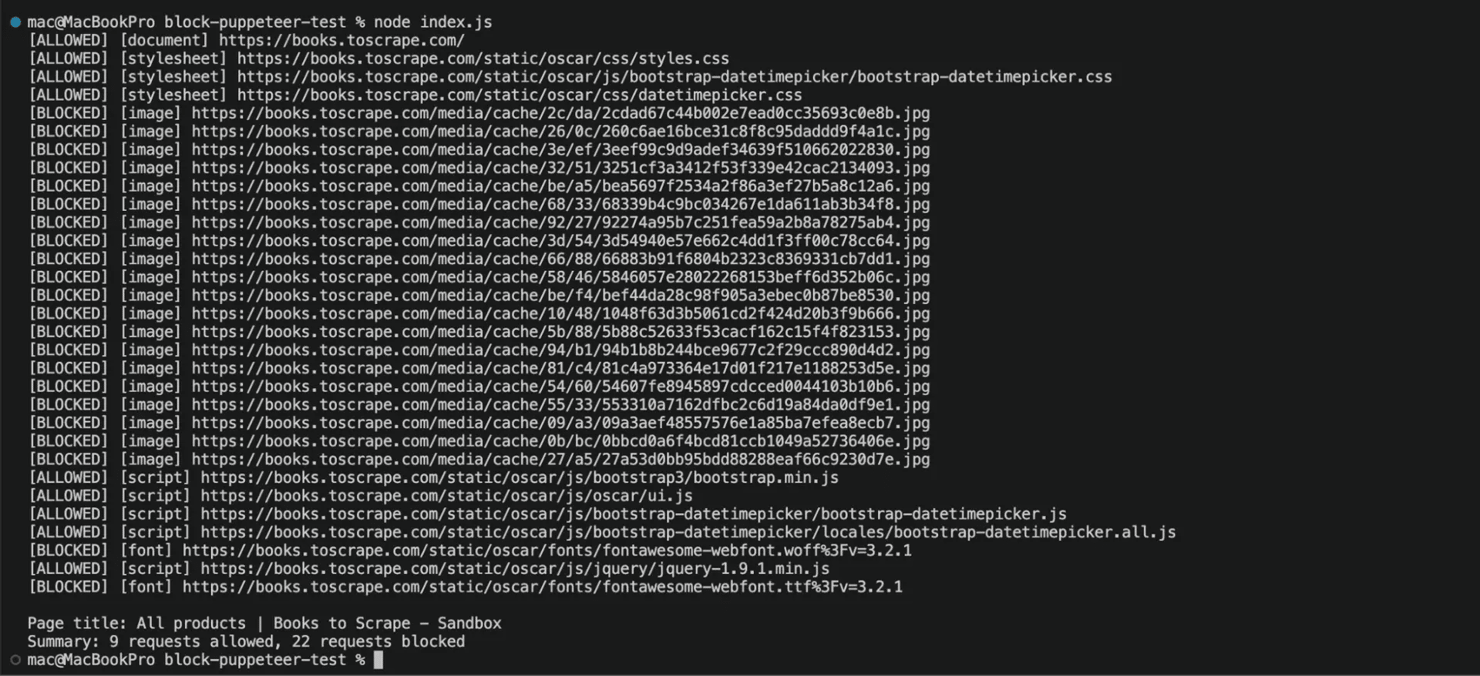
You also get a summary line at the bottom that gives you a quick count of what got through and what didn't, so you don't have to scroll through every request to confirm your request interception is working.
Notice the page.off('request', requestHandler) call at the end, that line removes the request listener once you're done with it. If you skip this step and reuse the same page instance across multiple URLs, the old listener will remain active, which means any new listener you add will run alongside it and both will try to handle the same request event.
That quickly becomes a problem because each request can only be handled once, and Puppeteer expects a single action for every request. So if one handler calls request.abort() while another calls request.continue() on the same request, Puppeteer won't know which instruction to follow and will throw a "Request is already handled!" error.
Note: We are using puppeteer-core for our working examples in this guide, but feel free to use puppeteer itself if you don't already have Chrome installed on your system. If you choose to go with puppeteer-core, you need to point it to where Chrome is installed on your system via the executablePath option.
Here's where to find it, depending on your operating system:
- macOS — /Applications/Google Chrome.app/Contents/MacOS/Google Chrome
- Windows — C:\Program Files\Google\Chrome\Application\chrome.exe
- Linux — /usr/bin/google-chrome
If you decide to install the regular puppeteer instead, then you can drop the executablePath line entirely, and your code will still work fine.
Blocking requests in Puppeteer by resource type
Blocking images is a good starting point for request blocking in Puppeteer, but there's a lot more you can do to improve performance, save bandwidth, and cut down on unnecessary network activity. Chromium downloads different types of resources every time a page loads, some of which are critical to rendering the page correctly, while others simply add extra weight without contributing anything useful to your scrape.
This is where you can take full control over what Puppeteer blocks, so instead of blindly blocking everything that looks unnecessary, you can simply build a smarter block list based on exactly what type of resource each request is trying to load. You can get those resource types by running Puppeteer's request.resourceType() method, and once you know what each type does, you can make precise decisions about what should reach the browser and what should never get through.
You can use the table below to see every resource type Chromium exposes and decide which ones are safe to block during scraping.
Resource type
What it is
Recommendation
document
The main HTML document
Never block
stylesheet
CSS files
Block with care – safe if the layout doesn't affect the DOM you parse
image
All image requests, including background images
Usually safe to block
media
Video and audio files
Usually safe to block
font
Web font files (.woff, .woff2, .ttf)
Usually safe to block
script
JavaScript files
Block with care – never block first-party scripts
texttrack
Subtitles and captions for media
Usually safe to block
xhr
XMLHttpRequest calls
Never block – often carries page data
fetch
Fetch API calls
Never block – same reason as XHR
eventsource
Server-sent events
Block with care
websocket
WebSocket connections
Block with care
manifest
Web app manifest files
Usually safe to block
signedexchange
Signed HTTP exchanges
Usually safe to block
ping
Browser ping and beacon requests
Usually safe to block
cspviolationreport
CSP violation reports sent to a server
Usually safe to block
preflight
CORS preflight OPTIONS requests
Never block
other
Anything that doesn't fit a category above
Block with care
The default scrape-only block list
For most scraping jobs, this block list will effectively cut the bulk of unnecessary traffic without breaking anything important. If your goal is to extract content rather than render the page perfectly, you can safely block the following:
- image
- media
- font
- texttrack
- ping
- manifest
You can add stylesheet to that set if the site's layout doesn't affect the data you're extracting.
Combine resource-type filtering with URL filtering
Filtering resource types can significantly reduce the number of requests your scraper has to process, but it won't catch everything. Extra-heavy requests like analytics libraries, ad scripts, and fingerprinting trackers will still slip through with your scraper.
At the same time, blocking all scripts isn't a good idea because many websites rely on JavaScript to load and display their content. A more effective approach is to filter resource types and URLs together. This will allow you to block requests from known tracking and advertising domains while still letting the page load the scripts it needs to function properly.
Here's how to do that:
This script visits an eCommerce page and blocks images, fonts, media files, and known tracking or analytics scripts before they load. It then extracts the first 3 product titles and prices, while tracking how many requests were allowed or blocked and how much data was downloaded.
When you run the script, you will see every request tagged [BLOCKED] or [ALLOWED], then print a summary showing the scraping results, request statistics, and total bandwidth used at the bottom.
Here's what that looks like on your terminal:
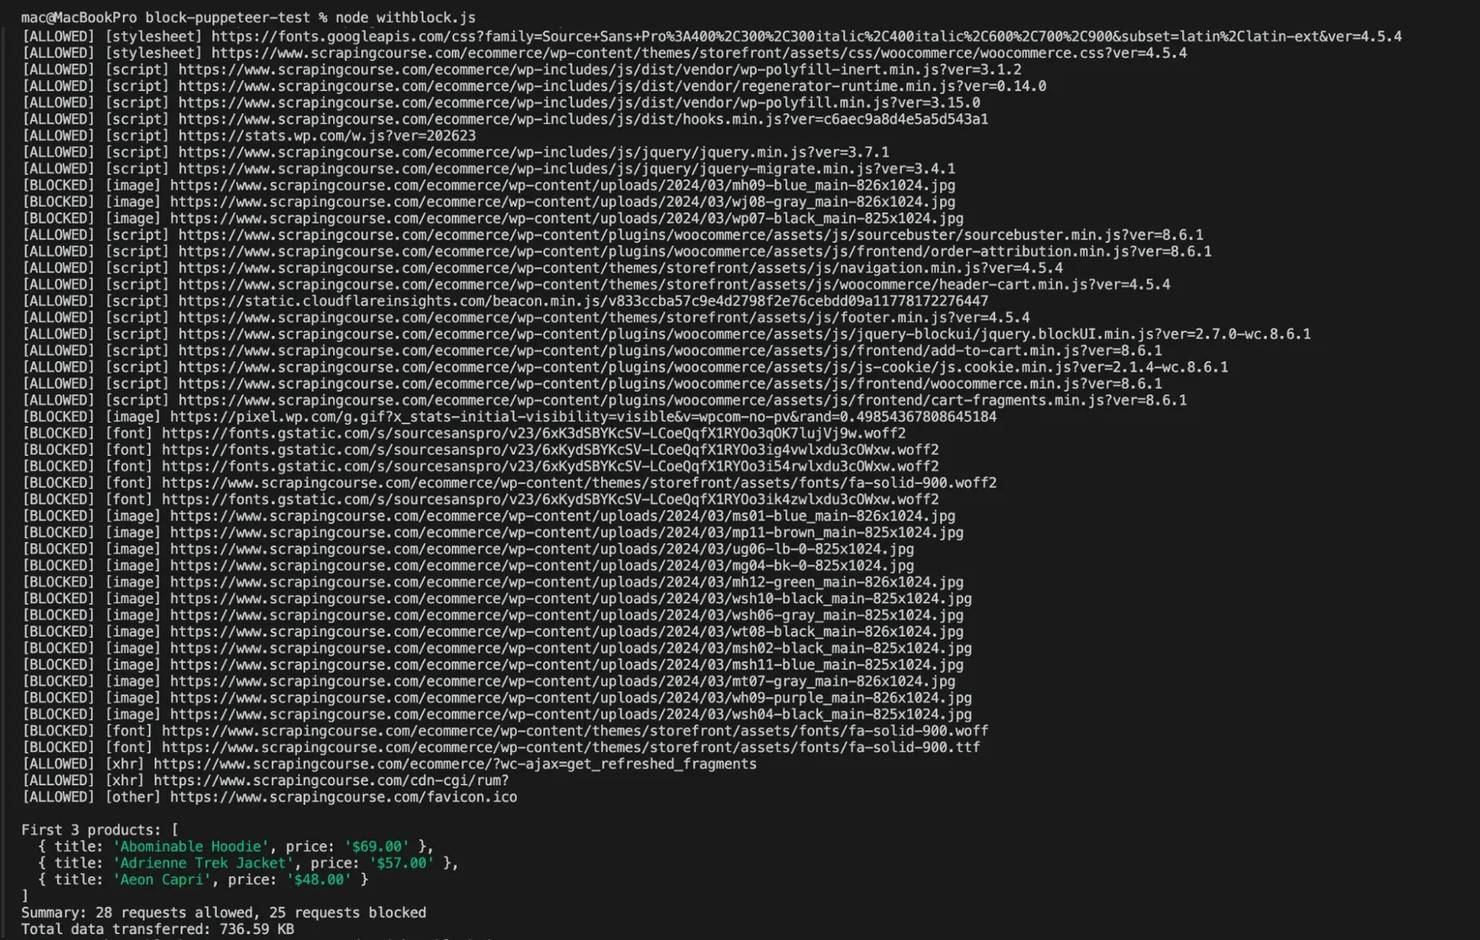
You can see that the product titles and prices still scrape cleanly even though every image and font request gets blocked. In this example, the scraper allowed just 28 requests to load and transferred roughly 737 KB of data. Always remember to remove the request listener with page.off('request', requestHandler) when you're done, otherwise the same request can end up being handled twice and trigger a "Request is already handled" error.
Putting it together
Let's say you're scraping an online store and only need the product titles and prices; you don't need product photos, custom fonts, tracking pixels, or advertising scripts. By blocking those resources, you can reduce the amount of data transferred during each page visit and speed up the scraping process at the same time.
The previous example already showed this in action. With the block list enabled, the page loaded with only 28 requests and transferred around 737 KB of data while still returning all the information we needed.
Now let's run the same page again without any blocking logic. This time, every request is allowed through, so we can compare the results side by side and see exactly how much bandwidth and overhead those extra resources add.
You can see that the page pulled in 57 requests and around 1.6 MB of data this time — product photos, fonts, ad scripts, and trackers all included.
Scenario
Transferred data
Request count
No blocking
~1.6 MB
56 requests
Resource type + URL block list active
~737 KB
28 requests
That's a 54% cut in transferred data, because 29 of the heaviest requests get blocked before the script even runs. The exact same product titles and prices came back on both runs, so you know the page still parsed cleanly despite the blocks.
When you're scraping thousands of pages on a schedule, that 54% drop in transferred data comes straight off your bandwidth and proxy bill, and since fewer requests go out, you get more stable and reliable scraping runs as a result. If you want to see how this fits into a real-world workflow, Decodo's guide on real estate scraping walks you through the full data extraction process from start to finish.
Note: Some sites render product thumbnails, logos, and other visual content through CSS background-image properties instead of standard <img> tags. You might expect those to register as stylesheet type since they're defined in CSS, but Chromium classifies them as image requests when it fetches them, so your image block will still catch them. Just make sure the content you're trying to scrape doesn't depend on those assets before you block them.
Using Chrome DevTools Protocol directly to block requests in Puppeteer
Request interception isn't always the fastest option for blocking requests in Puppeteer, because every single request has to route through your Node.js callback before anything can happen. On a page that triggers 150+ requests, that's 150+ round-trips between the browser and your code, which isn't sustainable when you start scraping at scale.
Chrome DevTools Protocol (CDP) gives you another way to handle this. CDP is the low-level protocol that Puppeteer uses under the hood to communicate with Chromium, and instead of sending every request through a JavaScript listener, it applies filtering rules directly inside the browser. With this approach, you get a protocol-level block list without needing to trigger a callback on every request, deal with round-trip overhead, or maintain a request listener at all.
Setting up a CDP session
You can access CDP through a session attached to the page target. In current Puppeteer versions, here's how you do it:
If you're on an older version, you'll see this pattern instead:
Either way, both give you the same thing: a direct line to the browser's DevTools Protocol.
Step 1: Enable the Network domain
Once your session is ready, you need to enable the Network domain before you can send any network-related commands:
Step 2: Set your block list
With the Network domain enabled, you can now define the URL patterns you want Chromium to block:
The urls array accepts * wildcards, so you can match requests by domain, file extension, or URL path. Here's how the patterns above translate:
Pattern
Blocks
*.googletagmanager.com/*
Google Tag Manager requests
*.doubleclick.net/*
Advertising requests
*.woff2
Web font files
*/ads/*
URLs containing /ads/
The full CDP blocking setup
Here's the complete working example:
The script above opens a CDP session, blocks trackers and fonts by URL pattern, then scrapes the product titles and prices to prove the page still parses cleanly:
Here's what you'll see on your terminal:

The product titles and prices come back clean, and the page weighs in at around 1,137 KB, down from 1,591 KB with no blocking at all. That drop comes entirely from cutting trackers and fonts by URL pattern; no request interception logic needed in your code.
Where CDP blocking falls short
CDP's Network.setBlockedURLs works on URL patterns only, which means it can block a request just when its URL matches something in your block list. What it can't do is look at the resource type and decide whether a request is an image, a font, or a media file. That's exactly where page.setRequestInterception() still holds a clear advantage, because it gives you access to the request details before the browser ever processes them.
You can actually see this gap play out in the numbers. The same store page came in at around 1,137 KB with CDP blocking, but it dropped all the way down to around 737 KB with full request interception, and that difference comes almost entirely down to product images. CDP lets them through because they don't match any URL pattern, whereas the interception version blocks them by identifying their resource type directly.
Use the table below to compare both request blocking approaches and see what each one is good for:
Filter Method
Request Interception
CDP
Filter by resource type
Yes
No
Filter by URL pattern
Yes
Yes
Per-request callback overhead
Yes
No
Best for
Type-based logic, conditional blocking
Large deny lists, high-throughput crawlers
For production, a hybrid setup usually works best. You can use CDP's block list for ad networks, analytics, trackers, and web fonts, and then bring in page.setRequestInterception() for anything you need to block by resource type, like all images regardless of where they come from.
Block requests in Puppeteer with plugins and extensions
Writing your own Puppeteer request interception logic gives you full control over the workflow, but it also means you have to maintain every interception rule yourself, which can get really strenuous as your project grows. So if your goal is simply to block Puppeteer requests without building a custom handler from scratch, then plugins and browser extensions can save you a lot of time.
The two most common options here are puppeteer-extra plugins and Chrome extensions like uBlock Origin. Both approaches work well because they reduce unnecessary network traffic, lower your overall request count, and cut down on unwanted trackers as you scrape.
puppeteer-extra-plugin-block-resources
This plugin package acts as a thin wrapper around page.setRequestInterception(), so instead of creating a request listener and manually checking every single request event yourself, you simply define which resource types you want to block and let the plugin handle the rest. It really comes in handy when you just want to block images, fonts, or media files without needing any of the complex URL-based filtering.
To use this plugin, you have to install it first:
Then configure it into your script like this:
When you run this against the test site, you should see this on your terminal:

25 out of 51 requests were blocked, mostly product images, media files, and fonts that the scraper didn’t need. You don't have to write a custom request listener or handle all the requests yourself. Just tell the plugin which resource types you want to block, and it'll take care of the interception for you.
You can also remove types dynamically if you need to, like this:
Supported resource types you can block this way include
- document,
- stylesheet,
- image,
- media,
- font,
- script,
- texttrack,
- xhr,
- fetch,
- eventsource,
- websocket,
- Manifest,
- etc.
puppeteer-extra-plugin-adblocker
If your goal goes beyond just improving performance, then puppeteer-extra-plugin-adblocker is often the more practical choice. It's built on the Cliqz/Ghostery filtering engine and relies on EasyList and EasyPrivacy rules, so instead of you having to maintain a block list, it automatically blocks advertising networks, tracking scripts, and other common telemetry sources for you. And since fewer analytics and tracking scripts are running, you can scrape more discreetly, because there are fewer opportunities for third-party systems to collect session data while your script works.
To use this plugin, you first have to install it like this:
Then configure it into your block script like this:
That's how you set up blocking for Google Tag Manager, ad network scripts, fingerprinting libraries, and tracking pixels without having to write a single request listener yourself. This time we're pointing it at a real news site instead of a test page, so it can actually block real ads.
When you run it, you'll get this result on your terminal:

That's 11 requests blocked on a real, ad-heavy page, and the adblocker plugin pulls this off by matching each request against EasyList and EasyPrivacy filter rules, which together target real ad networks and tracking domains.
Loading uBlock Origin as a Chrome extension
If you're opting to use a real browser extension instead of a Puppeteer plugin, uBlock Origin is usually the first option you should reach for. The biggest advantage of uBlock Origin is that it comes with mature, battle-tested filtering rules that millions of users already rely on every day, so you don't have to spend time maintaining custom filters or building your own request listener logic.
To load uBlock Origin, you have to download a built version of it for Chrome (a .crx or unpacked extension folder), then launch Puppeteer with the extension loaded, as shown below:
Once loaded, uBlock Origin applies its own block list directly in the browser, so image requests, tracker scripts, and ad network calls all get filtered before they even reach the page. The trade-off, though, is the additional setup and maintenance that comes along with it.
Since Chrome extensions require a real browser environment, they won't work with headless: "new", which means you'll need to run Chromium in headless: false mode or fall back to the legacy shell mode instead. And if you're running your scraping jobs on a Linux server, you'll also need a virtual display solution like Xvfb to keep the browser session alive. On top of that, you'll have to keep it updated as new versions roll out because this is a browser extension that does get updated from time to time.
Which one should you use?
For most scraping projects, start with puppeteer-extra-plugin-adblocker, since it only takes a few lines of setup, doesn't require a display server, and saves you from maintaining your own block list. The plugin automatically blocks ads, trackers, and many common fingerprinting scripts, so you get most of the benefits of request blocking with very little effort.
If your goal is simply to block images, media files, fonts, and other heavy resources, then puppeteer-extra-plugin-block-resources is a solid choice, because it's lightweight, easy to configure, and works well when you only need resource-type blocking without any URL-pattern logic.
Browser extensions like uBlock Origin are best reserved for cases where browser behavior matters more than raw performance, since uBlock uses the same filtering approach as a real browser extension and makes your scraper look more like a privacy-conscious user. The trade-off, though, is that you'll need the infrastructure to run headful Chrome in production, which isn't always practical.
Still not sure where to start? Go with the adblocker plugin, since it gives you most of the performance and blocking benefits without overcomplicating your Puppeteer setup.
Handling challenges when you block requests in Puppeteer
Blocking requests in Puppeteer is usually straightforward; you enable page.setRequestInterception(), attach a request listener, and start filtering unwanted traffic. This usually works well until your scraper starts growing beyond a simple script. Once you start introducing multiple plugins, authentication flows, service workers, and large block list configurations, those can easily introduce bugs that are hard to diagnose if you don't know what to look for.
Here are the 6 most common bugs you'll run into when blocking requests in Puppeteer, what causes them, and exactly how to fix them.
1. "Request is already handled!"
This is probably the most common error you'll hit when using Puppeteer request interception, and it shows up when more than one request listener tries to handle the same request, or when your code calls both request.continue() and request.abort() on the same request. This can easily happen when you combine custom interception logic with third-party plugins that also intercept traffic behind the scenes.
To fix this, you need to keep exactly one interception handler per page. If multiple parts of your script need to participate in request filtering, build a single central dispatcher and let it route all decisions internally, like this:
Avoid using multiple listeners at once, which leads to duplicate processing of the same request event.
2. Multiple plugins conflicting with each other
If you're using Puppeteer ≥ 14 alongside plugins like puppeteer-extra-plugin-stealth, you'll run into a cooperative interception issue where both your handler and the plugin try to intercept the same request and end up fighting each other.
To fix this, enable cooperative mode when you activate interception:
Then pass a priority to your terminating calls so handlers know their order:
This way your handler and any plugin handlers will cooperate instead of colliding.
3. Race conditions with page.goto()
setRequestInterception is an asynchronous function, so if you call page.goto() before you attach your request listener, some early requests you want to block can slip through before the listener is even registered.
To keep the order straight, always set up interception and attach your listener before you navigate:
This is one of the more subtle race conditions that doesn't produce a visible error; it just silently lets requests through. If your block request logic seems to work on some scraping runs and not others, this is usually why.
4. Service workers can bypass your interception logic
Some websites use service workers to preload assets, cache resources, or handle requests before Puppeteer's listener ever sees them, which means your interception logic may never catch certain requests at all. You might notice unexpected images, scripts, or API calls appearing even though your block list should have caught them.
The most reliable workaround is to disable service workers and prefetch features during browser launch:
Another option is to block the service worker registration URL directly if the target site exposes it, so it never installs in the first place.
5. Authenticated requests and 401 challenges
Authentication flows can also break if you block requests too aggressively. For example, if you abort a 401 challenge too early while using a proxy that requires authentication, the session may never fully establish, which leads to failed connections or the web page doesn’t load completely.
Before you abort anything, check whether a request has already been handled before applying your logic:
If you run into authentication issues, it’s also worth checking your proxy error codes first, because many issues that look like interception bugs are actually proxy authentication problems in disguise.
6. Large block lists can increase CPU usage
Every intercepted request passes through your handler, so on a page that loads hundreds of assets, your interception code executes hundreds of times before the page even finishes loading.
When your block list is small, the performance impact is usually negligible, but large block list configurations consume significantly more CPU, especially when they rely on synchronous regex operations and repeated string matching like this:
To keep performance stable, it’s better to precompile patterns outside the handler or move heavy URL filtering to CDP-level blocking instead. That’s also why combining page.setRequestInterception() with CDP- level blocking. CDP will handle large URL deny lists efficiently at the protocol level, while Puppeteer's request listener focuses on resource types and conditional logic where it's actually needed.
That combination will effectively reduce CPU overhead and help you maintain higher throughput as your scraping workload grows.
When blocking requests in Puppeteer isn't enough: scaling the setup
Blocking requests in Puppeteer solves a specific set of problems quite well, as it reduces your request count, lowers bandwidth usage, and removes analytics and tracking scripts that anti-bot systems often rely on to score a session. However, it only works within the browser layer itself, which means it doesn't address everything happening outside of it. A well-crafted block list won't remove an IP ban, won't solve a CAPTCHA, and won't bypass JavaScript challenges triggered by systems like Cloudflare or DataDome. In that sense, request blocking should be seen as an optimization, not a bypass mechanism.
It becomes even trickier when you start scraping at scale. Running a fleet of headless browsers means you have to maintain block lists, update stealth plugins, manage request listener logic, handle interception rules, and set up blocking strategies across hundreds of concurrent page loads. At some point, the engineering effort needed to keep all of that running will inevitably start to outweigh the actual benefit.
That's where Decodo's Web Scraping API becomes a practical alternative. The API will help you handle browser rendering, proxy rotation, and anti-bot bypass behind a single HTTP call, and still return rendered HTML, JSON, or Markdown. If you decide to go that route, you can generate an API token straight from the Decodo dashboard and test your requests in the API Playground before integrating them into your workflow.
Final Thoughts
Blocking requests in Puppeteer is one of the quickest ways to improve your browser automation performance. A few lines of code can reduce your request count, cut bandwidth, and speed up page loads without you having to touch your scraping logic. For most projects, starting with page.setRequestInterception() is enough for resource-type filtering, and as your setup grows, you can move to CDP-level blocking for larger URL-based block lists or reach for puppeteer-extra plugins when you want prebuilt filtering rules without having to maintain it overtime.
That being said, request blocking only solves part of the problem. It speeds things up, cuts bandwidth consumption, and makes your scraping workflows more efficient, but it won't prevent IP bans, solve CAPTCHAs, or bypass advanced anti-bot systems. So when maintaining browser instances, block lists, and interception rules starts taking more time than the actual scraping, you can use Decodo's Web Scraping API to take some of the burdens off your hands.
Faster scraping, fewer problems
You've trimmed images, fonts, and trackers. Decodo's Web Scraping API trims the rest: proxy rotation, CAPTCHA bypassing, and anti-bot handling before your code even runs.
About the author

Justinas Tamasevicius
Director of Engineering
Justinas Tamaševičius is Director of Engineering with over two decades of expertise in software development. What started as a self-taught passion during his school years has evolved into a distinguished career spanning backend engineering, system architecture, and infrastructure development.
Connect with Justinas via LinkedIn.
All information on Decodo Blog is provided on an as is basis and for informational purposes only. We make no representation and disclaim all liability with respect to your use of any information contained on Decodo Blog or any third-party websites that may belinked therein.