How to Use a Proxy With node-fetch: Setup, Rotation, and Troubleshooting Guide
A node-fetch proxy routes your fetch requests through an intermediary server, so the target site sees the proxy's IP instead of yours. It's the standard fix for IP blocks, geo-restrictions, and rate limiting in Node.js scraping. The catch: neither node-fetch nor Node's native fetch supports proxies natively, so you need an external agent library to bridge the gap.

Justinas Tamasevicius
Last updated: May 26, 2026
9 min read

TL;DR
- node-fetch has no built-in proxy option, so you wire in an agent (typically https-proxy-agent) and pass it via the { agent } parameter
- Node's native fetch ignores { agent } entirely because it runs on Undici, not the http(s).Agent API. Use ProxyAgent or EnvHttpProxyAgent from Undici, or enable NODE_USE_ENV_PROXY=1 on Node 22.21+ or 24.0+
- For production scraping, rotate IPs through a residential proxy gateway like Decodo and reuse the same agent within a session for cart flows or paginated requests
- TLS errors like UNABLE_TO_VERIFY_LEAF_SIGNATURE usually point to a corporate MITM proxy or a self-signed cert. Load the right CA instead of disabling verification.
Prerequisites and project setup
This guide assumes you're comfortable with Node.js basics and understand what a proxy server does at a high level. If you're new to scraping more broadly, the JavaScript web scraping tutorial covers the basics.
You'll need Node.js. The version depends on which fetch you're using:
- node-fetch v2: Node 4 or later, CommonJS-compatible
- node-fetch v3: Node 12.20.0, 14.14, or 16.0 minimum, ESM-only
- Native fetch: shipped experimentally in Node 18, stable from Node 21
- NODE_USE_ENV_PROXY for native fetch: Node 22.21.0+ or 24.0.0+ (official Node.js feature)
Note: This guide uses macOS and Terminal commands throughout. If you're on Windows, you can install Node.js directly from the official download page.
If you don't already have Node.js installed, you can install it from Terminal using `nvm`:

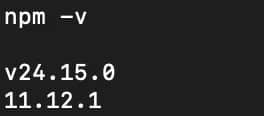
Verify the installation:
You should see version numbers returned for both commands.
Next, create a new project directory and initialize a Node.js project:
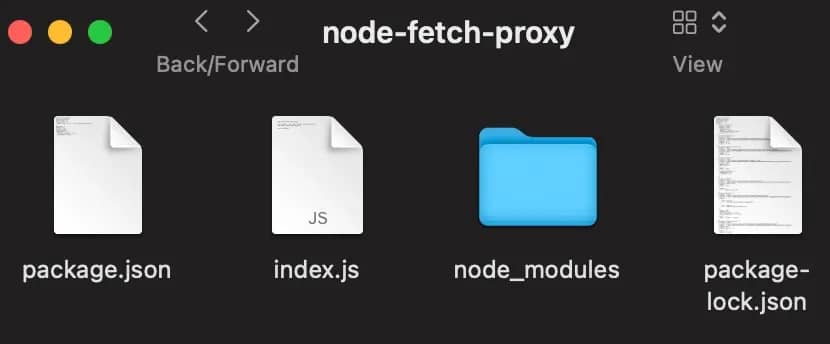
Your directory structure should now look like this:
Open package.json and add "type": "module". This tells Node to treat .js files as ESM (ECMAScript modules), matching node-fetch v3.
Next, install the dependencies:
A couple of things here:
- node-fetch brings the fetch() API to Node.js
- https-proxy-agent allows requests to run through an HTTP or HTTPS proxy
- dotenv is optional but useful for storing proxy credentials and other sensitive values in environment variables instead of hardcoding them
Once the installation finishes, create an index.js file in the root of the project directory.
For the examples in this guide, we'll use Decodo's IP endpoint to quickly verify whether requests are going through your real connection or a proxy.
This sends a request to ip.decodo.com and returns information about your current IP address.
Run the file with:
You should see a JSON response containing your IP and location details. That gives you a clean baseline. Everything else in this guide is about changing what appears in that response.
Integrating https-proxy-agent with node-fetch
Before jumping into the code, it helps to understand what the proxy agent is actually doing.
In Node.js, an HTTP agent manages how network requests are handled behind the scenes, including connection reuse, keep-alive behavior, and where requests are routed. By default, requests go directly to the target server. A proxy agent changes that behavior by routing requests through a proxy server first, which then forwards the request to the final destination.
The https-proxy-agent package does exactly this. Despite the name, the HttpsProxyAgent class handles both HTTP and HTTPS target URLs, so you don't need a separate agent for each.
The basic pattern looks like this:
This reads as: "create an agent that tunnels through this proxy, then use it for this fetch request". The { agent } option is the bridge. That's the one parameter node-fetch needs to route through the proxy.
Here's the full ESM example, hitting an IP echo endpoint to verify the proxy works:
The proxy URL embeds credentials inline, which is convenient for examples but not what you want in production (more on that shortly). The target is ip.decodo.com/json, an IP-echo endpoint that returns the IP, ISP, city, and country of whoever made the request. If the proxy is working, you'll see the proxy's IP and location in the response, not your own.
If you're using CommonJS with node-fetch v2, the structure is almost identical. The main difference is using require() and wrapping the request in an async IIFE because top-level await isn't available:
If you're weighing fetch against other HTTP clients in Node.js, cURL in JavaScript covers the trade-offs.

Get started with reliable residential proxies
115M+ ethically-sourced IPs in 195+ locations, with rotation and sticky sessions built in.
Handling proxy authentication and credentials
Proxy providers require authentication before they'll route your requests. In practice, there are two common approaches:
1. Authenticate with a username and password on each request
2. Pre-register your server's IP address with the provider (IP whitelisting)
Most setups use credentials, and that's where practical issues such as special characters in passwords and accidentally exposing credentials in source control show up.
Proxy credentials are usually embedded directly inside the proxy URL. The problem is that certain characters have special meaning inside URLs. For example:
- @ separates credentials from the hostname
- : separates the username from the password
- / and # can also break parsing
If those characters appear inside your password, the proxy URL can become invalid.
To avoid this, wrap the credentials with encodeURIComponent() before constructing the URL:
Hardcoding credentials directly into source files is fine for quick tests, but it's not ideal for real projects. A safer approach is storing them in environment variables.
Create a .env file in the root of your project:
Add .env to your .gitignore immediately. Then load it at the top of your script:
In CI/CD, skip the .env file and inject the same variables as secrets in GitHub Actions, GitLab CI, or wherever your pipeline runs. The code stays identical because it just reads process.env.
If you go the IP whitelisting route instead, you register your server's public IP address with the proxy provider through their dashboard. No credentials in code, no URL encoding to worry about.
The downside is that it only works reliably when your server has a stable public IP address. For most modern applications and cloud environments, credential-based authentication is usually the more flexible option.
Using proxies with Node.js native fetch
Native fetch in Node.js doesn't use the { agent } option. You can pass it anyway, but the request will still go out through your real IP address.
The reason is that Node's built-in fetch is powered by Undici, which uses its own dispatcher system instead of the older http(s).Agent API. Since https-proxy-agent is built around http(s).Agent, native fetch simply ignores it.
That leaves you with three options:
Option 1: Global ProxyAgent
This replaces the default dispatcher for the entire process. Every subsequent fetch() call routes through the proxy automatically:
Option 2: Per-request dispatcher
If you only want certain requests proxied, pass the dispatcher directly into fetch():
In TypeScript projects, the dispatcher may not appear in the standard fetch typings yet, even though Undici supports it at runtime.
Option 3: NODE_USE_ENV_PROXY (Node 22.21+ or 24.0+)
Node.js 24 introduced built-in proxy support through environment variables.
Run your script like this:
No code changes required. This is especially useful in containerized or cloud environments where proxy settings are injected through environment variables.
Here's how the approaches compare:
Approach
Node version
Best for
Limitation
node-fetch + https-proxy-agent
Node 12.20+
Existing node-fetch projects and fine-grained per-request proxy control
Extra dependency and ESM/CommonJS version differences
Undici ProxyAgent (global)
Node 18+ (stable in 21+)
Native fetch projects where every request should use the proxy
Affects every fetch() call in the process
Undici ProxyAgent (per-request)
Node 18+ (stable in 21+)
Mixing proxied and direct requests in the same application
dispatcher isn't fully reflected in TypeScript typings yet
NODE_USE_ENV_PROXY
Node 22.21+ or 24.0+
Containerized or infrastructure-driven environments with env-based proxy configuration
Requires recent Node, less programmatic control
The practical rule: on Node 20 or below, stick with node-fetch + https-proxy-agent. On Node 21+, native fetch + Undici ProxyAgent gets you there with one fewer dependency. On Node 22.21+ or 24.0+, the env-variable approach is hard to beat.
Customizing headers and user agents to avoid detection
When a target server receives your request, it sees more than just your IP address. Every HTTP request also includes headers that describe the client: which browser you're claiming to be, what content types you accept, which languages you prefer, and more.
Real browsers send these headers in fairly predictable combinations and formats. By contrast, a default Node.js fetch() request sends a sparse and highly distinctive header set that doesn't resemble normal browser traffic. Anti-bot systems routinely use those differences as detection signals.
That means a request can still get flagged even if it's coming through a clean residential proxy. The most important headers are usually:
- User-Agent (browser and operating system information)
- Accept (content types the client can process)
- Accept-Language (preferred languages)
- Accept-Encoding (supported compression formats)
- Referer (where the request originated from)
Combine custom headers with your proxy agent:
For rotation, keep an array of realistic User-Agent strings and pick one at random per request. The point isn't to be clever about it, just not to send the same headers on every request from every IP.
There's a ceiling to what header rotation can do. Modern anti-bot systems also fingerprint your TLS handshake (JA3, JA4), HTTP/2 frame settings, and the order of your headers. Node's default TLS stack has a fingerprint that doesn't match any real browser, so a determined detection system will flag you no matter how realistic your User-Agent looks.
For targets with serious bot protection, header rotation alone won't get you through. The cleaner answer is to offload the problem entirely. Decodo's Web Scraping API handles all of that automatically, so you keep your fetch code clean and let the proxy layer deal with fingerprinting.
Rotating proxies and managing sessions
Rotation means a different IP per request, so a target can't ban you based on traffic volume from any single address. Sessions mean the same IP for multiple requests, so a target sees a coherent visit rather than disconnected hits. The choice depends on whether the request has state attached.
For independent requests (product pages, search results, anything without state), rotate. The simplest version picks a random proxy from a pool:
Round-robin works too and gives more predictable distribution. But maintaining your own proxy pool is an old problem. Modern residential providers route everything through a single gateway and rotate server-side. With Decodo, you point at gate.decodo.com:7000 and every request gets a fresh IP automatically:
For stateful workflows (logging in, adding to cart, scraping page 7 of a paginated list), rotation breaks things. You want the same IP for the duration of the session. The reliable approach is provider-managed sticky sessions, where you encode the session into the proxy username:
This reads as: "use the user account username, keep the same IP for the session identified as cart42, and hold that IP for 30 minutes". Every request through that agent now comes from the same IP for the duration. Change session-cart42 to a new value (or wait for it to expire), and you'll get a different IP.
Retry logic ties both patterns together. Proxy connections fail more often than direct ones because the IP at the end might go offline, get banned mid-session, or just time out. Exponential backoff with jitter is the standard retry pattern:
The jitter (the random component) matters. If 100 of your worker processes all retry at exactly 2 seconds, you've just synchronized a thundering herd. The randomness spreads them out.
Understanding proxy types: Residential, datacenter, ISP, and mobile
Not all proxies are equal. The four main types differ in where the IPs come from, which affects how much trust target sites give them.
- Datacenter proxies come from servers in data centers. Fast and cheap, but the ASN ranges are well-known and many sites flag them on sight.
- Residential proxies route through real home internet connections, so they appear to come from regular users. Slower and pricier than datacenter, but they pass through anti-bot systems that block datacenter IPs immediately.
- ISP proxies are a hybrid. The IPs are registered with residential ISPs but hosted in data centers, so target sites treat them as residential while you get datacenter-grade stability.
- Mobile proxies use carrier IPs from 4G and 5G networks. Carrier NAT means thousands of real users share a single IP, so banning one effectively bans innocent users. Sites avoid that, which makes mobile proxies the hardest to block.
Type
Speed
Cost
Detection risk
Best for
Datacenter
Fast
Low
High
Low-risk targets, internal APIs
Residential
Medium
Medium
Low
Sites with aggressive anti-bot
ISP
Fast
Medium-High
Low
Long sessions, sustained scraping
Mobile
Slow
High
Very low
Hardest targets
Handling TLS, certificates, and common connection errors
When you start putting node-fetch behind a proxy, a handful of errors will show up often enough to learn by heart. The pattern is usually clearer if you start from what you observe rather than the error code itself.
- The request fails with a TLS certificate error. You'll see something like UNABLE_TO_VERIFY_LEAF_SIGNATURE or SELF_SIGNED_CERT_IN_CHAIN. This means your proxy is intercepting TLS (typically a corporate MITM proxy that re-signs traffic with its own CA) or you're using a self-signed certificate somewhere in the chain. The wrong fix is setting NODE_TLS_REJECT_UNAUTHORIZED=0. That disables certificate verification globally for your process, which means a man-in-the-middle attacker could swap any cert and you'd never know. The right fix is to load the actual CA certificate your proxy uses. To resolve it, point Node at the CA via the environment variable:
Or pass it programmatically to the agent:
Verification works as designed, and you keep the security guarantees.
- The connection is refused immediately. You'll see ECONNREFUSED. The proxy server isn't accepting your connection. Check that the URL is correct, the port is right (Decodo's residential gateway is 7000), and the proxy is actually running. A quick curl -x
http://gate.decodo.com:7000 https://ip.decodo.com/jsonwill fail in the same way if it's a connectivity problem rather than something in your code. - The request hangs and times out. You'll see ETIMEDOUT. The proxy is reachable but slow, the target is slow, or both. Try a different geographic proxy location closer to the target, increase your timeout, or check whether the target is rate-limiting you in a way that looks like a timeout.
- The proxy returns 407. Authentication required. Your credentials are missing, wrong, or not making it into the request. URL-encoding issues are the usual culprit when the credentials look correct but still fail. Special characters like @, :, /, or # need encodeURIComponent() treatment before they go into the URL.
- The target returns 403. This one's different from the rest. The proxy worked, the IP got through, and then the target's anti-bot kicked in. The fix isn't in your proxy code, it's in your strategy: rotate IPs faster, add realistic headers, or move to a higher-trust proxy type (residential or ISP instead of datacenter).
Testing and troubleshooting proxy connections
When something breaks, work through it in order rather than guessing. Each step verifies one assumption.
- Is the proxy reachable? Run curl -v -x
http://gate.decodo.com:7000 https://ip.decodo.com/json-U user:pass from the same machine your Node code runs on. If curl fails, your code can't possibly succeed. - Does authentication work? Check the curl response. A 407 means credentials are wrong or malformed. A real response with an IP means auth is fine.
- Is the IP what you expect? Check the returned country, city, and ISP. If you wanted Germany and got Brazil, your geo parameters aren't being passed correctly.
- Does it work against the actual target? If steps 1-3 passed but this fails, the target is blocking the proxy IP, not your setup.
Quick checklist for when nothing else fits:
- Missing http:// prefix in the proxy URL
- Wrong port
- Special characters in credentials are not URL-encoded
- Firewall blocking the outbound proxy port
- node-fetch v3 imported with require() (it's ESM-only)
- { agent } passed to native fetch (it's ignored, use { dispatcher } instead)
Limitations of node-fetch proxies and alternative approaches
node-fetch + proxy gets you a long way, but it has a ceiling.
First, it can't execute JavaScript. If the page is built with React, Next.js, or any client-side framework, fetch returns the empty shell that ships from the server, not the populated page a browser would see. For JS-rendered pages, you need a headless browser like Playwright or Puppeteer, or a rendering API.
Second, basic fetch lacks browser-level fingerprints. Even with rotated headers and residential IPs, your TLS handshake, HTTP/2 settings, and absence of a real browser stack are detectable. Sophisticated anti-bot systems (Cloudflare Bot Management, DataDome, PerimeterX) catch this. Two realistic paths for those targets:
- A headless browser, which adds real browser fingerprints but is heavy on resources and slow
- A scraping API like Decodo's Web Scraping API, which handles proxies, headers, fingerprints, JavaScript rendering, and retries in a single HTTP call
For simple targets, stick with node-fetch + proxy. If your work is mostly parsing static HTML in Node.js, web scraping with Cheerio and Node.js pairs naturally with this setup. When the target fights back, move up the stack – and if that stack is TypeScript, the TypeScript SDK gives you typed access to the same scraping API, so you're not rebuilding the agent, header, and retry layer by hand..
Final thoughts
If there's one thing to take from all of this, it's that node-fetch and Node's native fetch behave differently enough that they should almost be treated as separate libraries.
One uses { agent }, the other uses { dispatcher }. One works with https-proxy-agent, the other doesn't. Knowing which fetch you're using and which proxy mechanism it expects is more than half of getting a node-fetch proxy setup right.
The rest is plumbing you'd rather not maintain forever. Tools like Decodo's Web Scraping API handle the proxy layer, the rendering, and the anti-bot work for you, so your fetch code stays focused on parsing what comes back.

Scrape pages that block fetch requests
Get rendered HTML from Cloudflare, DataDome, and PerimeterX-protected sites without managing rotation, headers, or retries yourself. Data delivered in HTML, JSON, CSV, XHR, PNG, or Markdown.
About the author

Justinas Tamasevicius
Director of Engineering
Justinas Tamaševičius is Director of Engineering with over two decades of expertise in software development. What started as a self-taught passion during his school years has evolved into a distinguished career spanning backend engineering, system architecture, and infrastructure development.
Connect with Justinas via LinkedIn.
All information on Decodo Blog is provided on an as is basis and for informational purposes only. We make no representation and disclaim all liability with respect to your use of any information contained on Decodo Blog or any third-party websites that may belinked therein.