Back to blog

End-to-End AI Workflows with LangChain and Web Scraping API

AI has evolved from programs that just follow rules to systems that can learn and make decisions. Businesses that understand this shift can leverage AI to tackle complex challenges, moving beyond simple task automation. In this guide, we'll walk you through how to connect modern AI tools with live web data to create an automated system that achieves a specific goal. This will give you a solid foundation for building even more sophisticated autonomous applications.

Justinas Tamasevicius

Oct 22, 2025

11 min read

The rise of the AI workforce: from chatbots to autonomous agents

The public imagination has been captured by conversational AI, where Large Language Models (LLMs) act as sophisticated partners in dialogue. This, however, is just the first phase of a much larger tech shift. The next frontier moves beyond simple response generation to a paradigm of autonomous action, introducing AI agents: systems that don't merely respond, but actively reason, plan, and execute multi-step tasks to achieve high-level goals.

While a chatbot is a conversational partner, an AI agent is a digital employee. It’s the engine behind AI workflow automation.

What is AI workflow automation?

At its core, it's the use of intelligent systems to streamline and adapt multi-step processes, moving beyond rigid, pre-programmed instructions.

Unlike traditional automation that follows a rigid, rule-based script, these AI-driven workflows are autonomous. You give the agent a goal, and it independently figures out the necessary steps to accomplish it, learning from data and making dynamic, context-aware decisions.

This is a game-changer because it directly addresses the primary bottlenecks in modern data-intensive projects: manual data collection and the complexity of integrating disparate data sources. By moving from simple, script-based process automation to true autonomy, organizations can unlock data-driven insights in real-time. This leads to huge gains in efficiency and accuracy, freeing up teams from repetitive tasks for more creative and strategic work.

Understanding the core concepts

Before delving into the code, it's important to understand the core concepts that form the basis of modern workflow automation AI.

Traditional vs. AI-powered

The distinction between AI-powered automation and traditional, rule-based automation is a fundamental paradigm shift. Traditional automation, like Robotic Process Automation (RPA), operates like a train on a fixed track – it's highly efficient at executing a predefined sequence of steps but can't deviate from its path. On the other hand, AI workflow automation functions like a self-driving car given a destination; it perceives its environment, makes dynamic decisions, and navigates unexpected obstacles to reach its goal.

This difference comes down to a few key capabilities. AI-driven systems excel at handling unstructured data, such as the text of an email or a news article, whereas traditional automation typically requires structured inputs, like forms or spreadsheets. AI systems can also learn from data patterns to improve their performance and adapt to changing conditions – a feat that's impossible for rigid, rule-based scripts that often break when a website's layout changes.

The following table gives you a clear, side-by-side comparison of these two approaches.

Feature

Traditional automation

AI automation

Core logic

Rule-based, follows a predefined script.

Goal-oriented, uses a reasoning engine to decide steps.

Decision making

Static, based on if-then conditions.

Dynamic, adaptive, and context-aware.

Data handling

Primarily structured data (e.g., forms, databases).

Handles both structured and unstructured data (e.g., articles, emails).

Adaptability

Brittle, breaks when UI or process changes.

Resilient, can adapt to changes and handle exceptions.

Example

A script that copies data from a spreadsheet to a web form.

An agent that reads customer emails, understands intent, and decides whether to file a support ticket or search a knowledge base.

Anatomy of a LangChain agent

The LangChain framework acts as the central nervous system of the AI agent. It provides the cognitive architecture that enables the agent to reason, plan, and orchestrate its actions.

At the heart of our project is a LangChain agent. It's crucial to understand that the agent isn't the LLM itself, but a system that uses an LLM as its central reasoning engine to orchestrate a series of actions.

  • The ReAct framework (reason + act). The agent's logic is based on a powerful framework known as ReAct. This pattern is a continuous loop: the agent reasons about the task to form a plan, selects a tool and acts by executing it, and then observes the result to inform its next reasoning cycle. This loop continues until the agent determines the goal has been achieved. It's how an agent breaks down complex, multi-step problems into a manageable sequence of thought, action, and observation.
  • Tools. An LLM by itself is a closed system. It can't access real-time information or perform actions in the outside world. LangChain tools fix this. They're functions or interfaces the agent can call to interact with external systems like APIs, databases, or search engines. The real power of an agent comes from this fusion of an LLM's reasoning with the practical capabilities of its tools. The LLM provides the plan ("what" and "why"), and the tools provide the execution ("how").
  • LangGraph. The agent in this tutorial is built using createReactAgent, a function that leverages a more advanced library called LangGraph. LangGraph models agent behavior as a graph, where each step is explicitly defined. This graph-based architecture gives you superior control, state management, and reliability for building complex agentic workflows, representing the current best practice in the LangChain ecosystem. For a deeper dive into orchestrating AI agents, check out our guide on AI agent orchestration.

Overcoming the data barrier with Web Scraping API

For an agent to reason about the world, it needs real-time data. Web scraping is the primary way to get this data, but building and maintaining a robust scraping infrastructure is a massive engineering challenge. Manual scraping is filled with difficulties:

  • Anti-bot defenses. Modern websites use sophisticated measures to detect and block automated traffic.
  • CAPTCHAs. These automated challenges can stop a scraper in its tracks.
  • IP rotation. Too many requests from a single IP will quickly get you blocked.
  • JavaScript rendering. Many sites load content dynamically, so the raw HTML that a simple scraper gets is often empty. This is especially true for most scraped websites in 2025.

A managed Web Scraping API, like Decodo's one, is the strategic solution to these problems. This serves as the agent's senses, giving it the ability to perceive and interact with the live internet. It handles the immense complexity of web data extraction, like IP rotation, JavaScript rendering, and anti-bot countermeasures, so the agent can reliably retrieve real-time information. You can also explore how Decodo's API integrates with AI-powered workflows through MCP protocol, n8n automation, and AI assistants like Claude and ChatGPT.

Chat models

Chat models like Google's Gemini are the agent's intellect or cognitive engine. As a powerful Large Language Model (LLM), Gemini provides the core reasoning capability within the LangChain framework, allowing the agent to understand user requests, formulate plans, and synthesize information into coherent outputs.

Building the trend analysis agent: step-by-step implementation

Now, let’s build a functional application that acts as an autonomous intelligence agent. While our example focuses on generating a market intelligence report, this same architectural pattern could be adapted for a manufacturing workflow using sensors for predictive maintenance, or for enhancing customer support workflows with intelligent issue resolution. For our project, the goal is clear:

  1. Input. You provide a topic of interest (e.g., "AI in healthcare").
  2. Process. The AI agent autonomously searches the web for the most recent and relevant articles on the topic. It then scrapes the full content of these articles for in-depth analysis.
  3. Output. The agent synthesizes its findings and generates a concise, professionally formatted executive intelligence briefing, highlighting key trends, business impacts, and actionable recommendations.

Setting up your development environment

Before writing any code, let's walk through setting up your development environment. This section serves as a LangChain tutorial for beginners, guiding you through the essential first steps.

Step 1: Initialize a Node.js project

First, create a new directory for the project and initialize it with npm. Open your terminal and run these commands:

mkdir trend-analysis-agent
cd trend-analysis-agent
npm init -y

This command creates a package.json file, which manages your project's dependencies.

Step 2: Install required dependencies

Our project uses several key packages. Install them using npm:

npm install dotenv @langchain/google-genai @langchain/langgraph @decodo/langchain-ts readline

Here’s a quick rundown of what each package does:

  • dotenv – loads environment variables from a .env file so you can keep your API keys secure.
  • @langchain/google-genai – the integration package for using Google's Gemini models with LangChain.
  • @langchain/langgraph – the library that provides the graph-based architecture for creating robust agents.
  • @decodo/langchain-ts – the official package with pre-built LangChain tools for interacting with the Decodo Scraper API.
  • readline – a native Node.js module for building the command-line interface (CLI).

Step 3: Set up your API keys

The agent needs credentials for two services:

1. Decodo. Go to the Decodo dashboard to get your Web Scraping API (Advanced) username and password. For a detailed walkthrough, quickly follow our quick start documentation or watch a step-by-step video tutorial. Create a .env file and add them:

SCRAPER_API_USERNAME="YOUR_DECODO_USERNAME"
SCRAPER_API_PASSWORD="YOUR_DECODO_PASSWORD"

2. Google Gemini. Visit Google AI Studio to generate an API key for the Gemini model. Add this key to your .env file as well:

GOOGLE_API_KEY="YOUR_GOOGLE_API_KEY"

The dotenv package will automatically load these variables when the application starts.

Step 4: Configure TypeScript

You also need to create a tsconfig.json file in your project's root directory and paste the following content:

{
  "compilerOptions": {
    "target": "ES2020",
    "module": "commonjs",
    "moduleResolution": "node",
    "strict": true,
    "esModuleInterop": true,
    "allowSyntheticDefaultImports": true,
    "skipLibCheck": true,
    "forceConsistentCasingInFileNames": true,
    "resolveJsonModule": true,
    "declaration": false,
    "sourceMap": false
  },
  "ts-node": {
    "esm": false
  }
}

Getting started

Once you've got your prerequisites ready, it's time to do the real magic.

Step 1: Setup and imports

First, create your main application file, trend-analysis-agent.ts.

At the very top of this new file, we'll add all the necessary imports and set up our environment. This includes loading the dotenv package, importing classes from LangChain and Decodo, and defining a TypeScript interface for our agent's configuration.

Add this code to the top of trend-analysis-agent.ts:

import dotenv from "dotenv";
import { ChatGoogleGenerativeAI } from "@langchain/google-genai";
import { createReactAgent } from "@langchain/langgraph/prebuilt";
import {
  DecodoUniversalTool,
  DecodoGoogleSearchTool,
} from "@decodo/langchain-ts";
import * as readline from "readline";
// Load environment variables from .env file
dotenv.config();
// Define an interface for the configuration object
interface TrendAnalysisConfig {
  topic: string;
  timeframe?: string;
  geoLocation?: string;
  articleCount?: number;
}

Step 2: Define the agent class and constructor

Next, let's create the main class for our application, TrendAnalysisAgent. This class will hold all the logic for our agent.

We'll also define the constructor, which is the special function that runs when we create a new instance of the class. It will initialize our agent and the command-line interface.

Add this code below your imports:

class TrendAnalysisAgent {
  // The agent executor, which will run the agent logic
  private agent!: ReturnType<typeof createReactAgent>;
  // The interface for reading user input from the command line
  private readlineInterface: readline.Interface;
  constructor() {
    this.initializeAgent();
    this.readlineInterface = readline.createInterface({
      input: process.stdin,
      output: process.stdout,
    });
  }

Step 3: Initialize the agent (tools & model)

The constructor calls a method named initializeAgent. Let's create that now. This method is the "brain" and "hands" of our agent. It will:

  • Load and validate API credentials.
  • Initialize the tools (web scraper and Google Search).
  • Initialize the LLM (reasoning engine).
  • Assemble the agent using createReactAgent.

Add this initializeAgent method inside the TrendAnalysisAgent class:

/**
  * Initializes the agent by setting up the LLM, tools, and credentials.
  */
  private initializeAgent() {
    const username = process.env.SCRAPER_API_USERNAME;
    const password = process.env.SCRAPER_API_PASSWORD;
    const apiKey = process.env.GOOGLE_API_KEY;
    // Validate that all necessary API credentials are set
    if (!username || !password) {
      throw new Error(
        `Missing Decodo API credentials. Please set:\n- SCRAPER_API_USERNAME\n- SCRAPER_API_PASSWORD\nGet these from: https://decodo.com/scraping/web`,
      );
    }
    if (!apiKey) {
      throw new Error(
        `Missing Google API key. Please set:\n- GOOGLE_API_KEY\nGet this from: https://aistudio.google.com`,
      );
    }
    // Initialize the Decodo tool for scraping content from any URL
    const universalTool = new DecodoUniversalTool({
      username,
      password,
    });
    // Override with more detailed description for better agent decision-making
    universalTool.name = "web_content_scraper";
    universalTool.description = `Use this tool to extract the full text content from any URL. Input should be a single valid URL (e.g., https://example.com/article).
Returns the main article content in markdown format, removing ads and navigation elements.
Perfect for scraping news articles, blog posts, and research papers.
Always use this tool AFTER finding URLs with the search tool.`;
    // Initialize the Decodo tool for performing Google searches
    const googleSearchTool = new DecodoGoogleSearchTool({
      username,
      password,
    });
    googleSearchTool.name = "google_search";
    googleSearchTool.description = `Use this tool to search Google for relevant articles and websites.
Input should be a search query string (e.g., "artificial intelligence trends 2024").
Returns a list of relevant URLs with titles and snippets.
Use this tool FIRST to find articles, then use the web_content_scraper to get full content.
Include terms like "news", "latest", "trends", "recent" for current information.`;
    const tools = [googleSearchTool, universalTool];
    // Initialize the Google Gemini model
    const model = new ChatGoogleGenerativeAI({
      model: "gemini-2.5-flash",
      apiKey: apiKey,
      temperature: 0.3, // Slightly higher for creative trend analysis
    });
    // Create the ReAct agent, wiring together the model and the tools
    this.agent = createReactAgent({
      llm: model,
      tools: tools,
    });
  }

This method handles several critical tasks.

First, it sets up the tools. A critical step is to customize their name and description. This customization isn't a minor tweak. It's the best practice for multi-tool agent design. The agent's reasoning engine (the LLM) doesn't inherently understand what a tool does. It relies entirely on this metadata to make its decisions.

By changing the name to web_content_scraper and providing a detailed description (e.g., "Use this tool FIRST", "Always use this tool AFTER"), we give the LLM a direct instruction manual, which significantly enhances its ability to formulate a correct plan.

Second, it initializes the ChatGoogleGenerativeAI model:

  • model: 'gemini-2.5-flash’ specifies the Gemini model, chosen for its speed and cost-effectiveness in multi-step agentic workflows.
  • apiKey is securely loaded from our environment variables.
  • temperature: 0.3 controls the model's creativity. A low value like 0.3 is chosen to keep the agent's reasoning focused and factual, while still allowing for nuance.

Finally, createReactAgent assembles the agent, taking the model (the brain) and the tools (the hands) and wiring them together into a fully functional, autonomous agent.

Step 4: Implement the core analysis logic

With the agent initialized, we need the main function that uses it. performTrendAnalysis takes the user's topic, constructs the full prompt (using helper methods we'll build next), and calls the agent to get a result.

Add this performTrendAnalysis method inside the TrendAnalysisAgent class:

/**
  * Performs the main trend analysis workflow.
  * @param config The configuration for the analysis, including the topic.
  * @returns A promise that resolves to the final executive report string.
  */
  async performTrendAnalysis(config: TrendAnalysisConfig): Promise<string> {
    const {
      topic,
      timeframe = "recent",
      geoLocation = "global",
      articleCount = 3,
    } = config;
    // Construct the detailed, multi-step prompt for the agent
    const analysisQuery = this.buildAnalysisQuery(
      topic,
      timeframe,
      geoLocation,
      articleCount,
    );
    try {
      console.log(`Analyzing "${topic}"...\\n`);
      // Invoke the agent with the user's query
      const result = await this.agent.invoke({
        messages: [
          {
            role: "user",
            content: analysisQuery,
          },
        ],
      });
      console.log("Analysis complete.\\n");
      // The final response from the agent is the last message in the sequence
      return result.messages[result.messages.length - 1].content;
    } catch (error) {
      throw new Error(`Trend analysis failed: ${error}`);
    }
  }

Step 5: Craft the agent's instructions (prompts)

An agent without instructions is inert. For agentic workflows, a prompt isn't just a question, it's a comprehensive standard operating procedure (SOP) that guides the agent's entire thought process. We'll use an advanced prompting technique, breaking the logic into modular components.

Now, it's time to add the following four helper methods inside the TrendAnalysisAgent class.

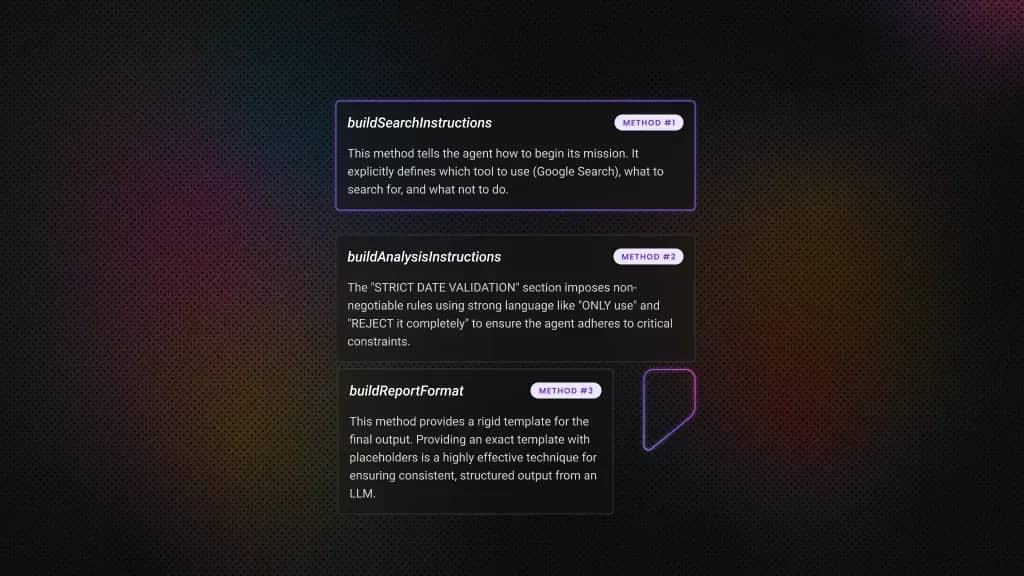
The buildSearchInstructions method

This method tells the agent how to begin its mission. It explicitly defines which tool to use (Google Search), what to search for, and what not to do (it offloads the cognitive burden of date filtering, telling the agent to validate dates after scraping).

/**
  * Builds the 'SEARCH' part of the agent's instructions.
  */
  private buildSearchInstructions(
    topic: string,
    articleCount: number,
    timeframe: string,
  ): string {
    return `Use google_search to find ${articleCount} recent news articles about "${topic}".
Search for: ${topic} latest news
Do NOT worry about date filtering in search - just find relevant articles.
You will validate dates after scraping content.`;
  }
The buildAnalysisInstructions method

This is the most complex part of the SOP, giving the agent its rules for analysis. This demonstrates several powerful prompting techniques:

  • Guardrails. The "STRICT DATE VALIDATION" section imposes non-negotiable rules using strong language like "ONLY use" and "REJECT it completely" to ensure the agent adheres to critical constraints.
  • Conditional logic. "FLEXIBLE SOURCE HANDLING" gives the agent an if-else structure for handling different scenarios, making it more resilient.
  • Persona and tone. Instructions like "think like a business consultant briefing a CEO" guide the style of the final output.
/**
  * Builds the 'ANALYZE' part of the agent's instructions, including validation and logic.
  */
  private buildAnalysisInstructions(timeframe: string): string {
    const now = new Date();
    let cutoffDate: string;
    // Determine the date cutoff based on the requested timeframe
    switch (timeframe.toLowerCase()) {
      case "this week":
        const weekStart = new Date(now);
        weekStart.setDate(now.getDate() - now.getDay());
        cutoffDate = weekStart.toISOString().split("T")[0];
        break;
      case "this month":
        cutoffDate = `${now.getFullYear()}-${String(
          now.getMonth() + 1,
        ).padStart(2, "0")}-01`;
        break;
      default: // 'recent'
        const recentStart = new Date(now);
        recentStart.setDate(now.getDate() - 30);
        cutoffDate = recentStart.toISOString().split("T")[0];
        break;
    }
    return `STRICT DATE VALIDATION:
1. Check each article's publication date
2. ONLY use articles published on or after ${cutoffDate}
3. If an article is older than ${cutoffDate}, REJECT it completely
FLEXIBLE SOURCE HANDLING:
- If you find 3+ valid sources: Use all for comprehensive analysis
- If you find 1-2 valid sources: Use them and note limited scope
- If you find 0 valid sources: Respond with "No recent articles found for this topic in the specified timeframe."
DO NOT use old articles just to fill the report. Work with whatever valid recent sources you find.
For articles that pass date validation (${timeframe} only):
- Focus on business impact and competitive implications
- Extract actionable intelligence executives can act on immediately
- No academic analysis - think like a business consultant briefing a CEO`;
  }
The buildReportFormat method

This method provides a rigid template for the final output. Providing an exact template with placeholders is a highly effective technique for ensuring consistent, structured output from an LLM, as it removes ambiguity and forces the agent to organize its findings.

/**
  * Builds the 'REPORT' part of the agent's instructions, defining the output format.
  */
  private buildReportFormat(): string {
    return `Create an executive-focused intelligence briefing with this EXACT format:
[Topic]
[X] recent sources analyzed
MARKET REALITY:
[Key trend 1 with business impact]
[Key trend 2 with business impact]
[Key trend 3 with business impact - adapt based on sources available]
BOTTOM LINE:
[One clear sentence on what this means for business strategy]
YOUR MOVE:
1. [Specific actionable item]
2. [Specific actionable item]
3. [Specific actionable item - adapt based on insights available]
RULES:
- No academic language - executive communication only
- Lead with impact, end with action
- If 0 sources: "No recent intel found for this topic. Try different terms."
- If 1-2 sources: Use "EMERGING INTEL:" instead of "MARKET REALITY:"
- Keep total length under 150 words for busy executives`;
  }
The buildAnalysisQuery method

This top-level prompt, called by performTrendAnalysis, acts as a declarative program for the agent. It defines the overall goal and then breaks it down into a clear, logical sequence of named steps (SEARCH, EXTRACT, ANALYZE, REPORT) that the LLM can follow reliably.

/**
  * Builds the main orchestration prompt by assembling the other prompt-building methods.
  */
  private buildAnalysisQuery(
    topic: string,
    timeframe: string,
    geoLocation: string,
    articleCount: number,
  ): string {
    return `Analyze business trends for: "${topic}"
TASK: Create actionable business intelligence report.
Timeframe: ${timeframe} | Region: ${geoLocation} | Articles: ${articleCount}
STEPS:
1. SEARCH: ${this.buildSearchInstructions(topic, articleCount, timeframe)}
2. EXTRACT: Use web_content_scraper for full article content
3. ANALYZE: ${this.buildAnalysisInstructions(timeframe)}
4. REPORT: ${this.buildReportFormat()}
Focus on business value, not academic analysis. Start now.`;
  }

Step 6: Build the CLI and main entry point

To make the agent usable, we'll create the command-line interface (CLI) methods using Node.js's built-in readline module and the final main function to run the script.

Add these 2 final methods inside the TrendAnalysisAgent class:

/**
  * Prompts the user for input via the command line.
  * @param question The question to ask the user.
  * @returns A promise that resolves to the user's trimmed input.
  */
  private askUser(question: string): Promise<string> {
    return new Promise((resolve) => {
      this.readlineInterface.question(question, (answer) => {
        resolve(answer.trim());
      });
    });
  }
  /**
  * Starts the interactive command-line interface loop.
  */
  async startInteractiveCLI() {
    console.log("AI Trend Analysis Agent\\n");
    while (true) {
      try {
        const topic = await this.askUser("Topic to analyze: ");
        if (topic.toLowerCase() === "exit") {
          break;
        }
        
        // Smart defaults - no need to ask users
        const config: TrendAnalysisConfig = {
          topic,
          timeframe: "recent",
          geoLocation: "global",
          articleCount: 3,
        };
        const report = await this.performTrendAnalysis(config);
        console.log(report);
        const continueAnalysis = await this.askUser(
          "\\nAnalyze another topic? (y/n): ",
        );
        if (
          continueAnalysis.toLowerCase() !== "y" &&
          continueAnalysis.toLowerCase() !== "yes"
        ) {
          break;
        }
      } catch (error) {
        console.error("Error:", error instanceof Error ? error.message : error);
        
        const retryChoice = await this.askUser("Try again? (y/n): ");
        if (
          retryChoice.toLowerCase() !== "y" &&
          retryChoice.toLowerCase() !== "yes"
        ) {
          break;
        }
      }
    }
    this.readlineInterface.close();
  }
} // <-- This brace closes the TrendAnalysisAgent class

This CLI code sets up a continuous loop (while (true)) that prompts you for a topic, invokes the agent's main analysis function, prints the result, and then asks if you want to continue. The try...catch block is a safety net: it ensures that if any part of the agent's execution fails, the program will report the error gracefully instead of crashing.

Finally, add this code outside and at the very end of your trend-analysis-agent.ts file. This is the entry point that runs the application.

/**
* Main function to create and run the agent.
*/
async function main() {
  const agent = new TrendAnalysisAgent();
  await agent.startInteractiveCLI();
}
// Entry point for the script
if (require.main === module) {
  main().catch(console.error);
}

Complete code

Here is the complete, final code for trend-analysis-agent.ts. You can use this to verify your work from the steps above or as a complete copy-paste reference.

import dotenv from "dotenv";
import { ChatGoogleGenerativeAI } from "@langchain/google-genai";
import { createReactAgent } from "@langchain/langgraph/prebuilt";
import {
  DecodoUniversalTool,
  DecodoGoogleSearchTool,
} from "@decodo/langchain-ts";
import * as readline from "readline";
// Load environment variables from.env file
dotenv.config();
// Define an interface for the configuration object
interface TrendAnalysisConfig {
  topic: string;
  timeframe?: string;
  geoLocation?: string;
  articleCount?: number;
}
class TrendAnalysisAgent {
  // The agent executor, which will run the agent logic
  private agent!: ReturnType<typeof createReactAgent>;
  // The interface for reading user input from the command line
  private readlineInterface: readline.Interface;
  constructor() {
    this.initializeAgent();
    this.readlineInterface = readline.createInterface({
      input: process.stdin,
      output: process.stdout,
    });
  }
  /**
  * Initializes the agent by setting up the LLM, tools, and credentials.
  */
  private initializeAgent() {
    const username = process.env.SCRAPER_API_USERNAME;
    const password = process.env.SCRAPER_API_PASSWORD;
    const apiKey = process.env.GOOGLE_API_KEY;
    // Validate that all necessary API credentials are set
    if (!username || !password) {
      throw new Error(`Missing Decodo API credentials. Please set:
- SCRAPER_API_USERNAME
- SCRAPER_API_PASSWORD
Get these from: https://decodo.com/scraping/web`);
    }
    if (!apiKey) {
      throw new Error(`Missing Google API key. Please set:
- GOOGLE_API_KEY
Get this from: https://aistudio.google.com`);
    }
    // Initialize the Decodo tool for scraping content from any URL
    const universalTool = new DecodoUniversalTool({
      username,
      password,
    });
    // Override with more detailed description for better agent decision-making
    universalTool.name = "web_content_scraper";
    universalTool.description = `Use this tool to extract the full text content from any URL. 
Input should be a single valid URL (e.g., https://example.com/article).
Returns the main article content in markdown format, removing ads and navigation elements.
Perfect for scraping news articles, blog posts, and research papers.
Always use this tool AFTER finding URLs with the search tool.`;
    // Initialize the Decodo tool for performing Google searches
    const googleSearchTool = new DecodoGoogleSearchTool({
      username,
      password,
    });
    googleSearchTool.name = "google_search";
    googleSearchTool.description = `Use this tool to search Google for relevant articles and websites.
Input should be a search query string (e.g., "artificial intelligence trends 2024").
Returns a list of relevant URLs with titles and snippets.
Use this tool FIRST to find articles, then use the web_content_scraper to get full content.
Include terms like "news", "latest", "trends", "recent" for current information.`;
    const tools = [googleSearchTool, universalTool];
    // Initialize the Google Gemini model
    const model = new ChatGoogleGenerativeAI({
      model: "gemini-2.5-flash",
      apiKey: apiKey,
      temperature: 0.3, // Slightly higher for creative trend analysis
    });
    // Create the ReAct agent, wiring together the model and the tools
    this.agent = createReactAgent({
      llm: model,
      tools: tools,
    });
  }
  /**
  * Performs the main trend analysis workflow.
  * @param config The configuration for the analysis, including the topic.
  * @returns A promise that resolves to the final executive report string.
  */
  async performTrendAnalysis(config: TrendAnalysisConfig): Promise<string> {
    const {
      topic,
      timeframe = "recent",
      geoLocation = "global",
      articleCount = 3,
    } = config;
    // Construct the detailed, multi-step prompt for the agent
    const analysisQuery = this.buildAnalysisQuery(
      topic,
      timeframe,
      geoLocation,
      articleCount,
    );
    try {
      console.log(`Analyzing "${topic}"...\n`);
      // Invoke the agent with the user's query
      const result = await this.agent.invoke({
        messages: [
          {
            role: "user",
            content: analysisQuery,
          },
        ],
      });
      console.log("Analysis complete.\n");
      // The final response from the agent is the last message in the sequence
      return result.messages[result.messages.length - 1].content;
    } catch (error) {
      throw new Error(`Trend analysis failed: ${error}`);
    }
  }
  /**
  * Builds the 'SEARCH' part of the agent's instructions.
  */
  private buildSearchInstructions(
    topic: string,
    articleCount: number,
    timeframe: string,
  ): string {
    return `Use google_search to find ${articleCount} recent news articles about "${topic}".
Search for: ${topic} latest news
Do NOT worry about date filtering in search - just find relevant articles.
You will validate dates after scraping content.`;
  }
  /**
  * Builds the 'ANALYZE' part of the agent's instructions, including validation and logic.
  */
  private buildAnalysisInstructions(timeframe: string): string {
    const now = new Date();
    let cutoffDate: string;
    // Determine the date cutoff based on the requested timeframe
    switch (timeframe.toLowerCase()) {
      case "this week":
        const weekStart = new Date(now);
        weekStart.setDate(now.getDate() - now.getDay());
        cutoffDate = weekStart.toISOString().split("T")[0];
        break;
      case "this month":
        cutoffDate = `${now.getFullYear()}-${String(now.getMonth() + 1).padStart(2, "0")}-01`;
        break;
      default: // 'recent'
        const recentStart = new Date(now);
        recentStart.setDate(now.getDate() - 30);
        cutoffDate = recentStart.toISOString().split("T")[0];
        break;
    }
    return `STRICT DATE VALIDATION:
1. Check each article's publication date
2. ONLY use articles published on or after ${cutoffDate}
3. If an article is older than ${cutoffDate}, REJECT it completely
FLEXIBLE SOURCE HANDLING:
- If you find 3+ valid sources: Use all for comprehensive analysis
- If you find 1-2 valid sources: Use them and note limited scope
- If you find 0 valid sources: Respond with "No recent articles found for this topic in the specified timeframe."
DO NOT use old articles just to fill the report. Work with whatever valid recent sources you find.
For articles that pass date validation (${timeframe} only):
- Focus on business impact and competitive implications
- Extract actionable intelligence executives can act on immediately  
- No academic analysis - think like a business consultant briefing a CEO`;
  }
  /**
  * Builds the 'REPORT' part of the agent's instructions, defining the output format.
  */
  private buildReportFormat(): string {
    return `Create an executive-focused intelligence briefing with this EXACT format:
[Topic]
[X] recent sources analyzed
MARKET REALITY:
[Key trend 1 with business impact]
[Key trend 2 with business impact]  
[Key trend 3 with business impact - adapt based on sources available]
BOTTOM LINE:
[One clear sentence on what this means for business strategy]
YOUR MOVE:
1. [Specific actionable item]
2. [Specific actionable item]
3. [Specific actionable item - adapt based on insights available]
RULES:
- No academic language - executive communication only
- Lead with impact, end with action
- If 0 sources: "No recent intel found for this topic. Try different terms."
- If 1-2 sources: Use "EMERGING INTEL:" instead of "MARKET REALITY:"
- Keep total length under 150 words for busy executives`;
  }
  /**
  * Builds the 'REPORT' part of the agent's instructions, defining the output format.
  */
  private buildAnalysisQuery(
    topic: string,
    timeframe: string,
    geoLocation: string,
    articleCount: number,
  ): string {
    return `Analyze business trends for: "${topic}"
TASK: Create actionable business intelligence report.
Timeframe: ${timeframe} | Region: ${geoLocation} | Articles: ${articleCount}
STEPS:
1. SEARCH: ${this.buildSearchInstructions(topic, articleCount, timeframe)}
2. EXTRACT: Use web_content_scraper for full article content
3. ANALYZE: ${this.buildAnalysisInstructions(timeframe)}
4. REPORT: ${this.buildReportFormat()}
Focus on business value, not academic analysis. Start now.`;
  }
  /**
  * Prompts the user for input via the command line.
  * @param question The question to ask the user.
  * @returns A promise that resolves to the user's trimmed input.
  */
  private askUser(question: string): Promise<string> {
    return new Promise((resolve) => {
      this.readlineInterface.question(question, (answer) => {
        resolve(answer.trim());
      });
    });
  }
  /**
  * Starts the interactive command-line interface loop.
  */
  async startInteractiveCLI() {
    console.log("AI Trend Analysis Agent\n");
    while (true) {
      try {
        const topic = await this.askUser("Topic to analyze: ");
        if (topic.toLowerCase() === "exit") {
          break;
        }
        // Smart defaults - no need to ask users
        const config: TrendAnalysisConfig = {
          topic,
          timeframe: "recent",
          geoLocation: "global",
          articleCount: 3,
        };
        const report = await this.performTrendAnalysis(config);
        console.log(report);
        const continueAnalysis = await this.askUser(
          "\nAnalyze another topic? (y/n): ",
        );
        if (
          continueAnalysis.toLowerCase() !== "y" &&
          continueAnalysis.toLowerCase() !== "yes"
        ) {
          break;
        }
      } catch (error) {
        console.error("Error:", error instanceof Error ? error.message : error);
        const retryChoice = await this.askUser("Try again? (y/n): ");
        if (
          retryChoice.toLowerCase() !== "y" &&
          retryChoice.toLowerCase() !== "yes"
        ) {
          break;
        }
      }
    }
    this.readlineInterface.close();
  }
}
/**
* Main function to create and run the agent.
*/
async function main() {
  const agent = new TrendAnalysisAgent();
  await agent.startInteractiveCLI();
}
// Entry point for the script
if (require.main === module) {
  main().catch(console.error);
}

The agent in action

With the code fully combined, it's time to run the agent and see what it can do. This section shows you how to execute the script and, more importantly, how to interpret the agent's internal thought process.

Execution and observation

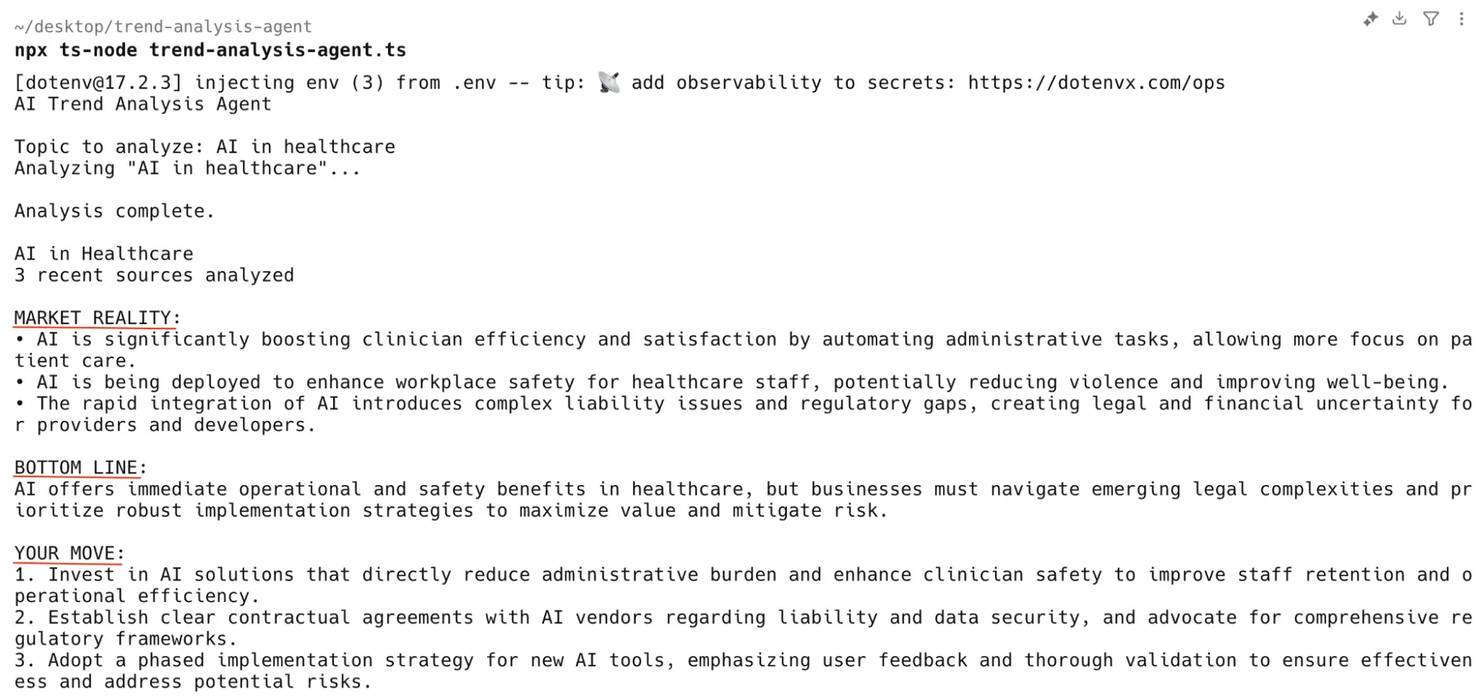
1. Save the code. Save the complete code into a file named trend-analysis-agent.ts.

2. Run the script. Open your terminal in the project directory and run the application:

npx ts-node trend-analysis-agent.ts

Troubleshooting tip from our scraping experts: if you run into issues with the @decodo/sdk-ts package later on, there's a simple fix. Just navigate to node_modules/@decodo/sdk-ts/package.json and remove the line "type": "module". This helps resolve potential module conflicts in some Node.js environments.

3. Interact with the agent. The application will start and prompt you for a topic. Enter a topic of interest, for example, “AI in healthcare”.

4. The agent will begin its work, and after a short time, it will produce a complete executive report:

Bonus: Visualizing the workflow with LangSmith

For more complex agents, reading through console logs can be a hassle. That's where a dedicated observability platform like LangSmith becomes invaluable. LangSmith is a tool from LangChain designed specifically to trace, monitor, and debug LLM applications.

By setting a couple of environment variables in your .env file, all of your agent's activity will be automatically logged to the LangSmith platform.

LANGCHAIN_TRACING_V2="true"
LANGCHAIN_API_KEY="YOUR_LANGSMITH_API_KEY"

A run in LangSmith gives you a clear, visual graph of the agent's execution, showing each call to the LLM and each tool execution in sequence. This makes it incredibly easy to see exactly what the agent did, what data it received, and why it made the decisions it did – which is essential for debugging and optimizing agent performance.

Emerging trends and the future of AI automation

The agent we built in this tutorial is powerful, but it's just the beginning. The field of AI workflow automation is evolving at a breathtaking pace, with several key trends pointing toward an even more autonomous future.

Multi-agent systems

The next frontier involves moving from a single agent to collaborative teams of specialized agents. For example, in a sophisticated customer service workflow, a team of different AI models could work together. A conversational AI agent might first interact with the customer, a second agent could then analyze technical logs to diagnose the problem, and a third could perform document summarization to create a concise ticket for a human expert.

However, this increasing complexity introduces some of the key AI workflow automation challenges. Beyond the initial implementation costs, organizations must plan for change management and address serious ethical issues. For instance, bias found in training datasets can negatively impact everything from hiring workflows to loan applications, making careful oversight and robust exception handling for edge cases critical for success.

Frameworks like LangGraph are explicitly designed to facilitate these multi-agent architectures, allowing patterns of collaboration and delegation.

Autonomous workflow composition

Right now, a developer designs the workflow (the "SOP" prompt). An emerging trend is the development of "meta-agents" that can autonomously design the workflow itself based on a high-level business goal. A user could simply state, "Generate a weekly competitive analysis report", and the AI would figure out the necessary steps, select the right tools, and construct the entire automation pipeline.

Decentralized AI

Looking further ahead, there's a growing interest in moving AI systems away from centralized cloud servers and onto decentralized networks. Decentralized AI workflows could offer huge advantages in data privacy, security, and censorship resistance, as computation and data ownership would be distributed across a network rather than controlled by a single company.

Bottom line

This guide demonstrated building a sophisticated, autonomous AI agent. It covered the shift from rule-based to intelligent automation, initializing LangChain, Gemini LLM, and Decodo's web scraping tools, and crafting agent prompts. The key takeaways from this process are transformative for any developer or organization entering the field of AI engineering:

  • Agents reason, they don't just execute. The core of an agent is its ability to use an LLM to make decisions within a ReAct loop of reasoning, acting, and observing.
  • Tools are the bridge to reality. An agent's capabilities are defined by its tools. Without access to external information and actions, an LLM's intelligence remains latent.
  • Prompting is a form of programming. For agents, a well-structured prompt isn't just a query but a declarative program – an SOP that orchestrates complex behavior through natural language.

These principles can help you build AI-enabled workflows that deliver real-time, data-driven insights.

Next steps

To continue your journey into building autonomous AI systems, the following resources are highly recommended:

Get 30% off Web Scraping API

Collect real-time data fast with JavaScript rendering, proxy integration, and anti-bot features.

About the author

Justinas Tamasevicius

Head of Engineering

Justinas Tamaševičius is Head of Engineering with over two decades of expertize in software development. What started as a self-taught passion during his school years has evolved into a distinguished career spanning backend engineering, system architecture, and infrastructure development.


Connect with Justinas via LinkedIn.

All information on Decodo Blog is provided on an as is basis and for informational purposes only. We make no representation and disclaim all liability with respect to your use of any information contained on Decodo Blog or any third-party websites that may belinked therein.

Frequently asked questions

What is the difference between AI workflow automation and traditional automation?

The primary difference lies in their core logic and adaptability. Traditional automation is rule-based. It follows a fixed, predefined script of if-then conditions, excels at handling structured data, and is often brittle, meaning it can break when processes or interfaces change. On the other hand, AI workflow automation is goal-oriented and adaptive. It uses an AI model to reason, make dynamic decisions, and handle both structured and unstructured data, allowing it to navigate unexpected changes and learn from new information.

What are the best practices for implementing AI workflow automation?

Start by identifying high-impact areas where automation can provide the most value, but begin with a non-critical workflow as a pilot project. Success heavily depends on the quality of your data sources and training data, so ensure you're working with clean, well-structured data. Plan for handling exceptions gracefully and involve your teams early to ensure a smooth transition. For sensitive data, always consult with security and legal experts and consider using private AI model environments.

How do you integrate LangChain agents with web scraping APIs?

The integration process is straightforward and involves a few key steps:

  • Installation. Install the necessary packages, such as the LangChain framework and the specific web scraping API integration (e.g., @decodo/langchain-ts).
  • Tool initialization. Instantiate the scraping tool (e.g., DecodoUniversalTool) within your code, providing it with the necessary API credentials.
  • Tool configuration. Assign a clear, descriptive name and a detailed description to the tool. This metadata is crucial as it tells the LangChain agent what the tool does and when to use it.
  • Agent assembly. Pass the configured tool(s) into the agent constructor (e.g., createReactAgent).
  • Prompting. Instruct the agent within your prompt to use the tool to accomplish its goals, like "Use the web_content_scraper tool to extract the content from the URLs".

What are some popular AI workflow tools?

The ecosystem is diverse, but the tools can be seen in layers. For developers building custom solutions, powerful frameworks like LangChain, generative AI platforms like Google's Gemini, OpenAI's GPT models, and Anthropic's Claude. Building on top of this, a rapidly growing category is productivity platforms where tools are embedding AI-powered features. This is often delivered as no-code workflow automation software like n8n, allowing non-technical users to perform specific tasks like document summarization of meeting notes, creation of intelligent checklists, or deployment of helpful chatbots.

How do you handle rate limiting when using web scraping APIs in workflows?

While rate limiting can be a challenge, several strategies can mitigate it:

  • Use a managed API. The most effective approach is to use a high-level web scraping API like Decodo's Web Scraping API. These services are designed to handle rate limiting, IP rotation, CAPTCHAs, and other anti-bot measures automatically, abstracting this complexity away from the developer.
  • Implement retries with exponential backoff. In your tool's code, implement a retry mechanism. If an API request fails (e.g., with a 429 Too Many Requests error), wait for a short period before trying again, exponentially increasing the wait time with each subsequent failure.
  • Control concurrency. Limit the number of parallel requests your application makes to the API to stay below the designated rate limits.
  • Leverage LangChain handlers. For rate-limiting LLM calls specifically, LangChain provides callback handlers like UpstashRatelimitHandler that can be integrated into your chains.

How do you optimize costs for large-scale AI workflow automation?

Cost optimization is a continuous process that involves several strategies:

  • Smart model selection. Use smaller, faster, and more cost-effective models (like gemini-2.5-flash) for simpler tasks. You can implement logic to dynamically switch to a more powerful (and expensive) model only when the complexity of the query requires it.
  • Caching. Implement a caching layer (e.g., using Redis) to store the results of frequent or identical requests. This avoids re-running the entire expensive workflow for known inputs.
  • Prompt engineering. Craft concise and efficient prompts. Reducing the number of tokens in your prompts and limiting the max_tokens for the output directly translates to lower costs.
  • Batching requests. When processing multiple similar tasks, group them into a single batch request to the LLM or other APIs, which can be more efficient than making numerous individual calls.

What security considerations are important for AI workflows with external data?

Securing AI workflows, especially those interacting with external data, is paramount. Key considerations include:

  • Secure credential management. Never hardcode API keys or other secrets in your code. Use environment variables (loaded from a .env file for local development) or a dedicated secret management service, like AWS Secrets Manager or HashiCorp Vault, in production.
  • Data privacy and minimization. Be conscious of the data you're scraping and processing. Avoid collecting personally identifiable information (PII) unless necessary. If you must handle sensitive data, ensure it's anonymized or redacted before being sent to an external LLM.
  • Access control. Secure your agent's API endpoint with robust authentication and authorization. Implement role-based access control (RBAC) and the principle of least privilege to ensure users and systems only have access to the resources they absolutely need.
  • Input sanitization. Protect against prompt injection attacks by sanitizing and validating all user inputs before they're passed to the LLM.

How do you troubleshoot performance issues in LangChain workflows?

Troubleshooting performance requires a systematic approach to identify bottlenecks:

  • Use tracing. The most powerful tool for this is an observability platform like LangSmith. It provides a detailed trace of each run, showing the exact duration of every LLM call, tool execution, and parsing step. This immediately highlights which part of the chain is causing the delay.
  • Isolate components. Test each component of your workflow in isolation. Benchmark the speed of your web scraping tool, your vector database queries, and your LLM calls independently to identify which one is the performance bottleneck.
  • Analyze prompts and models. A slow response might be due to an overly complex prompt or a slow model. Experiment with simpler prompts or faster models to see if performance improves.
  • Check external services. The bottleneck may not be in your code but in an external API you're calling. Monitor the latency of these external services to ensure they're responding quickly.

How Does AI Process Data: From Bytes to Brilliance

AI has revolutionized how we process data, enabling machines to analyze and interpret vast amounts of information quickly and efficiently. In this comprehensive guide, we'll explore how AI processes data, understand the importance of quality data, and delve into the challenges it faces.

Martin Ganchev

Oct 10, 2024

3 min read

Best-AI-tools-for-coding

Best AI Tools for Coding in 2025

With all the buzz about AI taking over our jobs, why not flip the script and employ AI to help you write efficient code and boost your productivity instead? In 2025, the best AI tools for coding are designed to be your new sidekick, helping you code smarter, faster, and with less stress. Let's explore how you can make AI work for you before the inevitable machine world domination.

Zilvinas Tamulis

Oct 04, 2024

9 min read

AI Agent Orchestration Tutorial: n8n and Decodo MCP Setup

Individual AI agents are powerful, but their true value is unlocked when they operate cooperatively as a collective. This coordinated effort, known as AI agent orchestration, is fundamental to creating truly autonomous systems capable of managing intricate, multi-step business processes. This guide will walk you through the core patterns of AI agent orchestration and build a practical, autonomous agent using the robust, low-code combination of n8n and Decodo MCP.

Mykolas Juodis

Sep 30, 2025

9 min read

© 2018-2025 decodo.com. All Rights Reserved