Web Scraping in C#: From Zero to Production Code [2026 Guide]
Manually copying data from websites? That's what interns are for – except you don't have interns. Good news: C# can automate the tedious stuff. While Python dominates the web scraping conversation, C# has matured into a legitimate contender with robust libraries, type safety, and performance that actually matters in production. Let's learn more about it.
Zilvinas Tamulis
Last updated: Jan 14, 2026
15 min read
What is web scraping with C#?
Web scraping is automated data extraction from websites – think of it as batch downloading information that's publicly visible but annoyingly trapped in HTML. Developers use it for price monitoring, lead generation, market research, competitor analysis, and basically any scenario where manual copy-pasting would drive you insane.
C# wasn't always the obvious choice for scraping. Python owned that territory with Beautiful Soup and Scrapy. But .NET 8 changed the game with cross-platform support, improved performance, and a mature ecosystem. Various libraries emerged that handle static HTML parsing elegantly, while Selenium and PuppeteerSharp tackle JavaScript-heavy sites. The result? C# now offers type safety, async capabilities, and IDE tooling that makes scraping feel less like duct-taping scripts together and more like actual engineering.
In this guide, you'll build a fully functioning C# scraper from scratch. We're talking environment setup, dependency management, extracting data from both static and dynamic pages, and exporting everything to a clean CSV file.
Prerequisites: You should know basic C# syntax and understand object-oriented programming concepts. If you can write a class and understand what a method does, you're good to go. This works on Windows, Linux, and macOS – .NET doesn't discriminate.
Setting up your C# web scraping environment
Before you scrape anything, you need three things: the .NET SDK (the actual compiler and runtime), Visual Studio Code (your IDE), and NuGet package manager (to install libraries).
Here's how it all works together: The .NET SDK compiles your C# code into executable programs and provides the dotnet CLI tool. Visual Studio Code is just a text editor with superpowers – syntax highlighting, debugging, IntelliSense – but it doesn't actually compile anything. You could technically write C# in Notepad and compile it with the SDK, but why torture yourself? Finally, NuGet allows you to add third-party libraries to your work easily, so you don't have to start inventing HTTP requests from scratch.
Pro tip: Use VS Code's integrated terminal. It keeps everything in one window, and you won't lose track of which terminal belongs to which project.
Installing .NET SDK and Visual Studio Code
Let's get the setup out of the way so you can get started with writing code.
Step 1: Download the .NET SDK
Head to Microsoft's .NET download page and grab the latest .NET SDK (8.0 or newer). Run the installer, click Next a few times, and let it finish. This will also install NuGet, so you don't have to worry about a separate installation and can use it right away.
Step 2: Download Visual Studio Code
Get Visual Studio Code for your OS. Install and launch the application. Once it's open, hit Ctrl+Shift+X (Cmd+Shift+X on macOS) to open the Extensions panel.
Step 3: Install C# extensions
Search for and install these:
- C# Dev Kit (Microsoft's official extension pack)
- C# Extensions (make sure it's not a deprecated version)
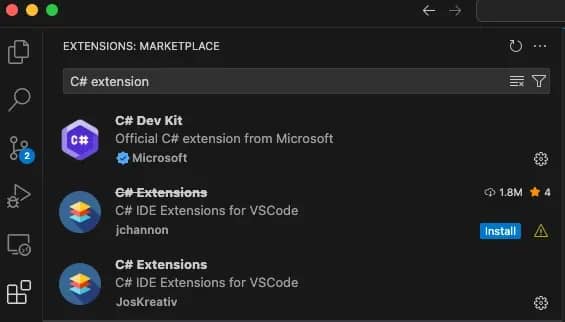
These give you IntelliSense, debugging, and syntax highlighting. They're a necessity to efficiently write and test code.
Step 4: Verify installation
Open a terminal (or VS Code's integrated terminal) and run:
You should see something like "10.0.100". If you get an error, the SDK isn't in your system PATH – see the solutions below.
Common issues
dotnet isn't recognized as an internal or external command
The installer didn't add .NET to your PATH. Restart your terminal first and see if it fixes the issue. If that doesn't work:
- Windows: Search for "Environment Variables" in the Start menu, edit the PATH, and add C:\Program Files\dotnet\.
- macOS/Linux: Add export PATH="$PATH:$HOME/.dotnet" to your .bashrc or .zshrc file (located inside your home directory. It can be found with the "cd /" command), then run source ~/.bashrc.
VS Code can't find the SDK
Open VS Code settings (Ctrl+, / Cmd+,), search for "dotnet path", and manually point it to your SDK installation directory. Usually, it will be C:\Program Files\dotnet\dotnet.exe on Windows or /usr/local/share/dotnet/dotnet on macOS.
Creating a console project with dotnet new
Let's get started with building a project. You'll first create a console application – the easiest way to run small automation tasks and perform tests.
Open your terminal (or VS Code's integrated terminal) and run these commands:
This creates a new folder called "WebScraper" with everything you need to start coding. The -n flag names your project – feel free to call it whatever you want, but make sure it's not something like "test-script-final-final-version2" so that you'll remember what it does six months from now.
Once created, your project structure will look like this:
Choosing the right C# web scraping library
C# doesn't have a single "official" scraping library because different websites need different approaches. Some sites serve plain HTML that's ready to parse the moment it loads. Others use JavaScript frameworks that render content in the browser after the initial page loads. You need the right tool for the job – or you'll end up scraping empty divs, wondering why nothing works.
Static vs. dynamic content: What's the difference?
Static content is HTML that's fully rendered on the server before it reaches your browser. When you view the page source (Ctrl+U / Cmd+U), you see the actual data you want to scrape. News sites, blogs, and documentation pages usually fall into this category.
Dynamic content is generated by JavaScript after the page loads. The initial HTML is often a skeleton with empty containers, and JavaScript fills them in using AJAX requests or client-side rendering. Single-page applications (React, Vue, Angular) and modern eCommerce sites are notorious for this. If you view the source and don't see the data you're after, it's dynamic.
HtmlAgilityPack vs. Selenium vs. PuppeteerSharp
Here are the leading C# web scraping libraries from which you can choose:
Library
Best for
Pros
Cons
HtmlAgilityPack
Static HTML parsing
Lightweight, fast, simple API, XPath support
Can't handle JavaScript-rendered content
Selenium
Dynamic pages with JavaScript
Full browser automation, widely used, stable
Slow, resource-heavy, requires WebDriver management
PuppeteerSharp
Headless Chrome automation
Modern API, suitable for SPAs, faster than Selenium
Steeper learning curve, less mature ecosystem
Use HtmlAgilityPack when the data is visible in "view source." It's the fastest option and doesn't spin up a browser. Perfect for scraping blogs, product listings with server-side rendering, or any site built before 2015. If you're coming from Python's Beautiful Soup, this is your equivalent.
Use Selenium when content loads after the page renders – think infinite scroll, lazy-loaded images, or data fetched via API calls. It's battle-tested and has extensive documentation. Yes, it's slower than parsing raw HTML, but it actually works on modern websites. Check out our guide on Selenium Scraping With Node.js to see how the concepts translate across languages.
Use PuppeteerSharp if you want Selenium's capabilities with a cleaner API. It's the C# port of Google's Puppeteer library. Good choice if you're already familiar with headless Chrome workflows or need advanced browser control like request interception.
In the following sections of this guide, you'll see how to use HtmlAgilityPack for static and Selenium for dynamic content. That doesn't mean they're the best options, as many more libraries exist, such as ScrapySharp, which offer completely different features based on your particular needs.
Installing HtmlAgilityPack via NuGet
To install HtmlAgilityPack, from your project directory, run:
You'll see output confirming the package was added. The command downloads HtmlAgilityPack and automatically updates your project file.
To verify the installation, open the WebScraper.csproj file in VS Code. You should see a new <ItemGroup> section that looks like this:
Adding CsvHelper for CSV export
Scraping data is pointless if you can't export it somewhere useful. You could manually write CSV formatting logic – concatenating strings, escaping commas, dealing with newlines – but why waste time reinventing the wheel when CsvHelper exists?
CsvHelper is the de facto standard for CSV operations in C#. It handles encoding, culture-specific formatting, and edge cases (like fields containing commas or quotes) automatically. You define a class, pass it a list of objects, and it generates a properly formatted CSV. No surprises, no bugs at 2 AM because someone's company name had a comma in it.
But why CSV, you might ask? Because it's the universal data format. Excel opens it, Google Sheets imports it, Pandas reads it, and databases ingest it. For your first scraping project, CSV is the path of least resistance. You're not dealing with JSON schema validation, database connections, or API rate limits – just rows and columns that anyone can understand.
Once your scraper works, you can always swap CSV for JSON, SQL, or whatever your pipeline needs. But start simple.
Run this in your project directory:
That's it. CsvHelper is now in your project alongside HtmlAgilityPack. If you want to check out other NuGet packages or explore different versions, browse the official NuGet gallery.
Now you've got the tools to scrape and export. Time to write actual code.
Building a static web scraper with HtmlAgilityPack
For this example project, let's scrape quotes from quotes.toscrape.com – a practice site designed for precisely this purpose. This site displays quotes with authors and tags. The HTML is server-rendered, which means all the content is already in the page source when it loads. Perfect for HtmlAgilityPack.
Loading HTML with HtmlWeb.Load()
HtmlAgilityPack provides two ways to fetch web pages: synchronous and asynchronous. For most scraping tasks, especially when you're just learning, synchronous is simpler.
Synchronous loading blocks your program until the page loads completely. Open Program.cs and write the following code:
Save the file and run it with this command in your terminal:
You'll see the page title printed in the terminal. It's a simple task, but it confirms that the library works and sets a basis for further scraping tasks.
Using XPath with SelectNodes() and SelectSingleNode()
XPath is a query language for navigating HTML/XML structures. It's like SQL for documents – a bit cryptic at first, but incredibly powerful once you understand the syntax.
Basic XPath patterns:
The "//" tells the application to search anywhere in the document. The [@class='quote'] filters for elements with that specific class attribute. To find them, you should know how to Inspect Element in your browser.
Let's extract actual data:
The script heads to the website, finds the required information through the defined XPaths, and prints the quotes and author names.
Cleaning HTML entities with HtmlEntity.DeEntitize()
If you ran the code above, you probably noticed that the text in your terminal looks a little bit odd:
Those "'" are HTML entities – encoded representations of special characters. Browsers decode them automatically, but when you extract InnerText, you get the raw encoded version.
To fix this issue, you must decode them before outputting:
Much cleaner. Always run DeEntitize() before writing to CSV or JSON – your data analysts will thank you.
Now let's tackle the more complex problem: JavaScript-rendered pages.
Scraping JavaScript-rendered pages with Selenium
HtmlAgilityPack works perfectly until you encounter a site where "view source" shows only empty div containers.
This is where Selenium saves you. It's not just a scraping and parsing library – it's a browser automation framework. Selenium launches an actual Chrome (or Firefox) instance, navigates to the page, waits for JavaScript to execute, and then lets you extract data from the fully rendered DOM.
How Selenium works: WebDriver architecture
Selenium uses a WebDriver protocol to control the browser. Think of it as a remote control:
- Your C# code sends commands to the WebDriver (e.g., "navigate to this URL," "click this button").
- WebDriver translates those commands into browser-specific instructions.
- Chrome (via ChromeDriver) executes the instructions and sends back results.
- Your code receives the data and continues.
This round trip makes Selenium slower than plain HTTP requests, since you're driving a full browser. Still, when a page relies heavily on JavaScript to generate content, a real browser engine is often the only practical option.
Responsible automation
Automated browsers can send requests faster than humans, and hammering a server with 1000 concurrent Selenium instances will get you IP-banned instantly. Add delays between requests (Thread.Sleep() or better yet, use exponential backoff). Respect robots.txt. If a site explicitly blocks automation, don't try to circumvent it – use a service like Decodo's Web Scraping API that handles rate limits and proxies correctly.
Also, check out our ChatGPT web scraping guide if you're experimenting with AI-assisted scraping workflows.
Now let's build a scraper for quotes.toscrape.com/js – the JavaScript-rendered version of the site you scraped earlier.
Installing Selenium.WebDriver and ChromeDriver
You need two packages: the Selenium library itself and the ChromeDriver binary that controls Chrome. Run these commands in your project directory:
Launching Chrome in headless mode
Headless mode runs Chrome without a visible window. No GUI means less memory usage and faster execution. Here's the basic script to write in Program.cs:
Run this with:
You won't see a browser window open, but you should see this in your teerminal:
If you bump into an issue where the driver isn't found after running the script, check that chromedriver.exe (or chromedriver) exists in the output folder. Some antivirus software flags it – add an exception if needed.
Why headless matters:
- Speed. No rendering overhead for UI elements you'll never see.
- Server environments. Many CI/CD servers don't have displays.
- Resource efficiency. Lower memory usage when running multiple scrapers.
If you're debugging and want to see what Selenium is doing, just remove the --headless argument. Chrome will open visibly, and you can watch it navigate and interact with the page.
Extracting elements with driver.FindElements()
Once the page loads and JavaScript executes, you can extract data just like with HtmlAgilityPack – but with Selenium's API instead.
The script launches a browser, navigates to the page, waits for elements to load dynamically, then extracts the quotes, author names, and tags, and finally, prints them in the terminal.
Skip building, start scraping
Decodo's Web Scraping API returns structured data through simple HTTP requests – no scrapers to build or maintain.
Element selection: CSS selectors vs. XPath
In the previous example, the script used a CSS selector to find content. However, that's not always the perfect way to scrape pages. While CSS selectors are faster and cleaner, XPath is more flexible for complex tree traversal, especially when you need to hop around parent or sibling nodes that CSS can't easily reach.
The good news – Selenium supports both CSS selectors and XPath. Choose based on preference.
CSS selectors:
XPath selectors:
Extracting attributes
Need href, src, or other attributes? Use GetAttribute():
Explicit waiting
The Thread.Sleep(2000) inside the code is a crude way to wait for JavaScript execution. It works, but wastes time. Selenium offers explicit waits that poll until elements appear:
This waits up to 10 seconds but continues as soon as elements are found. Much more efficient than blind sleeping.
Exporting and structuring scraped data
Printing to the console is fine for testing, but real projects need structured data you can analyze, share, or import into databases. The professional approach: define a model class, populate a collection, and export to CSV.
We'll continue our Selenium example from the previous section and add proper data export. This pattern works whether you're scraping with HtmlAgilityPack or Selenium – the export logic stays the same.
Creating a data model class in C#
Instead of juggling loose strings, create a class that represents what you're scraping. For our quotes example:
Classes are essential because their strong typing catches errors at compile time, not runtime. If you typo a property name, the compiler will notice it immediately. You also get IntelliSense support, refactoring tools, and precise documentation of your data structure.
Writing to CSV with CsvWriter.WriteRecords()
Now let's modify the Selenium scraper to populate a list of Quote objects and export them:
The script does the following:
- Scrapes all quotes into a List<Quote> instead of printing immediately.
- StreamWriter creates the CSV file.
- CsvWriter from CsvHelper handles formatting, escaping, and headers automatically.
- WriteRecords() serializes the entire list in one call – no loops, no manual formatting.
- The using statements ensure files close properly, even if exceptions occur.
Run this with the dotnet run command. You'll get a quotes.csv file in your project directory.
Handling CultureInfo and UTF-8 BOM for Excel compatibility
Notice the CultureInfo.InvariantCulture parameter? This ensures a consistent number and date formatting regardless of your system's locale settings. Without it, a German system might use commas for decimals while an American system uses periods. An invariant culture keeps everything standardized.
The Excel UTF-8 problem
Excel has a quirk: it doesn't recognize UTF-8 files unless they start with a Byte Order Mark (BOM). Without the BOM, special characters (é, ñ, 中文) display as gibberish when you open the CSV in Excel. Here's the fix:
The new UTF8Encoding(true) parameter adds the BOM. Now Excel correctly interprets UTF-8 characters.
Final words
You’ve completed a full scraping workflow, demonstrating that C# is reliable for production-ready web automation. By adding async scraping, proxies, and error handling, your setup can handle real-world scale with ease. Next up: conquer trickier sites and make data bow to your code.
Scrape smarter with residential proxies
Unlock reliable, rotating IPs to keep your scraping fast, stealthy, and uninterrupted.
About the author

Zilvinas Tamulis
Technical Copywriter
A technical writer with over 4 years of experience, Žilvinas blends his studies in Multimedia & Computer Design with practical expertise in creating user manuals, guides, and technical documentation. His work includes developing web projects used by hundreds daily, drawing from hands-on experience with JavaScript, PHP, and Python.
Connect with Žilvinas via LinkedIn
All information on Decodo Blog is provided on an as is basis and for informational purposes only. We make no representation and disclaim all liability with respect to your use of any information contained on Decodo Blog or any third-party websites that may belinked therein.