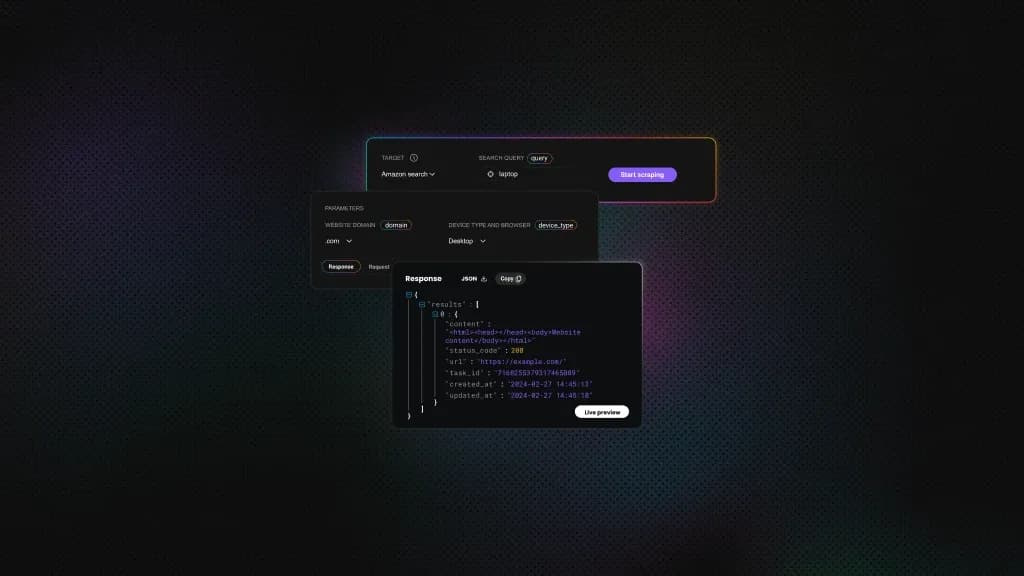
No-Code Web Scraping With n8n: Build Automated Data Workflows Without Writing Code
No-code web scraping with n8n lets you build automated scrapers on a visual canvas – no Python, no server, no terminal. You need prices tracked weekly or listings monitored daily, but can't code a scraper or run one. This guide shows you how to use only drag-and-drop nodes that run on schedule in the cloud.
Justinas Tamasevicius
Last updated: Jun 10, 2026
23 min read

TL;DR
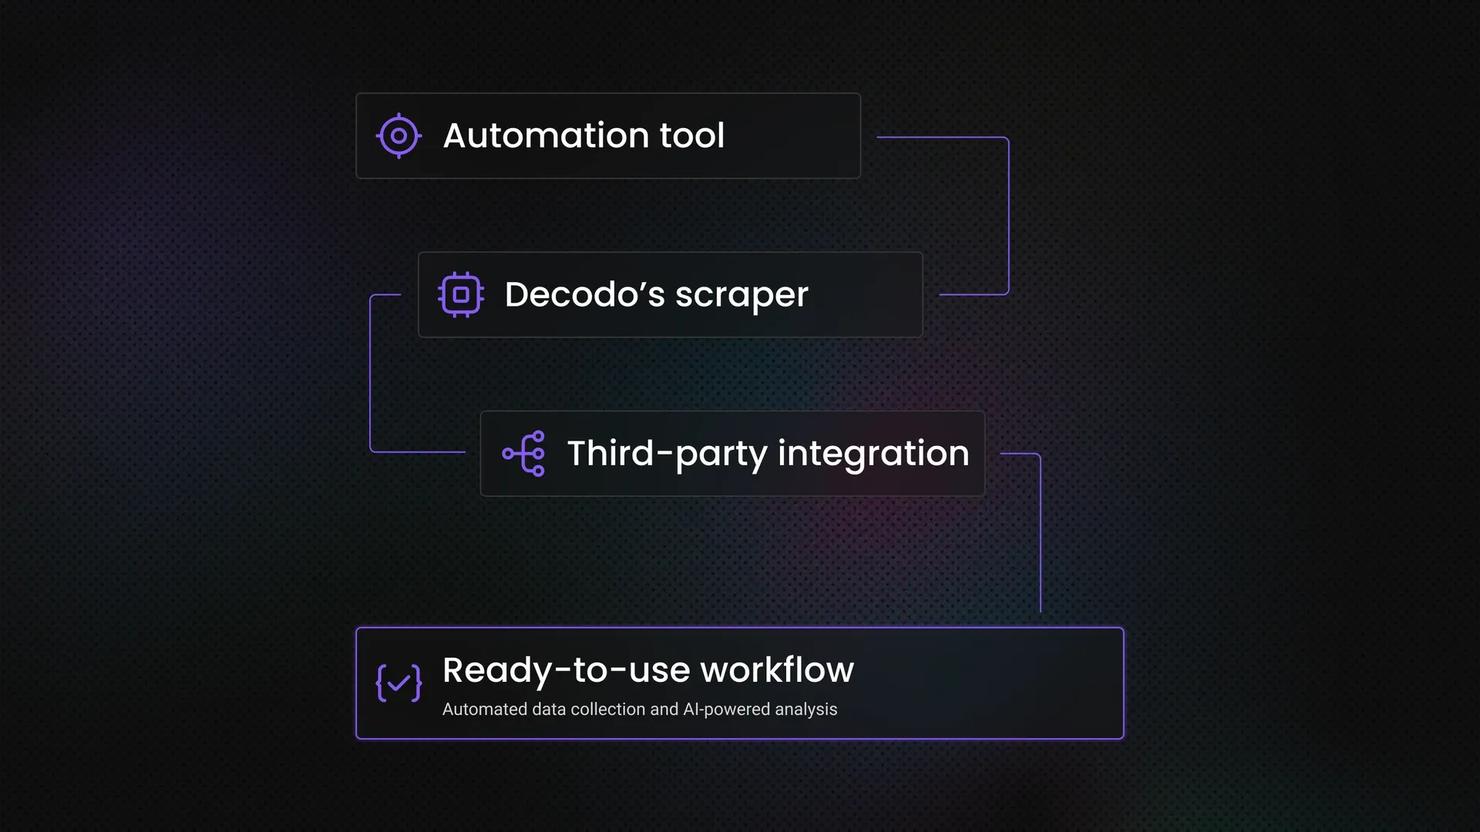
- n8n is a visual automation platform, not a point-and-click scraper. You build scraping pipelines by connecting nodes on a canvas: a trigger, a fetch step (the Decodo node or an HTTP Request), a parsing step, and an output.
- A plain HTTP Request node only fetches static HTML. It can't render JavaScript, rotate IPs, or get past bot detection. For dynamic or protected sites, route the request through Decodo's Web Scraping API.
- n8n works best for recurring, structured extractions with conditional routing. Price checks, stock alerts, SERP (search engine results page) rank tracking, content monitoring – on a schedule, sent only where and when they matter.
- This guide uses n8n Cloud with visual nodes only. No code nodes, no Docker, no self-hosting. 3 full walkthroughs included: stock-availability monitoring, a weekly SERP rank tracker, and a daily multi-source news digest.
- You can also let an AI agent take over. Attach the Decodo node as a tool inside an n8n AI Agent, or connect Claude/Cursor to Decodo's MCP (Model Context Protocol) server. Then just describe what to scrape instead of wiring every step.
- Know when you've outgrown it. Millions of pages per month, deeply nested logic, and self-healing selectors are the cues to move to a self-hosted instance or a code-based scraper.
Why n8n for no-code scraping
If you've been copying data into spreadsheets by hand every Monday morning, you already know the problem. Manual data collection is slow, repetitive, and one missed week means a gap in your records. It works for a while, but it breaks sooner than most people expect.
n8n is a visual workflow automation platform that connects triggers, actions, and logic on a drag-and-drop canvas. What makes it relevant for scraping specifically is the combination: a built-in HTTP Request node that can call any API or page, an HTML node to parse what comes back, direct connectors to destinations like Google Sheets, Slack, and email, and scheduling that runs your workflow on a recurring basis without you touching it. What makes n8n especially suited to recurring scraping is pairing all this with an open ecosystem of community nodes – such as the verified Decodo node, which is built to handle the parts a raw request can't.
Everything in this article uses n8n Cloud with visual nodes only. No code nodes, no Python, no Docker, no self-hosted instance. If you want full developer control with code nodes and self-hosting, the technical n8n scraping guide on the Decodo blog covers that path.
Each walkthrough below shows where Decodo's Web Scraping API fits into the workflow for targets that a plain HTTP request can't reach.
What is no-code web scraping with n8n?
n8n is a visual pipeline builder, not a point-and-click scraper where you select elements on a page and hit "extract". You build pipelines on a canvas by connecting nodes, and scraping is one of the things those pipelines can do.
A typical n8n scraping workflow has 4 parts:
- A trigger that starts the workflow. A schedule ("run every morning at 9 AM") or a webhook ("run when I call this URL").
- A fetch step that pulls data from the target. This is the Decodo node – a call to a scraping API that does the hard part – or, in plain cases, an HTTP Request.
- A parsing step that picks out the fields you need. When the API returns structured JSON (Decodo's Amazon, Google Search, and Reddit targets do), you just reference the fields and split the array into items. When it returns raw HTML (the Universal target), n8n's HTML node extracts fields with CSS selectors.
- An output node that sends the results somewhere useful. Google Sheets, Baserow, Slack, email, a database, or a webhook to another service.
You configure each step through form fields and dropdowns.
What you're actually building
You're defining the full pipeline: what URL to scrape, which elements to extract, when the job runs, and where the data goes. The low-level work – HTTP requests, parsing, proxy rotation, retries – is handled for you by the scraping API, so you make every decision that matters through a visual interface instead of a script.
Where n8n needs a scraping API
A plain HTTP Request node in n8n sends a standard GET request and returns whatever the server responds with. It doesn't render JavaScript, rotate IPs, solve CAPTCHAs, or handle bot detection. For static HTML pages, that's enough. The server returns the full page content, and n8n's HTML node can parse it with CSS selectors.
For dynamic or JavaScript-rendered pages, it's not. If the target site loads content through client-side JavaScript after the initial page load, the HTTP Request node gets back an empty shell. And if the site has any anti-bot protection, your requests will get blocked once they start repeating from the same IP on a schedule.
Instead of calling the target URL directly, you call Decodo's Web Scraping API – easiest via the Decodo node – that renders the page in a headless browser, handles proxy rotation, and returns the fully loaded HTML. For supported targets, that HTML comes back already parsed into JSON. From n8n's perspective, it's still just one node; the API does the hard part for you.
For the targets in this guide – retail, search, and social – a plain request isn't enough, which is why the walkthroughs below route the fetch step through Decodo's Web Scraping API.
What changed in 2026
Here's the paradox that defines web scraping in 2026: it has never been easier to build a scraper, yet access has never been harder. No-code tools, AI, and parsed APIs lowered the barrier to entry, while bot defenses now update in real time. Both are true at once. You don't need to memorize the details below – the takeaway is simply that the web got harder to scrape, which is exactly why the managed API in this guide handles the hard part. The shifts that matter:
- Bots now outnumber humans online. In 2026, automated traffic overtook human traffic for the first time – Cloudflare measured bots at 57% of all web requests, driven by a surge in AI crawlers and agents. Sites have responded with heavier, always-on bot defenses, which is exactly why a plain request struggles where it used to get through easily.
- Google removed the &num=100 search parameter (September 2025). A single search request now returns about 10 results instead of 100, so deep SERP rank tracking takes multiple paginated requests.
- Reddit and other platforms tightened access for unauthenticated direct requests. Even their public JSON endpoints now need a real browser session or a proxied, rendered request rather than a plain GET.
- Anti-bot detection moved to the TLS layer – before a page even loads. Systems like Cloudflare read your client's TLS fingerprint during the handshake, so a plain request library (including n8n's HTTP Request node) gets flagged as "not a browser" before it receives a single byte of HTML. On sites that do this, spoofing the user-agent, matching headers, or rotating IPs won't get a request through on its own – the detection happens at the packet level. That's why JavaScript rendering plus managed fingerprinting is no longer optional (see how to bypass Cloudflare).
- AI agents became a front-end for scraping. People now let an LLM (large language model) agent decide what to scrape and call a scraping tool to do it – see the section "The 2026 upgrade: let an AI agent run the scraper" below.
- The web is starting to formalize agent access. New standards like llms.txt (machine-readable crawl permissions) and pay-per-crawl frameworks are appearing – and the payment side is forming too, with agent-payment standards like x402 (backed by Coinbase, Cloudflare, and Stripe) letting an AI agent pay per request directly over HTTP. Adoption is still early and largely experimental, but the direction is clear: a web where some data is licensed and access is negotiated, not simply blocked.
JavaScript rendered like a Renaissance painting
Decodo's Web Scraping API handles the JavaScript rendering for you, so your scraper gets the full, beautiful picture.
When n8n no-code scraping works (and when it doesn't)
Here's an honest breakdown of where this approach delivers and where it runs into limits – starting with the realistic mix. In a typical scraping workload, about 70% of pages are simple static HTML, around 20% are moderately dynamic, and only about 10% are heavily protected or JavaScript-heavy. n8n's own nodes cover the simple static end; the scraping API handles the protected, JavaScript-heavy targets this guide focuses on.
Good fits
n8n no-code scraping fits best when the job has a predictable, repeatable shape. These are the cases it handles well:
- Static HTML pages. Sites that return complete HTML in the initial server response work well with n8n's HTTP Request node alone. Many news sites, blog listings, and publicly accessible directories fall into this category.
- Sites with public APIs or RSS feeds. If the data source exposes structured data through a JSON API or RSS feed, call it directly. It's more stable than scraping HTML and avoids broken selectors when the site updates its layout. Always check for an API or feed first – APIs are the more reliable path – before building an HTML scraper.
- Recurring structured extractions. The same data fields from the same URL on a regular schedule is n8n's strongest use case. Price checks, stock availability, content monitoring, and SERP rank tracking. Set the schedule, define what to extract, point the output at a spreadsheet, and let it run.
- Pipelines with multi-step routing. This is where n8n goes beyond a simple cron job. It can filter, transform, and route results based on conditions. Send a Slack alert only when a price drops below a threshold. Append a row to a spreadsheet only when a new listing appears. Skip the notification entirely when nothing has changed.
Cases that need a scraping API
These targets are still reachable, but only when the fetch step runs through a managed scraping API instead of a plain request:
- JavaScript-rendered pages. SPAs (single-page applications) and pages that load content via client-side JavaScript return an empty shell to a plain HTTP request. A managed scraping API that runs a headless browser is required to get the actual content.
- Bot-protected or rate-limited sites. Targets that use Cloudflare, Akamai, or similar anti-bot systems will block repeated requests from a single IP, especially on a predictable schedule. Proxy rotation and browser fingerprint management are needed, which a scraping API handles transparently.
- Login-gated content. Authenticated scraping requires session handling, cookie management, and sometimes multi-step login flows. That goes beyond what n8n's HTTP Request node manages natively.
When you've outgrown no-code
These are the signs you've outgrown no-code entirely, where a code-based scraper becomes the better investment:
- High volume. At millions of pages per month, you'll hit n8n Cloud's execution limits – that scale is a job for dedicated infrastructure, not a workflow automation tool.
- Deep conditional logic. n8n's Filter and IF nodes can handle branching, but workflows become unwieldy past 2 or 3 levels of nested conditions. If your parsing logic requires complex decision trees based on page content, you'll outgrow the visual editor.
- Selector resilience. CSS selectors break when a target changes its HTML, and can return empty data without raising an error – so the Universal/CSS path needs its own validation checks (parsed targets like Amazon, Google, and Reddit sidestep this). When that upkeep becomes constant, it's a clear signal to move to code.
Setting up your n8n environment for scraping
You need very little before building your first workflow, which is the point of the no-code path. There's no server to provision and nothing to install. This section covers the 3 things you set up first: an n8n Cloud account, a Decodo Web Scraping API authentication token, and a quick orientation to the nodes every scraping workflow uses. You'll also connect Slack and Baserow later, when a walkthrough first needs them.
Everything here runs on free trials (n8n Cloud for 14 days, Decodo for 7 days), so you can build and test the whole guide without paying. The walkthroughs also send alerts to Slack and save data to Baserow (a free, open-source Airtable alternative) – both have free tiers, so you'll sign into those two as well, and n8n prompts you the first time you add a Slack or Baserow node. And if you'd rather not wire nodes by hand, every walkthrough is downloadable – there's an import callout with the files just below.
Create an n8n Cloud account
Sign up at n8n.io and start a Cloud trial. The Cloud version gives you a hosted n8n instance with automatic updates and zero server management – you log in and build, and n8n keeps it running on schedule, even when your computer is off. That's the difference from self-hosted n8n, where you manage the container, updates, and uptime yourself.
The 14-day free trial is enough to build and test everything in this guide. After it, n8n Cloud is paid (priced mainly by monthly executions and active workflows), so check n8n's current pricing before committing to always-on jobs. Or self-host n8n for free if you'd rather manage the server yourself.
Get oriented on the canvas
Open a new workflow, and you'll see the editor canvas. A few things are worth knowing before you start:
- Nodes and connections. Each box is a node – a single step in the workflow. You drag the small dot on a node's right edge to the next node to connect them; data flows left to right along those connections.
- The execution log. Every time the workflow runs, n8n records what each node received and returned. This is where you debug – click any node after a run to see its input and output data.
- The manual test trigger. The Execute workflow button runs the whole thing immediately, without waiting for the schedule. You'll use this constantly while building, so you're not waiting until 9 AM tomorrow to find out a field reference is wrong.
- Fixed vs Expression fields. Every field holds either a plain value or an n8n expression – the {{ … }} snippets you'll paste throughout this guide. Before you paste an expression, switch the field to Expression using its small Fixed / Expression toggle. If the field is left in Fixed mode, n8n treats the text literally instead of evaluating it. It's the most common beginner mistake, so it's worth getting into the habit now.
Install the Decodo node and add your token
For any target that renders content with JavaScript or sits behind bot protection – which describes a lot of retail, search, and media sites – a plain request needs help. That's the role of the Decodo Web Scraping API: it reaches JavaScript-rendered and bot-protected pages that a plain request can't. The easiest way to use it inside n8n is the official Decodo node, which exposes the API as labeled form fields with ready-made targets (Universal, Google Search, Amazon, YouTube Transcript, Reddit).
- Install the node. In a workflow, open the nodes panel, search Decodo, and click Install node (it's a verified community node published by Decodo). Accept the install prompt.
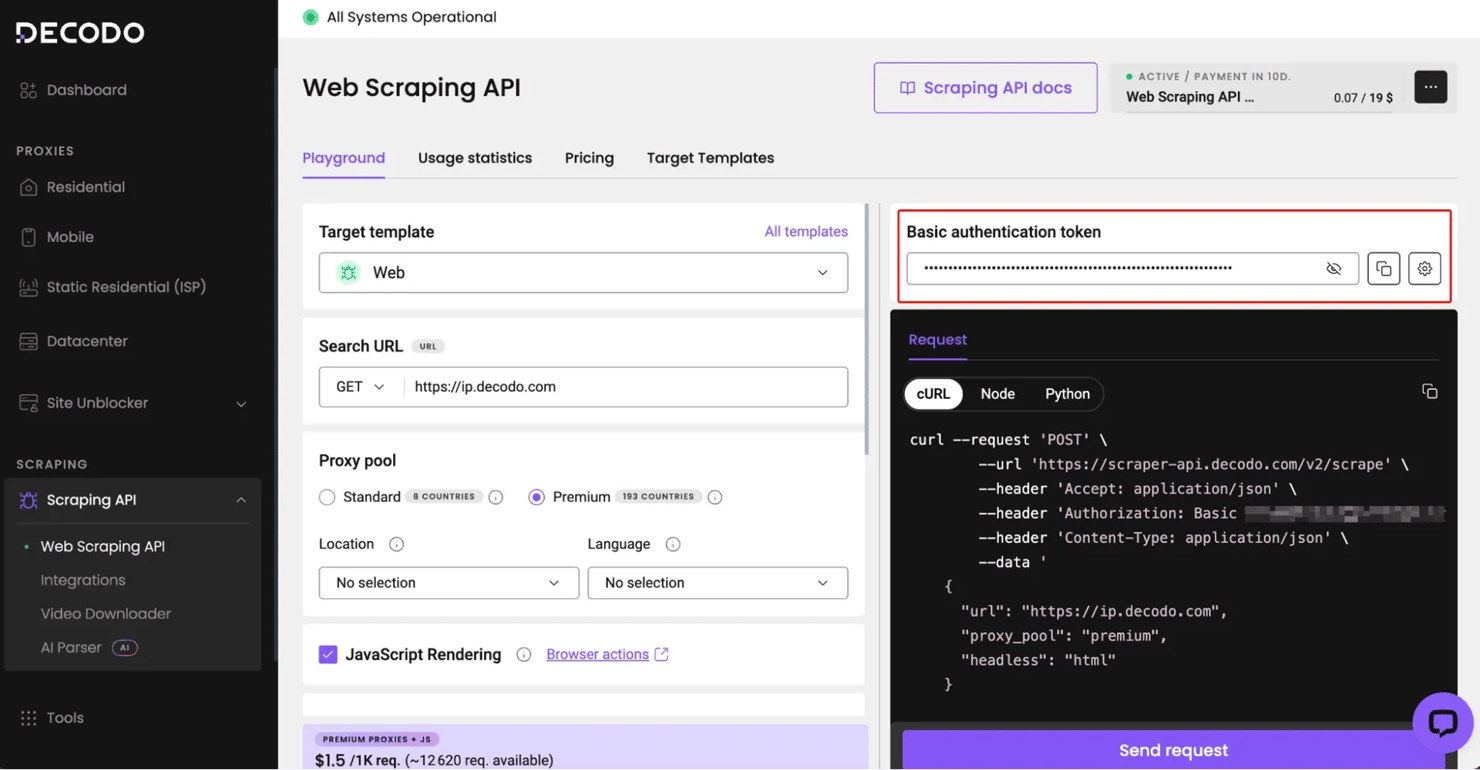
- Get your token. In the Decodo dashboard, open the Web Scraping API section and copy your authentication token (the Basic-auth token on that page). This token is on the Advanced Web Scraping API plan, available on the free 7-day trial.
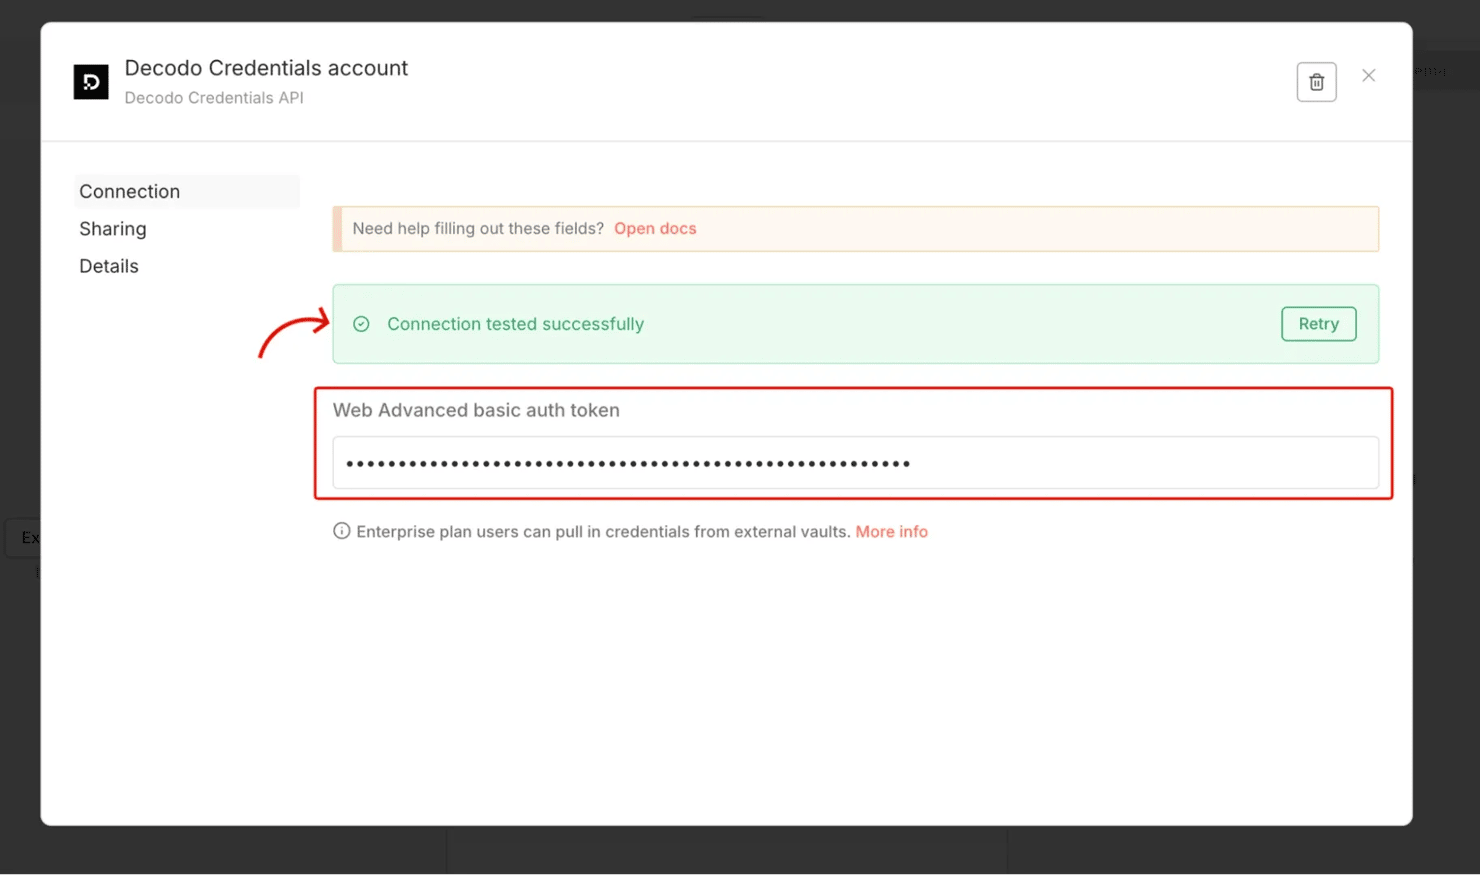
- Save the credential. In n8n's Credentials store, add a Decodo Credentials API credential and paste the token. Never hardcode credentials directly into node fields. They're encrypted, reusable across workflows, and don't leak into exported workflow JSON. Every Decodo node then just selects this credential from a dropdown.
Then paste that token into a new n8n credential and run the connection test:
The core nodes you'll use everywhere
A handful of node types show up in nearly every scraping workflow in this guide
Node
Role
Schedule Trigger
Fetches – and for supported targets (Amazon, Google Search, Reddit), parses the data. Any other page goes through its Universal target.
Split Out / Edit Fields (Set)
Break a results array into individual items, and reshape them into just the fields you want.
Filter / IF
Route or drop items based on conditions (in stock vs not, recent vs old).
Output (Slack, Google Sheets, Baserow, email, webhook)
Sends the result somewhere useful.
Once these feel familiar, the walkthroughs below are just variations on the same pattern.
If you prefer not to build from scratch, all walkthroughs are downloadable as ready-to-import n8n JSON:
In n8n, open the workflow menu, choose Import from File (or Import from URL), select the JSON, then connect your own credentials and data tables – the structure is built for you, so you skip the node-by-node wiring.
Walkthrough 1: Monitoring stock availability across multiple products
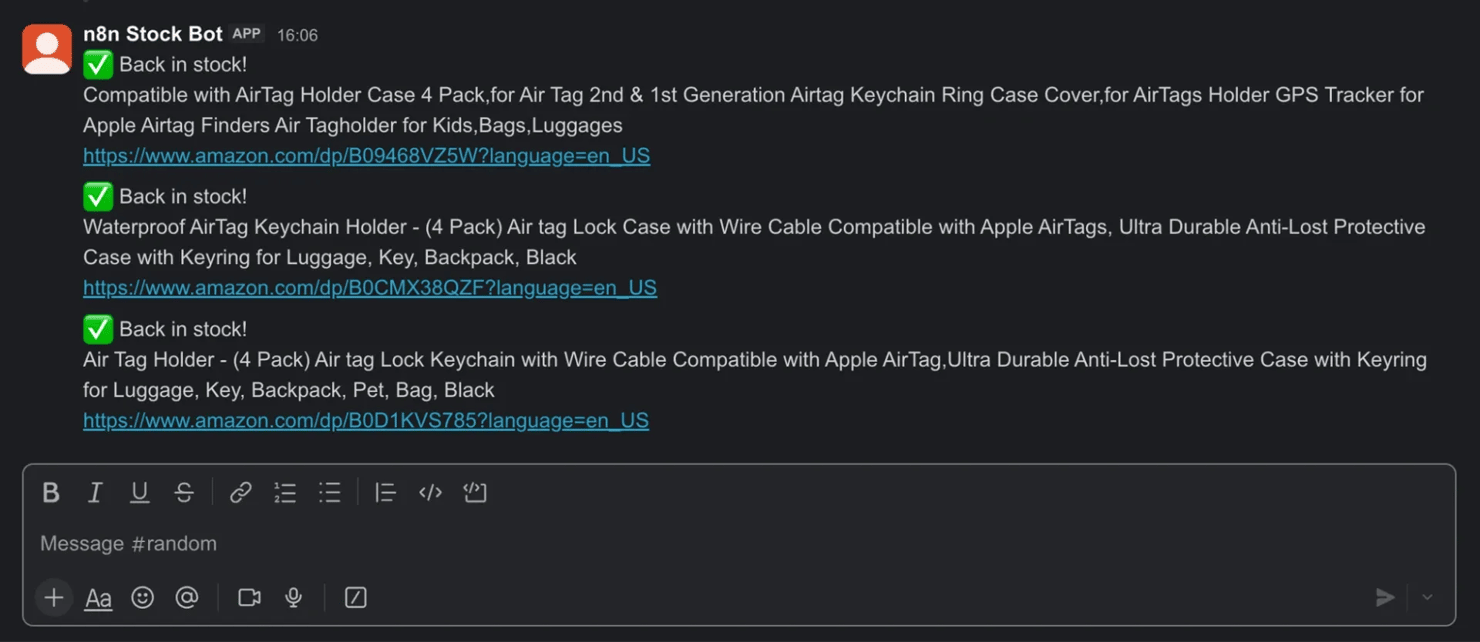
The scenario: a buyer is watching several hard-to-find products – a limited-edition item, a component that keeps selling out – and wants a Slack ping when one comes back in stock. Crucially, they want the alert only when a product's status actually changes to in-stock – not a repeat reminder every single morning while it's still available. The workflow checks each product daily and notifies only on that flip.
This is the ideal first build. It uses two of the things n8n is best at – scheduling and conditional routing – and introduces a clean no-code trick for change detection. You'll use a Schedule Trigger, the Decodo node (one per product), an Edit Fields (Set) node to normalize each result, a Merge, a Remove Duplicates node, a Filter, and a Slack output. By the end of these 7 steps, you'll get a real Slack ping – you'll see the exact alert in the screenshot at the end of this section.
For supported targets like Amazon, it returns clean, structured JSON – including a ready-made stock field – so you skip CSS selectors entirely.
Stock monitor: Workflow structure
The pipeline branches from one trigger to a Decodo node per product, then merges back to a single alert:
Every day 9 AM → check products 1–3 in parallel (Decodo, Amazon target) → normalize each → combine products (Merge) → only new status (Remove Duplicates, cross-run) → in stock? (Filter) → back-in-stock alert (Slack)
On the canvas, that's one Decodo node per product feeding a Merge, then the deduplication, filter, and Slack chain:
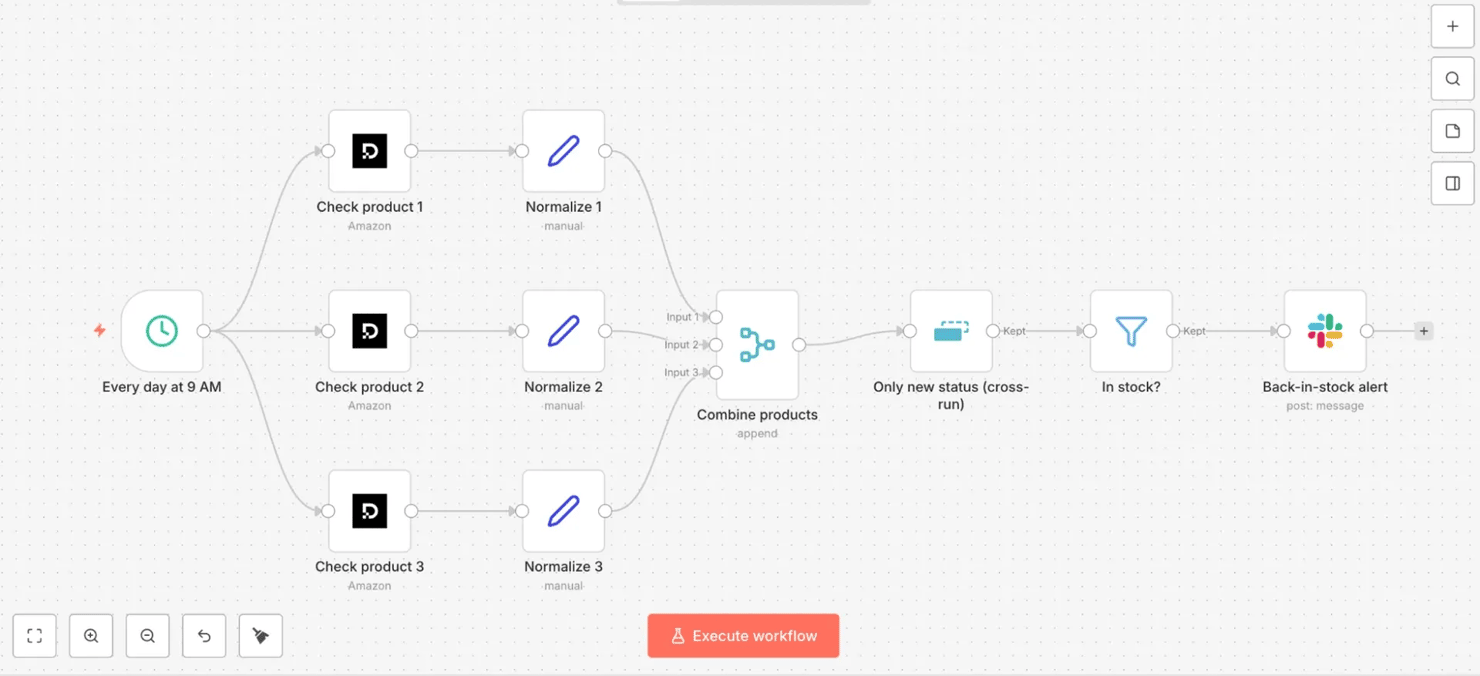
- Step 1 – Schedule Trigger – "Every day at 9 AM". Set Trigger Interval to Custom (Cron) and enter 0 9 * * * in the Expression field – "at minute 0 of hour 9, every day", i.e., 9 AM daily. (n8n also offers a friendlier interval picker if you'd rather not write cron.)
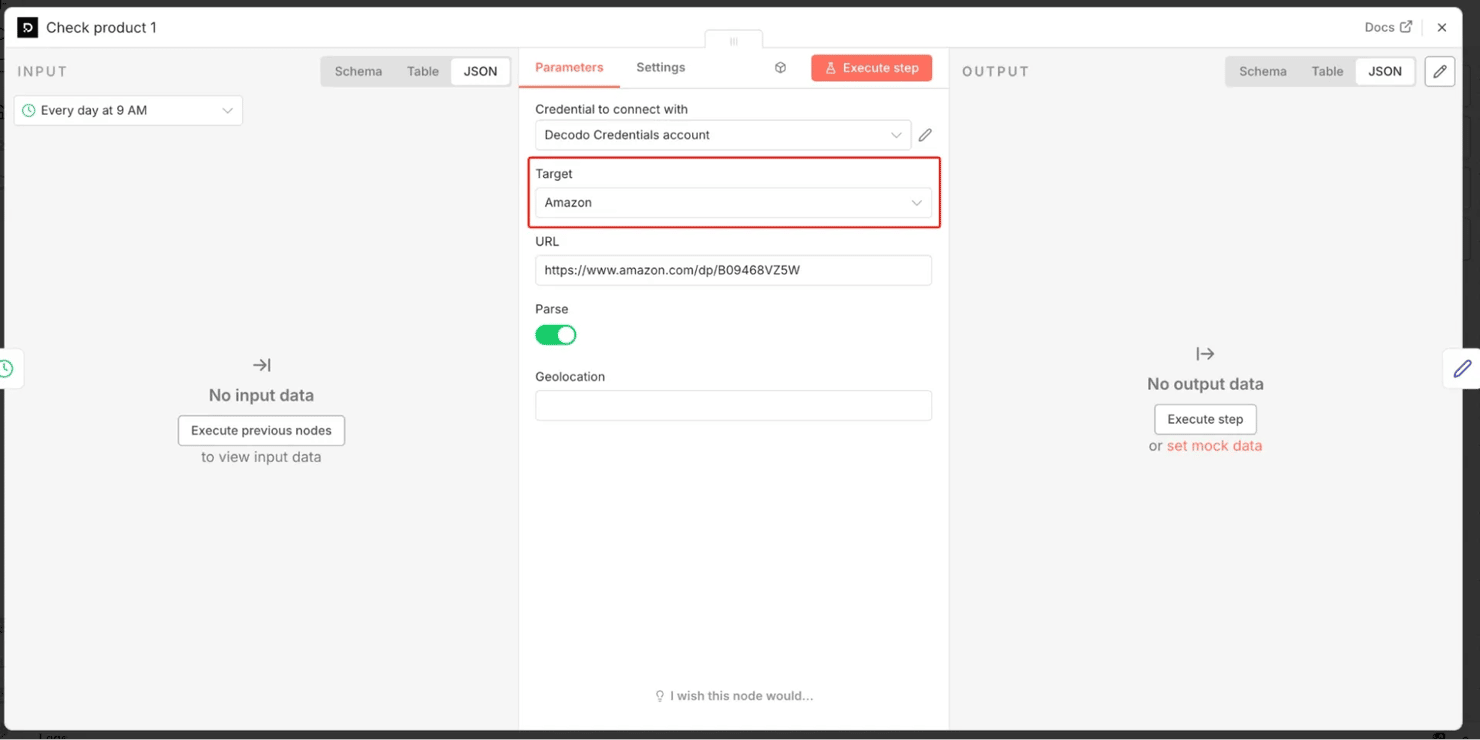
- Step 2 – Decodo nodes – "Check product 1/2/3". Add one Decodo node per product you want to watch. Select your Decodo Credentials API credential, set Target to Amazon (powered by Decodo's dedicated Amazon Scraper API), paste the product URL (e.g., https://www.amazon.com/dp/B09468VZ5W), and turn Parse on. Decodo renders the page through a proxy and returns a structured JSON product object with a ready-made stock field. Prices and availability differ by region, so if you're tracking a specific market, set the node's Geolocation to it. Watching a different retailer? Use the Decodo Universal target + n8n's HTML node with a CSS selector instead – Amazon is one of Decodo's dedicated parsed targets.
- Step 3 – Edit Fields (Set) – "Normalize". After each Decodo node, reshape the output to 3 tidy fields so every branch matches. (Those {{ … }} snippets are n8n expressions – switch the field to Expression mode first, then paste; you don't write them yourself.) Add 3 fields and paste one expression into each:
Before you trust these paths: run the Decodo node once (its Execute step button, not the canvas-level Execute workflow) and click it to see the real output – find a stock field (its value reads something like In Stock or Currently unavailable) and confirm it sits at this path, since an unusual listing can nest it differently.
- Step 4 – Merge – "Combine products". First, connect the Schedule Trigger's output to all the Decodo nodes so they run in parallel. Then, in the Merge node, set Mode to Append and Number of Inputs to your product count (3 here), and wire each Normalize node into its own Merge input – so all products flow on as a single list.
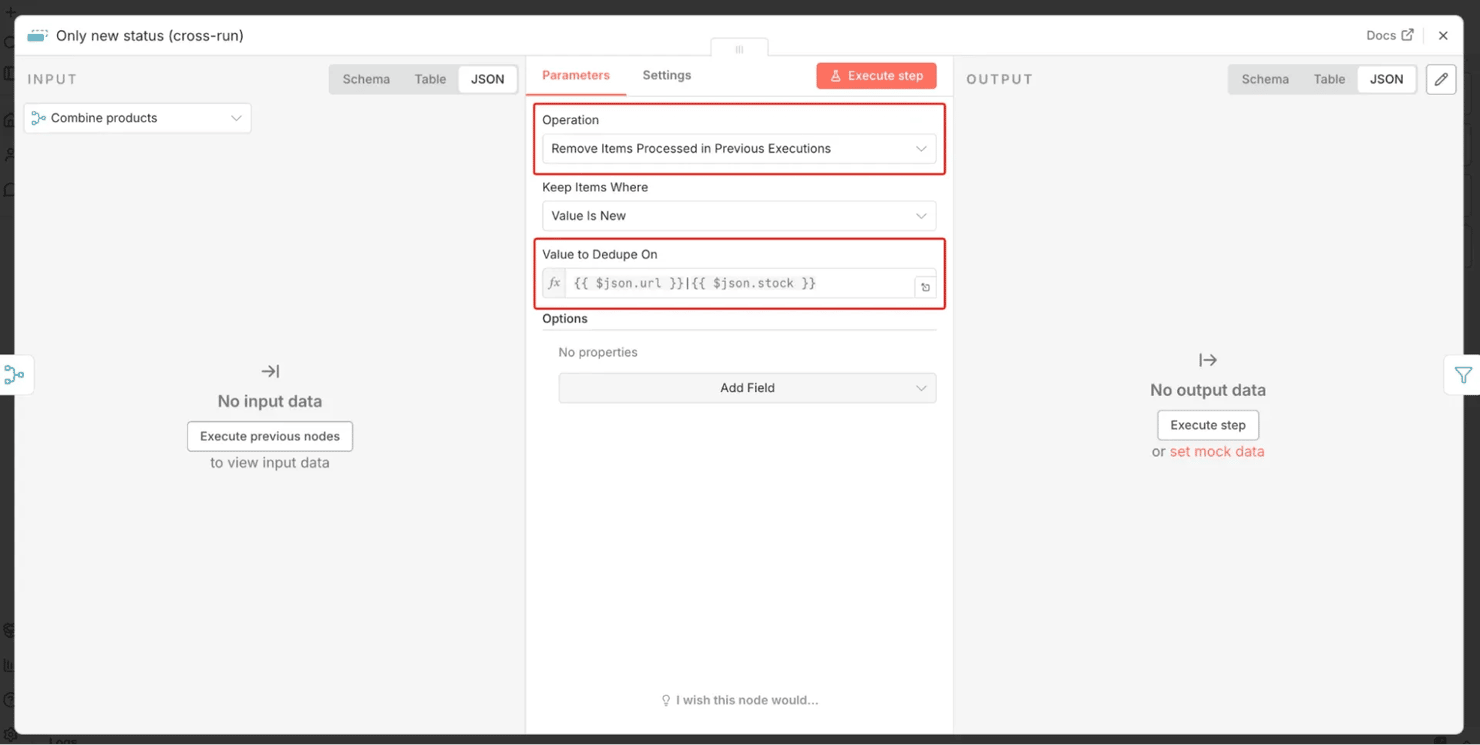
- Step 5 – Remove Duplicates – "Only new status (cross-run)". This is the change-detector. Use the Remove Items Processed in Previous Executions operation with the dedupe value set to the product and its status together: {{ $json.url }}|{{ $json.stock }}. A product passes through only when that URL-and-status combination is new – that is, when its availability just changed since the last run. No change → nothing passes → no alert. (Note: the very first run has no history yet, so everything currently in stock alerts once – that's expected, not a bug, and it works correctly from the next run on.)
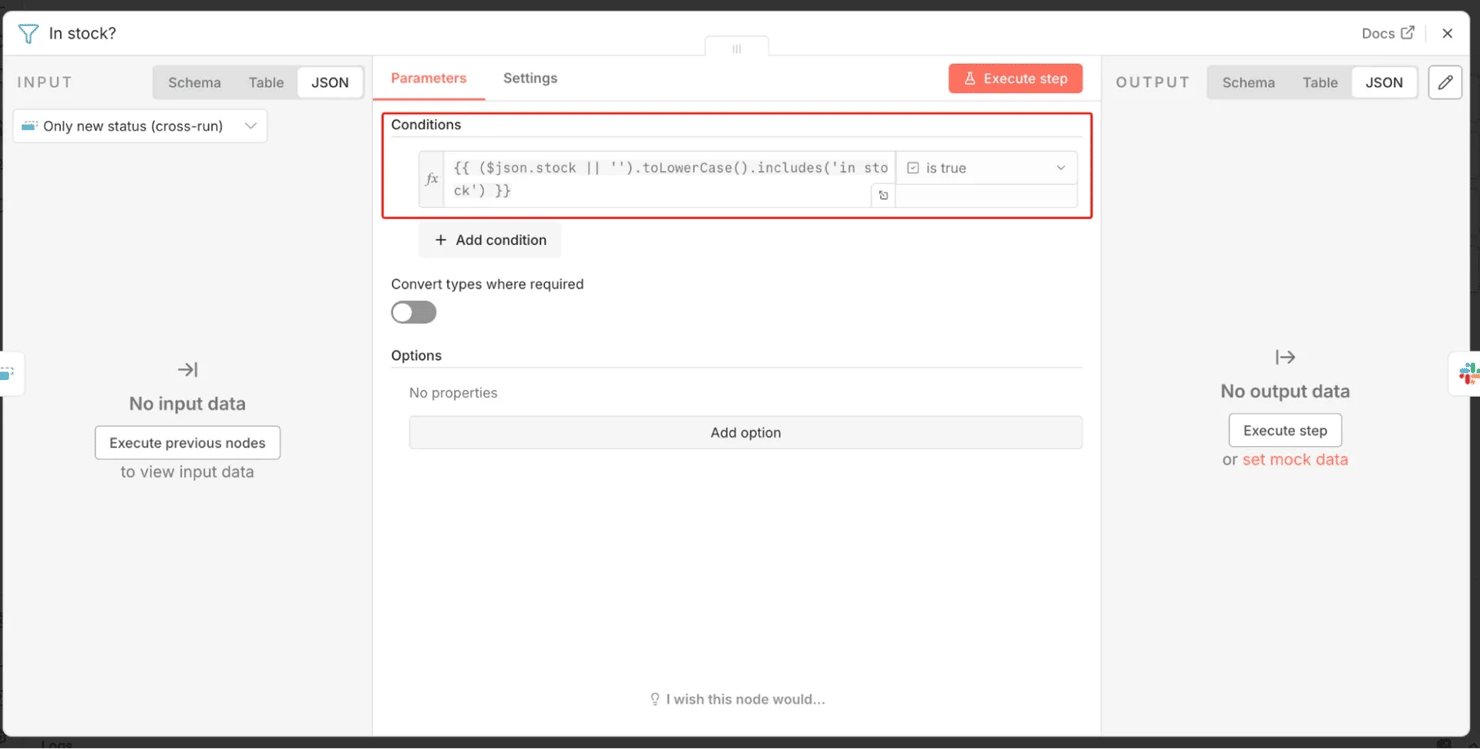
- Step 6 – Filter – "In stock?" Keep only items whose status reads in-stock:
Now, only products that have just flipped to in-stock survive.
- Step 7 – Slack – "Back-in-stock alert". Set Operation to Send a Message, pick your Channel, and put the text below in the Message Text field (n8n prompts you to sign into Slack the first time). One message goes out per newly restocked product:
Run the workflow, and that message posts to your chosen channel:
Stock monitor: Key details
The build above runs, but a few details keep it accurate and prevent duplicate alerts over time:
- How the change-detection works (and when to upgrade). Keying the cross-run dedup on url|stock means a product is only forwarded when that exact status is new. So you get alerted on the flip to in-stock, but not every day it stays in stock. The deliberate trade-off: if a product goes out of stock and returns a second time, that repeat won't re-alert, because its "in stock" state was already recorded. For full per-transition accuracy across repeated restocks, store each product's last status in a table (Baserow or Google Sheets) and compare against it – a small step up in complexity.
- Adding or removing products. Each product is just one Decodo node → Normalize pair wired into the Merge. Copy a branch (Ctrl/Cmd + C / V), change the URL, and rename it. For a long, frequently edited list, read the product URLs from a Baserow/Sheets table and loop instead of hardcoding nodes – the same read-from-table pattern Walkthrough 2 uses for keywords.
- Why use the Decodo API even for "just" a stock badge? Amazon and most large retailers render stock status via JavaScript after page load, behind aggressive bot protection. A plain request would get a bare page (or a block page) with the availability field missing – so the check would always read false, and you'd never get an alert. Decodo handles rendering, proxies, and parsing, so supported listings come back with a parsed stock field.
- Test before you schedule. Click Execute workflow manually and inspect each node's output. Confirm that the Normalize nodes carry the correct stock value before activating the schedule. (Re-testing the dedup from scratch: run the Remove Duplicates node's Clear Deduplication History operation once – any run, even a failed test, records items as "seen", so clear it before re-running or dedup will suppress the very items you're trying to test.)
Production upgrade: Catch every restock (state table)
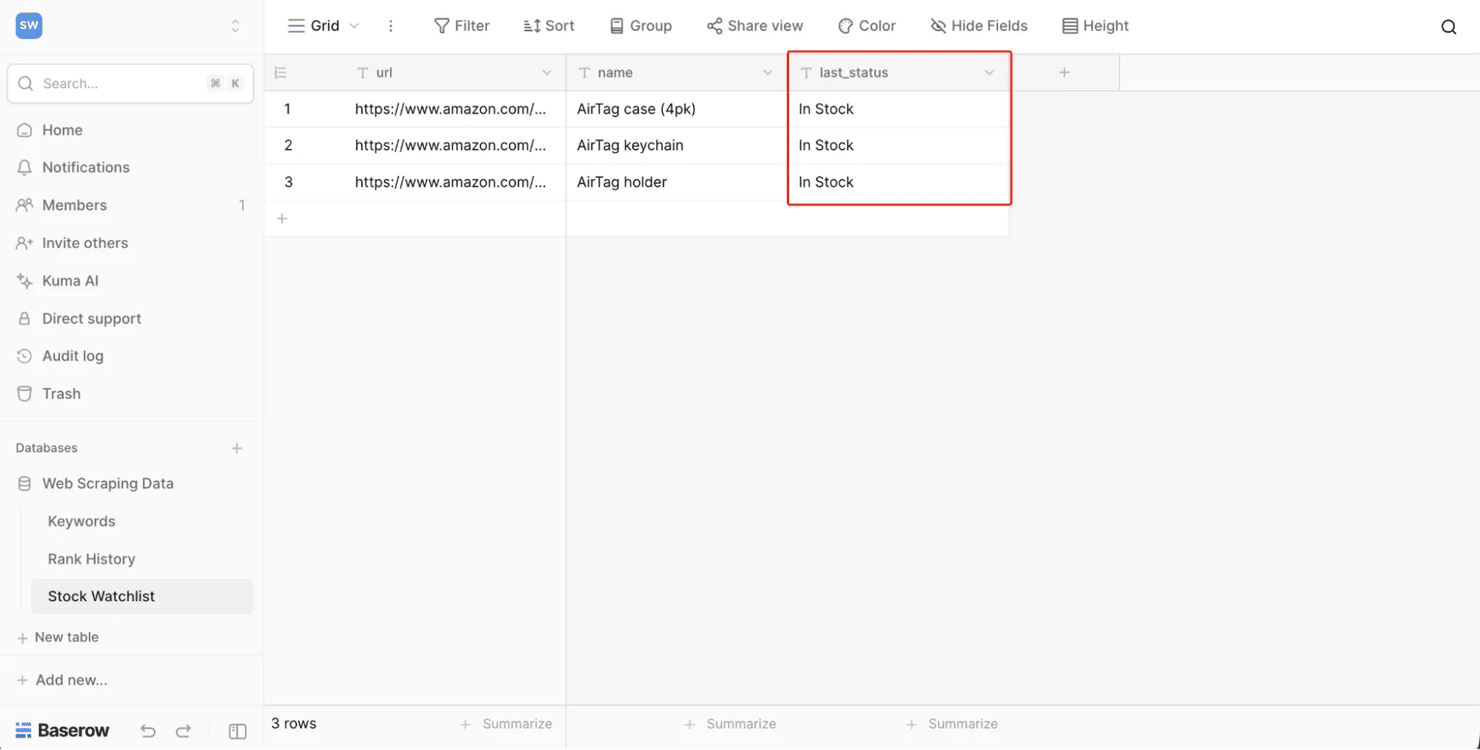
Optional – skip this on your first pass. The version you just built already works; come back here only when you're watching products that restock again and again. The cross-run dedup above alerts on a product's first return to stock, then stays quiet – perfect for one-time drops. But for products that sell out and return again and again, you want an alert on every out→in flip. That needs one more thing: somewhere to remember each product's previous status. Swap the dedup node for a small Baserow Stock Watchlist table with columns url, name, and last_status.
The upgraded workflow reads that table, compares each product's current status against its stored one, then writes the new status back:
Every day 9 AM → read products (Baserow) → (per product) Decodo scrape → compare → update last_status (Baserow) → newly in stock? (IF) → back-in-stock alert (Slack)
The same logic as one linear chain on the canvas, from the Baserow read to the Slack alert:
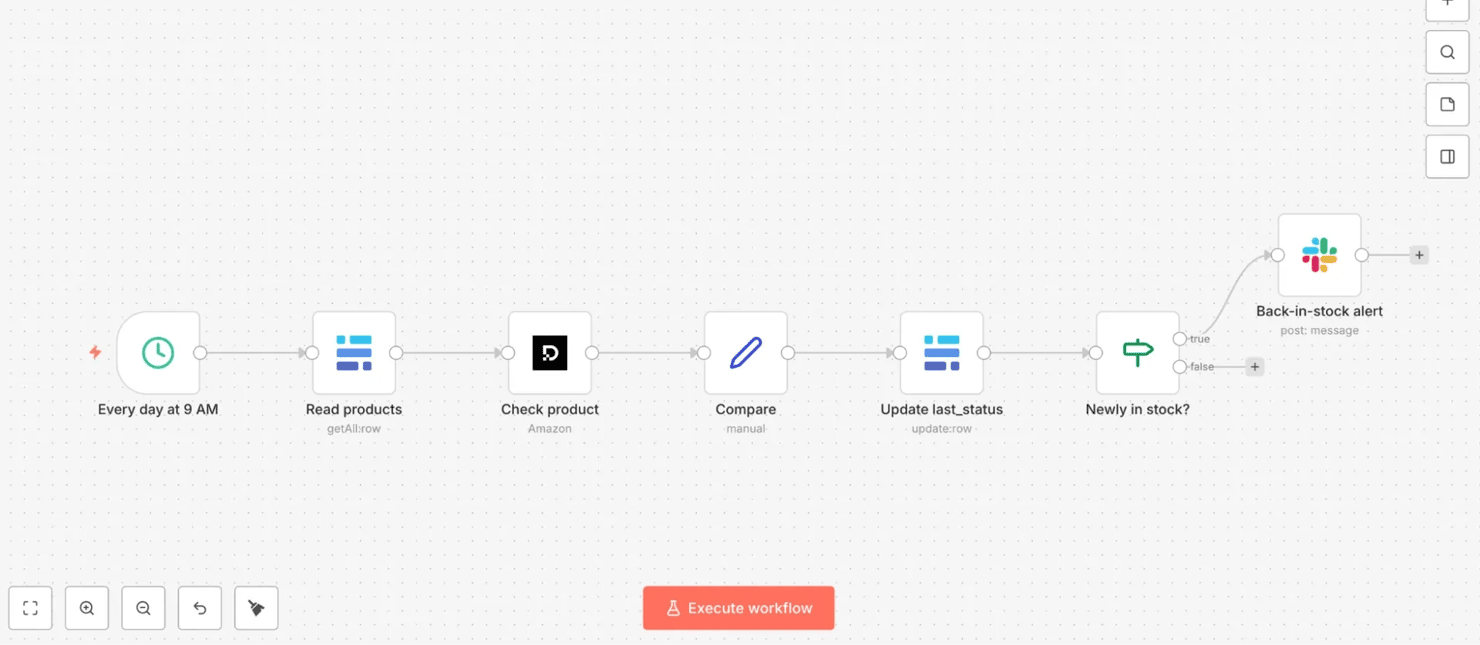
- Read products (Baserow). "Get Many Rows" → one item per product, carrying its stored last_status.
- Decodo (per product). Amazon target, URL {{ $json.url }} → current stock.
- Compare (Set). Capture the fields the rest of the flow needs: current_stock({{ $json.results[0].content.results.stock }}), the stored last_status({{ $('Read products').item.json.last_status }}), row_id ({{ $('Read products').item.json.id }} – you'll use it next to update the right Baserow row), plus name and url for the alert message. (Naming matters: expressions like $('Read products') refer to a node by its exact name, so name your nodes just Read products, Compare, etc. – the (Baserow)/(Set) in these headings are only type labels.)
- Update last_status (Baserow). Set Row ID to {{ $json.row_id }} and write {{ $json.current_stock }} back to the status column, so the next run has up-to-date state. This runs for every product.
5. Slack. Alert on the true branch.
Because the check reads each product's stored previous status (not a dedup fingerprint), it catches the 2nd, 3rd, and every future restock correctly. The trade-off is the extra table plus a read/update step – which is exactly why the dedup version above is the better starting point, and this is the upgrade you use when repeat restocks matter.
For more on what these retailer pages do to block automated requests (and how a scraping API gets around it), see anti-scraping techniques and how to outsmart them. The same pattern extends to price tracking – see how to scrape Amazon prices.
Walkthrough 2: Building a weekly SERP rank tracker
The scenario: an SEO or marketing team wants to track where their site ranks on Google's search engine results pages (SERPs) for a list of target keywords. They log it once a week to a spreadsheet, so they can watch the trend over time. The keyword list lives in a spreadsheet, so a non-technical teammate can edit it without ever opening n8n. In short: read your keywords from a table, scrape each through the Decodo Google Search target, and append the position to a history table on a weekly schedule.
This walkthrough is more advanced than the first. It introduces a real pipeline pattern: reading a list of inputs from a spreadsheet, running each one through the scraper, and writing results back to a different table – a far more realistic shape than a single-URL scrape. It also uses the Decodo node's dedicated Google Search target, which returns Google results as clean, structured JSON.
Rank tracker: Workflow structure
This pipeline reads a keyword list from a table, runs each one through Decodo, and writes the result to a second table:
Every Monday 9 AM (Schedule Trigger) → read keywords (Baserow) → scrape Google ranking (Decodo, Google Search target) → save rank (Baserow)
4 nodes left to right on the canvas, from the keyword read to the rank write:
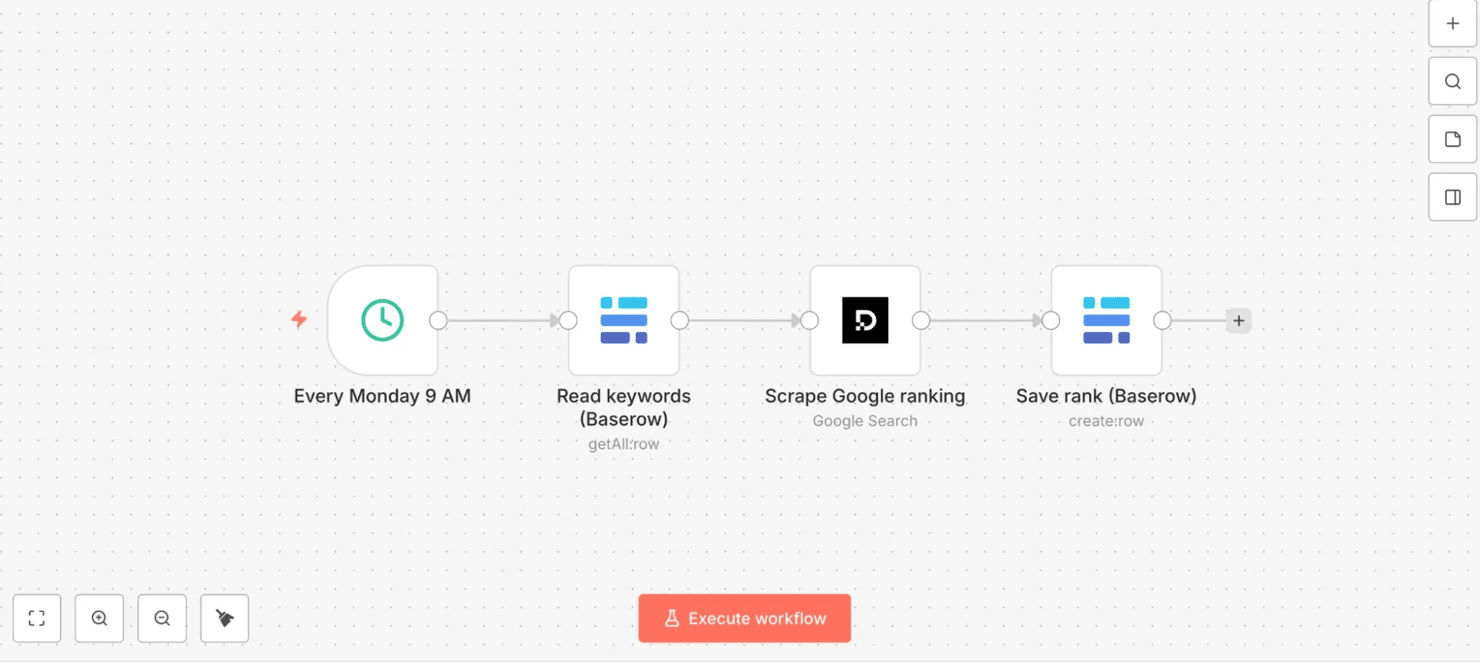
- Step 1: Schedule Trigger – "Every Monday 9 AM". Weekly, on Monday morning. With Custom (Cron) that's 0 9 * * 1 ("9 AM on day-of-week 1", i.e., Monday).
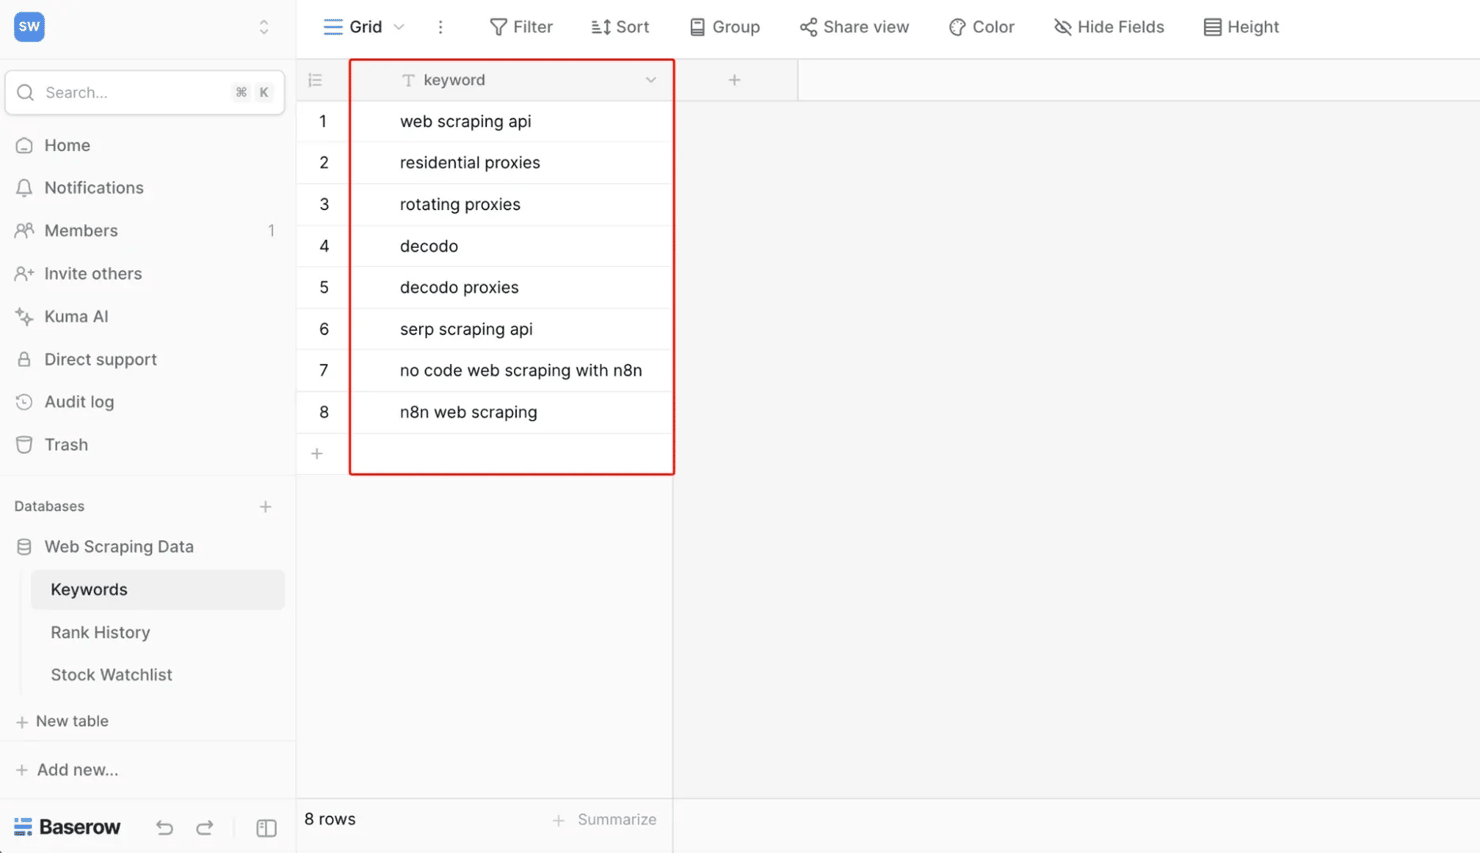
- Step 2: Read keywords (Baserow). First, create a Keywords table with a single column named exactly keyword (the next node references {{ $json.keyword }}, so the name must match), and add one keyword per row. Then point this node at that table. Reading the list from a table (instead of hardcoding keywords in the workflow) means it stays editable by anyone, without touching n8n. Each keyword row flows out as a separate item, so the next node runs once per keyword automatically – no explicit loop node required.
- Step 3: Decodo – "Scrape Google ranking". Add the Decodo node, choose target Google Search, and set Query to an expression referencing the keyword column from the previous step (e.g., {{ $json.keyword }}). Set Geolocation to your target market (e.g., United States) and turn Parse on. Geo-targeting matters: it makes the rank data reflect your target market, not the location of n8n's servers, which could sit anywhere.
Decodo returns a structured SERP object with an organic results array – each entry carrying pos (the rank), title, and url. A note on depth: since Google removed the num=100 parameter in September 2025, a single search request returns the first page (~10 results). So your domain logs a position only if it ranks on page one – otherwise not ranked.
To track deeper than the top ~10, loop with a Loop Over Items node to request more pages, one request per page (the same looping shown in the pagination FAQ below). Before you trust the rank expression below: run this Decodo node once (Execute step) and click it – confirm you see an organic array with real entries, each carrying a pos number. If organic is empty or missing, fix that first – otherwise every keyword silently logs not ranked, even ones you actually rank for.

- Step 4: Extract the rank (and a few useful fields). Map the values into the save step (or an Edit Fields (Set) node before it). The core is finding where your domain sits in the returned organic array and returning its position, or not ranked if it's not there.
Note: the next expression looks scary – but you don't read it, write it, or understand it. You copy it, change one word, and move on. (Or skip the typing and import the downloadable workflow.) Here it is:
Swap decodo.com for your own domain – that's the only edit. (Yes, the Google path repeats results back-to-back – content.results.results – which is correct, so copy it exactly. The Amazon path earlier doesn't double it like that.)
- Step 5: Save rank (Baserow). Create a Rank History table (columns: date, keyword, rank, URL, title, found), then write a new row to it each run: the date ({{ $now.toFormat('yyyy-MM-dd') }}), the keyword ({{ $json.results[0].query }} – conveniently available on the Decodo output itself), the rank, the ranking URL, the title, and the found flag. Because each run appends rather than overwrites, every week adds a dated row – so the table becomes a running history you can chart over time.
After a few weekly runs, the Rank History table fills in:

Rank tracker: Key details
A few of these choices are easy to get wrong when you adapt the workflow to your own site and keywords:
- Spreadsheet as the input list. Using a spreadsheet as the keyword source is a big part of why this workflow stays maintainable by non-technical users. They edit a familiar table; the workflow picks up the changes on the next run.
- Why the Google Search target instead of a raw scrape. Google's bot detection is among the most aggressive on the web – scripted requests to google.com/search are quickly hit with a CAPTCHA or blocked, and even if they got through, you'd have to parse raw HTML. The Decodo SERP Scraping API (exposed as the node's Google Search target) handles residential proxies and browser-level rendering and returns the results already parsed into a structured organic array – so there's no HTML parsing to do.
- Expect a realistic mix, including not ranked. You'll rank #1 for branded terms, mid-page for some, and not ranked for competitive head terms you don't rank for yet. That not ranked is the useful part – it shows the terms you don't rank for yet, instead of hiding them. If every keyword reads not ranked – including branded terms you know you rank for – the path is broken, or Parse is off; re-check the Decodo node's output. (Since Google's September 2025 num=100 removal, anything past page one reads not ranked unless you add pagination – a deliberate cost trade-off, since each extra page is another request.)
- Track your domain. Swap decodo.com in the expressions for your own domain. The hostname-anchored match means subdomains and blog paths (blog.yoursite.com/, yoursite.com/guide) all count, while look-alikes don't.
Related reading: how to build a rank tracker, how to scrape Google without getting blocked, and the Google Sheets web scraping ultimate guide for 2026.
Walkthrough 3: Aggregating a daily news digest from multiple sources
The scenario: a team lead wants a single daily Slack digest of the latest posts from the communities where scraping and data news actually breaks first – delivered every morning before standup. In short: pull the newest posts from several subreddits through the Decodo Reddit target, keep only the last few days, drop anything already sent, and post one combined message to Slack on a daily schedule. Instead of checking several subreddits by hand, the workflow combines, deduplicates, and formats them into a single message.
This is the most advanced of the 3. It demonstrates multi-source aggregation – n8n's strength at combining data from several inputs into one output. It also adds the 2 production essentials a "daily" digest needs: a recency filter and cross-run deduplication so you never see the same item twice.
A note on source choice: a natural first instinct is to scrape several news sites and competitor blogs with CSS selectors – but that path is fragile: well-structured sources almost always expose a feed or a parsed endpoint (use that), while the messy sites that force HTML scraping have brittle, frequently changing selectors. So this walkthrough uses the Decodo node's Reddit Subreddit target, which returns posts as clean structured JSON – no CSS selectors to break – across 3 relevant communities. The technique (Universal target + the HTML node) still applies to any blog you want to add; point it at a URL and a CSS selector.
News digest: Workflow structure
3 subreddit branches run in parallel, then merge into one deduplicated digest before it reaches Slack:
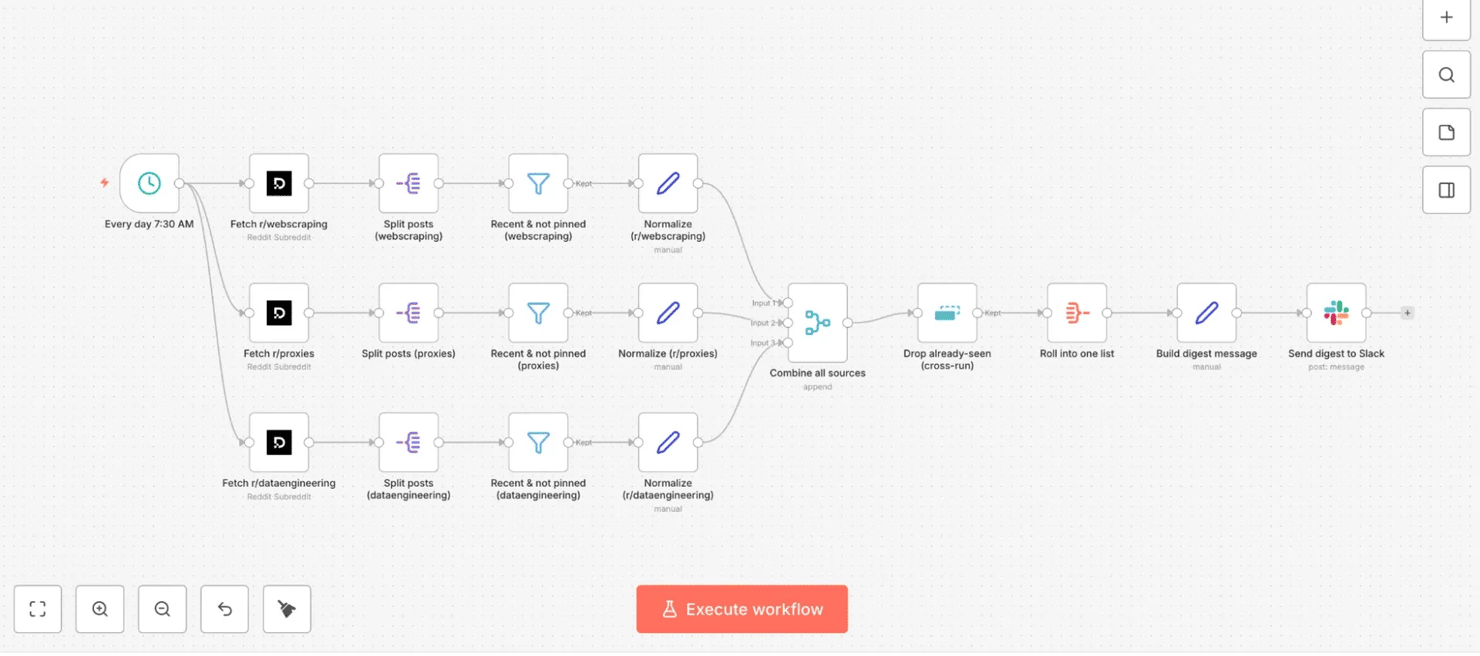
Every day 7:30 AM → fetch 3 subreddits in parallel (r/webscraping, r/proxies, r/dataengineering via the Decodo Reddit target) → per branch: split posts → recent & not pinned (Filter) → normalize → combine all sources (Merge) → drop already-seen (Remove Duplicates, cross-run) → roll into one list (Aggregate) → build digest message → send digest to Slack
The 3 branches and the merge-dedup-digest tail look like this on the canvas:
- Step 1: Schedule Trigger – "Every day 7:30 AM". Daily – 30 7 * * *.
- Step 2: 3 parallel Decodo branches – "Fetch r/…." One per subreddit, each using the Decodo Reddit Subreddit target: set the Subreddit field to the name only (webscraping, proxies, dataengineering – no r/) and Sort to New. They run in parallel, and each returns the subreddit's newest posts as parsed JSON.

- Step 3: Split Out (per branch) – "Split posts". The posts arrive as an array at results[0].content.data.children. Add a Split Out node and set its Fields To Split Out to that path – it turns the array into one item per post. Run it and confirm it emits one item per post; if it outputs nothing, the path is wrong (re-run the Decodo node above, click it, and copy the real path) – otherwise every node downstream runs green on an empty list and the digest silently never sends.
- Step 4: Filter (per branch) – "Recent & not pinned". Keep only non-pinned posts from the last 72 hours (a 3-day window, so weekend and quiet days still have something to show), so the digest is current and skips the weekly/monthly mod threads. One boolean expression does both:
- Step 5: Edit Fields (Set) (per branch) – "Normalize." Each source returns a different shape, so reshape every branch to the same 3 fields: title ({{ $json.data.title }}), url ({{ $json.data.url }}), and a literal source label (r/webscraping, etc.). Uniform shape = simple merge and formatting downstream.
- Step 6: Merge – "Combine all sources." Combine all 3 branches in Append mode (set Number of Inputs to 3) into one list of articles.
- Step 7: Remove Duplicates – "Drop already-seen (cross-run)." Use the "Remove Items Processed in Previous Executions" operation, keyed on {{ $json.url }}. This persists seen URLs across runs, so each morning's digest contains only what's new since the last run – the part that makes a daily digest worth reading.
- Step 8: Aggregate – "Roll into one list." Set the operation to Aggregate All Item Data and Put Output in Field to data– this rolls all remaining items into one item so the next node can build a single message from the whole list.
- Step 9: Edit Fields (Set) – "Build digest message." Build one Slack-formatted string in a field called message – grouped by source, capped at 6 per source, with sanitized clickable links:
Deriving the source list from the data (rather than hardcoding it) means the message formatting keeps working when you swap a subreddit – no edit to this step needed.
- Step 10: Slack – "Send digest to Slack." Set the Slack Text to {{ $json.message }} and send it to your channel. (Turn off the node's "Include Link to Workflow" option for a cleaner message.)
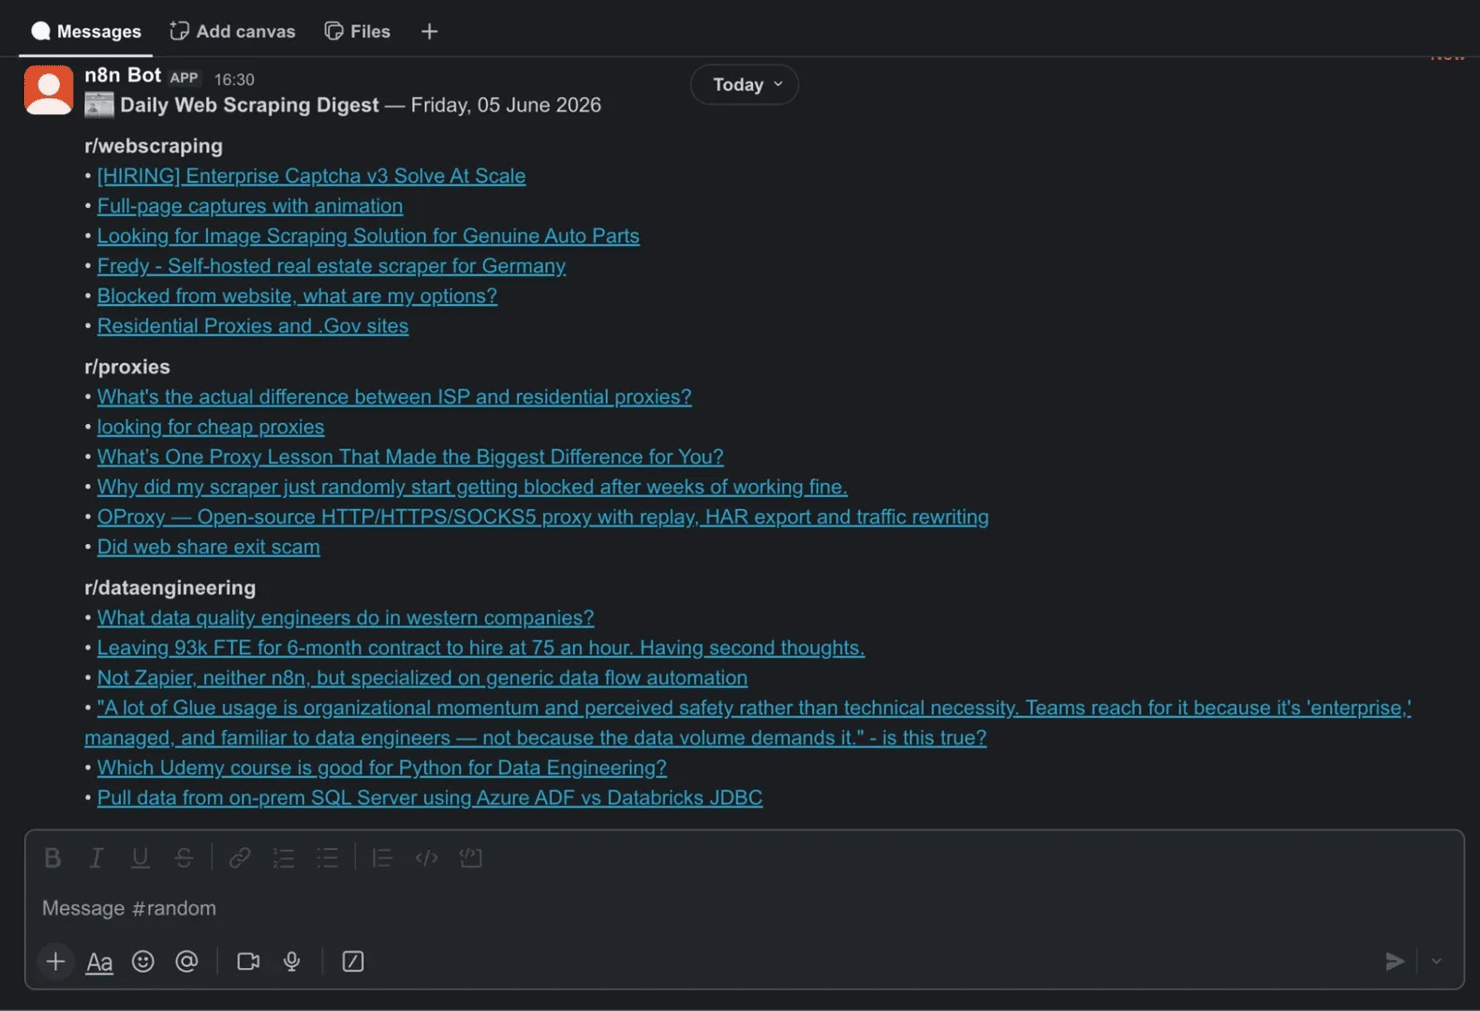
Run it, and the digest arrives in your channel each morning:
News digest: Key details
A few details are what make the digest worth opening every morning, not just technically correct:
- Why parsed targets over CSS scraping here. The Reddit target returns title, URL, score, and timestamp as JSON – no CSS selectors to maintain. This is the article's recurring lesson made concrete: use a parsed endpoint or feed first; save the HTML node (CSS selectors) for sources that have no other way in.
- Recency + dedup are what make it "daily." Without the 72-hour filter, the digest fills with old posts; without cross-run dedup, tomorrow's digest largely repeats today's. And a correct workflow legitimately sends nothing when there's nothing new (no posts in 72 hours, or all already seen) – that's not a failure. To tell "nothing new" from "broken," open the run and check the Merge node: items there but nothing at Slack means dedup suppressed them (working); zero items at Merge means look upstream at Split Out or the Filter. Together, they turn "a list of posts" into "what's new since you last looked."
- Deduplication across runs. n8n's Remove Duplicates node in history mode is doing the hard work. On the first run, it passes everything; on later runs, it suppresses anything already sent. (To re-test from a clean slate, run its Clear Deduplication History operation once.)
- Scaling and scope. Add more sources by duplicating a branch and changing the subreddit – or add a blog via the Universal target + the HTML node. Just keep the digest's theme coherent: mixing in a broad, off-topic source (a general subreddit, say) floods it with noise.
Once you're collecting articles daily, you can archive them beyond a Slack message. See how to save scraped data to CSV, Excel, and databases – and for a code-based take on the same idea, how to build a news crawler in Python.
The 2026 upgrade: Let an AI agent run the scraper
The 3 walkthroughs above walk you through every step by hand – you decide the product, the keyword, and the subreddit. Another pattern flips that: you describe what you want in plain language and an AI agent decides what to scrape and calls Decodo for you. Two no-code ways to do it.
Decodo as a tool inside an n8n AI Agent
n8n's AI Agent node lets you attach "tools" that the agent can call on its own initiative. Because the Decodo node is tool-enabled, you can add it as one of those tools (on self-hosted n8n, set N8N_COMMUNITY_PACKAGES_ALLOW_TOOL_USAGE=true). When it runs as a tool, most fields – target, URL, query – are inferred from your message rather than hardcoded. So instead of building a branch per source, you just send a chat prompt:
"Check whether [product URL] is in stock on Amazon and Slack me if it is."
"What's our Google rank for 'residential proxies' in the US? Log it to the sheet."
The agent reasons about the request, calls the Decodo tool, receives clean structured JSON back as its "observation", and decides the next step – no branches to wire. This pairing is the point: raw agents can scrape on their own, but without direction, they hallucinate selectors and give different, unreliable answers each time – fine for a one-off, risky in production. Handing the agent a parsed tool like Decodo, instead of letting it improvise the fetch, is what makes the output dependable. It's the natural progression from walkthroughs 1–3: same Decodo engine, but the coordination is delegated to an LLM. (n8n even ships ready-made templates for this, like a daily stock-market digest built on GPT-5 + Decodo.) For a full build, see the AI agent orchestration tutorial: n8n and Decodo MCP setup.
Decodo MCP: Give Claude or Cursor live web access
Outside n8n entirely, Decodo runs an MCP server – MCP (Model Context Protocol), being an open standard for connecting AI assistants to tools. Point Claude Desktop, Cursor, or Windsurf at it, and your assistant gains a full scraping toolset (scrape_as_markdown, google_search_parsed, amazon_search_parsed, and more), with JavaScript rendering, proxy rotation, CAPTCHA handling, and parsing all done server-side.
Then you can simply ask: "Scrape the top five results for X and summarize them" – and your AI returns live web data, fetched through Decodo's rendering and proxy layer. This is the same setup behind real-time RAG (retrieval-augmented generation) and agentic research. Decodo has a dedicated walkthrough in use Claude for web scraping (2026), and the full install steps across Claude Desktop, Cursor, and VS Code are in how to set up the Decodo MCP server.
These 3 fetch options trade off on rendering, where they run, and what each is best for:
Approach
Renders JS + bypasses bot detection
Where it runs
Best for
Plain HTTP Request node
No – raw HTML only
n8n workflow
Static pages, public APIs & RSS feeds
Decodo node
Yes – renders JS, rotates proxies
n8n workflow (manual or as an AI-agent tool)
Scheduled, auditable pipelines
Decodo MCP server
Yes – renders JS, rotates proxies
Your AI assistant (Claude, Cursor, Windsurf)
Open-ended, conversational scraping & agentic research
Which to choose: Stay with the visual walkthroughs when you want a fixed, scheduled pipeline you can see and audit. Use the AI-agent tool or MCP when the task is open-ended ("find and watch whatever's relevant") or when you want your existing AI assistant – not a workflow – to do the fetching. Either way, Decodo is the layer that gives the model live web access – handling the rendering and proxy work that a plain request can't.
Handling errors and keeping workflows running reliably
The difference between a workflow that works once in a demo and one that runs unattended for months is error handling. Unattended scraping has to expect the web to change – pages get updated, servers fail, rate limits apply – so a production workflow plans for that instead of assuming every run is clean. Everything here uses n8n's native, no-code tools. There are 3 failure modes that matter for scraping specifically.
Handling fetch errors
By default, a fetch node (the Decodo node, or a plain HTTP Request) stops the entire workflow if the request fails – one bad response and everything downstream halts.
- Open the node's Settings and set On Error to Continue (or enable Continue On Fail) so the workflow proceeds and you can handle the failure deliberately instead of crashing the whole run.
- Add an IF node right after the fetch that checks if the response succeeded. Route the error path to an email or Slack notification that includes the failing URL/keyword, so you know exactly what broke and where.
Handling empty, changed, or decoy results
A fetch can succeed and still give you nothing useful – the site changed its structure, so a parsed field comes back empty (or, on the Universal target, your CSS selector no longer matches).
- After the parsing step, add a check for empty output. If the field you rely on (stock, organic, title…) is blank, route it to an alert rather than letting an empty value flow silently into your spreadsheet or digest. A 200 OK status is not proof of success. A blocked request can come back as a 200 whose body is really a CAPTCHA or "verify you're human" challenge page – a block disguised as a success. So validate on the data you need being present, never on the status code alone.
- Watch for poisoned data, not just missing data. A defended site can return a clean 200 with deliberately wrong values – a honeypot page, or every price showing $999– and anti-bot systems serve ever more subtle decoys. Add a validity check on the shape of the result (is the price in a plausible range? is the title non-empty? did you get the expected number of rows?) and alert when it looks off. Routing through a managed scraping API that returns the real rendered page cuts most of this, but a validation step is cheap insurance.
- Use n8n's built-in Error Workflow feature (Settings → Error Workflow) to designate one notification workflow that fires whenever any workflow in your account fails. Build it once, and every scraping pipeline you own routes its failures through the same notification workflow.
Managing API rate limits
Running on a schedule fires the same requests repeatedly, so 2 small guardrails keep you under a target's limits:
- If you're scraping many pages in a loop, add a Wait node between iterations. A 2–5 second pause is a reasonable default for most targets, and keeps you from hitting rate limits by sending requests too fast.
- The Decodo Web Scraping API handles rate limiting and retries at the infrastructure level – for target-side rate limits, it retries automatically before returning a failure, which removes a lot of the retry logic you'd otherwise build by hand.
For a sense of how much retry logic this saves you compared to the code path, see retry failed Python requests in 2026.
The bottom line
No-code scraping with n8n comes down to a clean split: n8n schedules, routes, and outputs the data; Decodo's Web Scraping API fetches the sites a plain request can't reach and handles the upkeep as those sites change. The 3 patterns here – stock monitoring, rank tracking, and multi-source aggregation – cover most recurring jobs and reuse the same core nodes, so each build is less setup than the last. Move to code only when volume or logic outgrows no-code; until then, it runs on its own, and an AI agent can even do the scraping for you. Start with the stock-monitoring walkthrough and get one workflow running end-to-end.
Life's too short for CAPTCHA solvers
Decodo's Web Scraping API handles rendering, fingerprinting, proxy rotation, and CAPTCHAs. You just parse the JSON and move on with your day.
About the author

Justinas Tamasevicius
Director of Engineering
Justinas Tamaševičius is Director of Engineering with over two decades of expertise in software development. What started as a self-taught passion during his school years has evolved into a distinguished career spanning backend engineering, system architecture, and infrastructure development.
Connect with Justinas via LinkedIn.
All information on Decodo Blog is provided on an as is basis and for informational purposes only. We make no representation and disclaim all liability with respect to your use of any information contained on Decodo Blog or any third-party websites that may belinked therein.