How to Scrape Wikipedia: Complete Beginner's Tutorial
Wikipedia has over 60 million articles, making it a valuable resource for machine learning training data, research datasets, and competitive intelligence. This tutorial guides you through extracting your first article to building crawlers that navigate Wikipedia's knowledge graph. You'll learn to extract titles, infoboxes, tables, and image references, then scale up to crawling entire topic clusters.
Justinas Tamasevicius
Last updated: Dec 16, 2025
23 min read
Wikipedia has over 60 million articles, making it a valuable resource for machine learning training data, research datasets, and competitive intelligence. This tutorial guides you through extracting your first article to building crawlers that navigate Wikipedia's knowledge graph. You'll learn to extract titles, infoboxes, tables, and image references, then scale up to crawling entire topic clusters.
Why scrape Wikipedia?
Wikipedia serves as the foundational data layer for these five business and technical workflows:
- Market intelligence & data enrichment. Data teams use Wikipedia to validate and enrich internal databases. By extracting structured infobox metadata, such as revenue figures, headquarters, or C-suite executives, you can normalize entity records for competitive analysis at scale.
- Specialized research datasets. Wikipedia's official database dumps are massive (20GB+) and require complex XML parsing. Scraping allows the targeted extraction of specific tables, such as the "List of S&P 500 companies", directly into clean CSVs for immediate analysis.
- Fueling agentic workflows. Autonomous agents need reliable ground truth data to verify facts before taking action. Wikipedia serves as the primary reference layer for entity resolution, allowing agents to confirm that a company, person, or event exists and is correctly identified before executing code.
- Synthetic data for SLMs. Small language models (SLMs) running locally require high-quality text to learn reasoning. Wikipedia provides structured content for generating the AI training data needed to fine-tune these models for instruction following.
- GraphRAG and reasoning engines. For complex queries, standard AI search is evolving into GraphRAG. This uses structured data (like the infoboxes you'll scrape) to map relationships, allowing AI to understand connections across different articles rather than just retrieving isolated keywords.
Understanding Wikipedia's structure
Wikipedia's consistency makes extraction predictable. Every article follows the same HTML patterns once you know the right CSS selectors.
Wikipedia article structure
Right-click any Wikipedia page and select Inspect Element (or press F12 on Windows / Cmd+Option+I on Mac). You'll see these key structural elements:
1. The title #firstHeading – every article uses this unique ID for the main title.
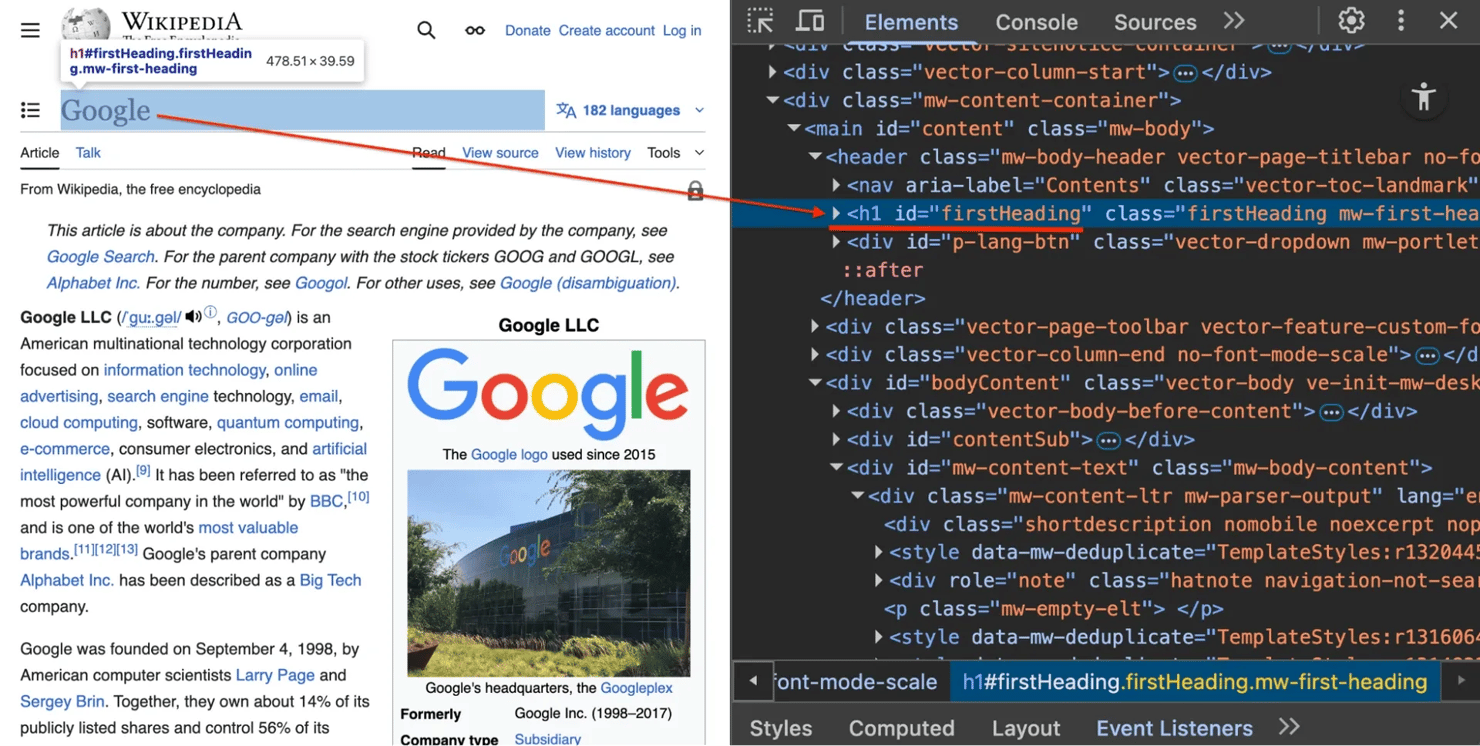
2. The content container .mw-parser-output – the actual article text is wrapped in this class. We target this to avoid scraping the sidebar menu or footer.
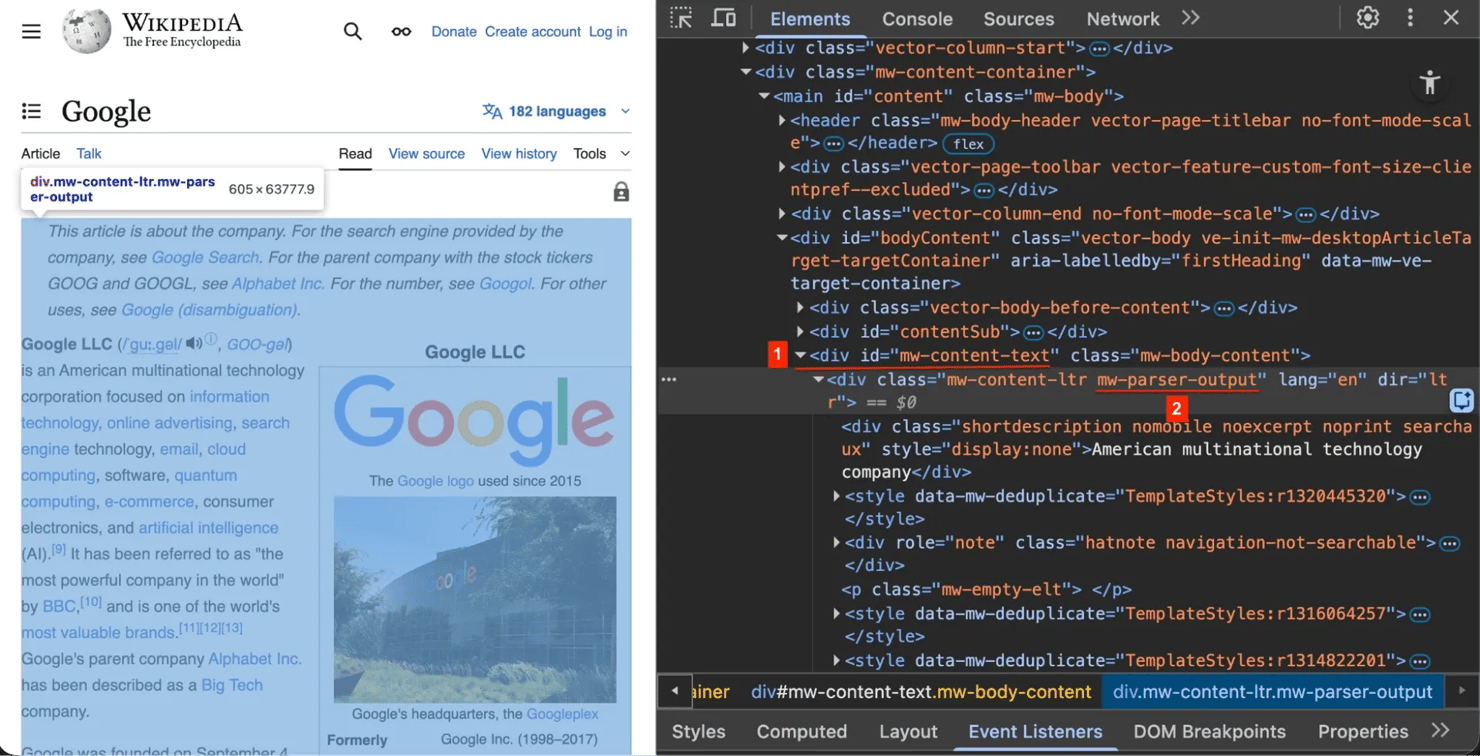
3. The infobox table.infobox – this table on the right side contains structured summary data (like founders, industry, or headquarters).

Skip the code, get the data
Decodo's Web Scraping API extracts Wikipedia content as clean Markdown with automatic retry logic, proxy rotation, and zero maintenance.
Setting up your scraping environment
Before building the scraper, set up an isolated Python environment to avoid dependency conflicts.
Prerequisites
Make sure you have:
- Python 3.9+ installed
- Basic terminal/command line knowledge
- A text editor (VS Code, PyCharm, etc.)
Creating a virtual environment
Create and activate a virtual environment.
Install required libraries
Install the necessary libraries:
Library breakdown:
- requests – sends HTTP requests and supports connection retries with configuration
- beautifulsoup4 – parses HTML and navigates the document tree
- lxml – a high-performance XML and HTML parser that speeds up Beautiful Soup
- pandas – a data analysis library for extracting tables to CSV
- html2text – converts HTML to Markdown format
New to these libraries? See our guides on Beautiful Soup web scraping, lxml parsing, table scraping with Pandas, and converting to Markdown.
Freezing dependencies
Save your library versions to make the scraper shareable:
Building the Wikipedia scraper
Let's build the Wikipedia scraper in steps. Open your code editor and create a file named wiki_scraper.py.
Step 1: Import libraries and configure retries
A good scraper needs to handle network errors. Start by importing libraries and setting up a session with retry logic.
Copy this into wiki_scraper.py:
The key components:
- User agents. Websites block the default Python requests user agent (python-requests/X.X.X). These headers identify requests as coming from Chrome browsers, preventing automated blocks.
- Session object. Reuses TCP connections from a pool instead of creating new connections for each request, significantly improving speed.
- Retry logic. Automatically retries up to 3 times with exponential backoff on server errors (500, 502, 503, 504) and rate limits (429).
Step 2: Extract infoboxes and tables
Create helper functions for specific extraction tasks.
Add the extract_infobox function:
soup.select_one("table.infobox") finds the first table with class infobox and returns None if not found (the function continues without crashing). The re.sub(...) regex removes special characters from keys – labels like "Born:" or "Height?" can't be used with dot notation in Python (data.Born: is invalid syntax). We use data cleaning to convert them into valid identifiers.
Add the extract_tables function:
Wikipedia uses table.wikitable as the standard class for data tables. The pd.read_html() function requires HTML strings wrapped in io.StringIO in newer pandas versions (older versions accepted raw strings but now show deprecation warnings). The function converts HTML tables to pandas DataFrames, which are then saved as CSV files. The try-except block catches all pandas parsing errors – tables that fail conversion are silently skipped.
Step 3: Build the scrape_page function
Combine everything into one pipeline: fetch → parse → clean → save.
Add the scrape_page function:
The function rotates through user agents using random.choice() to distribute requests across different browser identities, making traffic patterns less detectable. The 15-second timeout prevents the scraper from hanging indefinitely on slow connections – timeouts raise exceptions that are caught and printed. The function returns None when scraping fails, allowing the crawler to handle errors gracefully.
We use response.content (raw bytes) instead of response.text because the lxml parser handles encoding detection more reliably with binary input. The get_text(strip=True) method removes leading and trailing whitespace from the title, which is essential for creating clean folder names.
The safe_title regex replaces any character that isn't a word character, hyphen, or underscore with underscores – this prevents filesystem errors from titles containing characters like slashes, colons, or asterisks that are invalid in folder names across operating systems.
When saving the infobox JSON, indent=2 creates readable, pretty-printed output, and ensure_ascii=False preserves Unicode characters, which is necessary for non-English names and special characters in the data.
The scraping order is critical: extract structured data (infoboxes, tables) first, then remove Wikipedia's navigation and metadata elements. The junk selectors target navigation boxes, reference lists, citation superscripts, disambiguation notices, and article maintenance warnings. We use decompose() to remove these elements completely from the tree before converting to Markdown, ensuring clean output without navigational clutter.
The h.body_width = 0 setting disables html2text's default 78-character line wrapping, preserving the original structure of Wikipedia's content, which is better for downstream processing and AI training data.
The function returns a dictionary containing the BeautifulSoup object and title – we'll need the soup object for link extraction when we add crawling functionality.
Testing the scraper
Run the script:
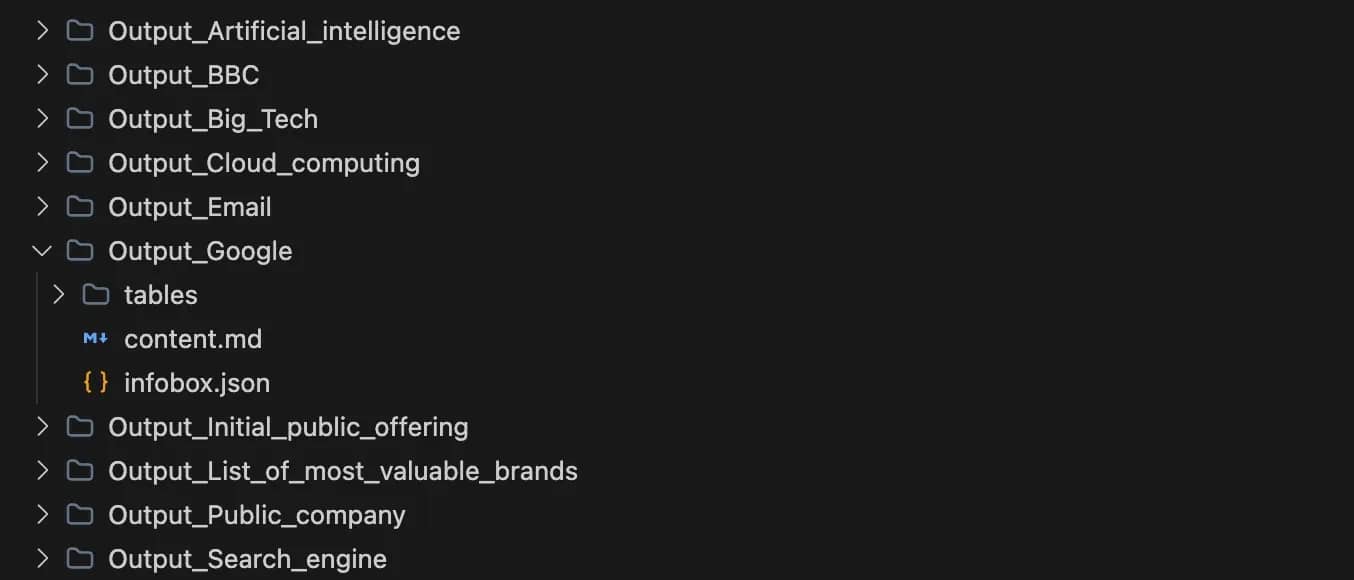
You'll see a new folder named Output_Google containing:
- infobox.json – structured metadata from the Wikipedia infobox.
- tables/ – all Wikipedia tables extracted as CSV files.
- content.md – the full article in clean Markdown format.
The infobox JSON structure:
Example table data (CSV format):
The Markdown output (content.md):
Building the Wikipedia crawler
Now that we have a working scraper that extracts data from individual Wikipedia pages, let's extend it to automatically discover and scrape related topics. This transforms our single-page scraper into a crawler that can map out connections between articles, creating a dataset of related concepts.
A basic crawler follows every link on a page. On Wikipedia, that's problematic – if you start at "Python" and follow every link, you'll end up scraping "1991 in Science" and "Netherlands" within seconds. The Python article alone contains over 1,000 links, and following all of them would quickly spiral out of control.
To collect related topics efficiently, we need a selective crawler that focuses on conceptually relevant links. We'll build this in three parts: URL validation, intelligent link extraction, and the crawling loop.
Step 4: Crawler setup and validation
Update your imports at the top of wiki_scraper.py:
Add these validation functions below your extract_tables function:
The normalize_url function strips URL fragments (like #History), so we treat each page as one unique URL. Wikipedia often uses protocol-relative URLs like //upload.wikimedia.org, which this function converts to proper HTTPS URLs. The is_valid_wikipedia_link function filters out maintenance pages, special pages, user pages, and talk pages, keeping only article content.
Step 5: Extract links from key sections
Add the link extraction function that focuses on the first few paragraphs and "See also" sections:
The recursive=False, limit=3 parameters tell Beautiful Soup to only examine the top-level paragraphs and stop after the third one. This typically captures key concepts linked in the article's opening. We focus on these sections because:
- The first 3 paragraphs usually contain the most important related concepts (e.g., the "Google" article mentions Alphabet Inc., Larry Page, search engines).
- In the "See also" section, Wikipedia editors manually curate related topics here, providing high-quality connections.
This strategy avoids noise from footnote links, navigation elements, and tangentially related articles mentioned deep in the content.
Step 6: Create the crawler class
Add the crawler class that uses breadth-first (BFS) search to explore related pages (read more about crawling vs scraping):
The deque (double-ended queue) allows efficient removal of URLs from the front using popleft(), implementing breadth-first search (FIFO – first in, first out). This means the crawler explores pages level by level rather than diving deep into one branch. Breadth-first search ensures you get a diverse set of related topics at similar conceptual distances from your starting point, rather than following a single chain of links very deep into one specific subtopic.
The crawler tracks depth to prevent going too deep into tangential topics:
- Depth 0 – starting page (e.g., "Google")
- Depth 1 – pages directly linked from start (e.g., "Alphabet Inc.", "Larry Page", "Android")
- Depth 2 – pages linked from depth 1 (e.g., "Stanford University", "Java", "Chromium")
The visited set prevents duplicate scraping – if "Python" links to "C++" and "C++" links back to "Python", we won't scrape "Python" twice. The time.sleep(1.5) pause prevents overwhelming Wikipedia's servers with rapid requests. The if data and data.get('soup') check handles cases where scraping fails (network errors, 404 pages, etc.) – the crawler continues with other pages instead of crashing.
Note that the queue can grow significantly even with max_depth limiting. At depth 1, the queue might contain 20-50 URLs. At depth 2, it could contain 200-500+ URLs. The visited set prevents re-scraping, but all unique URLs get added to the queue until max_pages is reached or the queue is exhausted.
Step 7: Set up the command-line interface
Replace the existing if __name__ == "__main__": block at the bottom of wiki_scraper.py with this CLI implementation using argparse (learn more about running Python in terminal):
Test the scraper and crawler
Open your terminal in the folder containing wiki_scraper.py.
Single page mode – scrape one article:
This creates an Output_Google folder containing content.md, infobox.json, and a tables/ directory with CSV files.
Crawler mode – collect related topics:
When finished, you'll have up to 10 separate Output_* folders, each containing the full extracted data for that topic. The crawler might scrape fewer than max_pages if it reaches max_depth and runs out of links to explore.
Here's what the output folder structure looks like after crawling:
Complete source code
Here’s the full script for reference. You can copy-paste this directly into wiki_scraper.py.
Troubleshooting common issues
Wikipedia constantly updates its layout, and network issues occur. Here are the most common errors and their fixes.
1. AttributeError: 'NoneType' object has no attribute 'text'
The cause: Your script tried to find an element (like the infobox), but it didn't exist on that page.
The fix: Our code handles this with if not box: return None. Always check if an element exists before accessing its .text property (read more about handling Python errors).
2. HTTP Error 429: Too Many Requests
The cause: You're hitting Wikipedia too fast with requests.
The fix: Increase your delay. Change time.sleep(1.5) to time.sleep(3) in your loop. If the error persists, you'll need proxy rotation to distribute requests across multiple IP addresses (which requires additional infrastructure or a proxy service).
3. Empty CSVs or JSON files
The cause: Wikipedia likely changed a CSS class name (e.g., infobox became information-box).
The fix: Open the page in your browser, press F12, and re-inspect the element to see the new class name. Update your selector in wiki_scraper.py.
Limitations of DIY scraping
Your Python script is powerful, but running it from your local machine has constraints. As you scale from scraping 10 pages to 10,000, you'll face these challenges:
- IP blocks. Wikipedia monitors traffic volume. Sending too many requests from a single IP risks getting blocked entirely.
- Maintenance overhead. Wikipedia updates its HTML structure occasionally. When they do, your selectors will break, requiring code updates.
- Speed vs. detection. Scraping faster requires parallel requests (threading), but parallel requests increase the chance of being flagged by anti-bot systems.
Tools like Claude or ChatGPT can help you write and debug scrapers faster through AI-assisted coding, but they don't solve infrastructure challenges like IP rotation or scaling. This is where developers often switch to managed solutions.
Scraping Wikipedia with third-party tools
For enterprise-scale data collection, developers often switch to web scraping APIs.
The Decodo solution
The Decodo Web Scraping API handles the complexity we just built. Instead of managing sessions, retries, and parsers yourself, you send a request to the API, and it handles the infrastructure.
Key features:
- Structured data is returned automatically (you can easily convert extracted HTML to Markdown).
- Automatic rotation through residential proxies to bypass blocks.
- Maintenance handled by Decodo when HTML changes.
- Handles proxy management and CAPTCHAs.
- Scale to millions of pages without local bandwidth constraints.
- Direct Markdown output without writing converters.
Implementation example
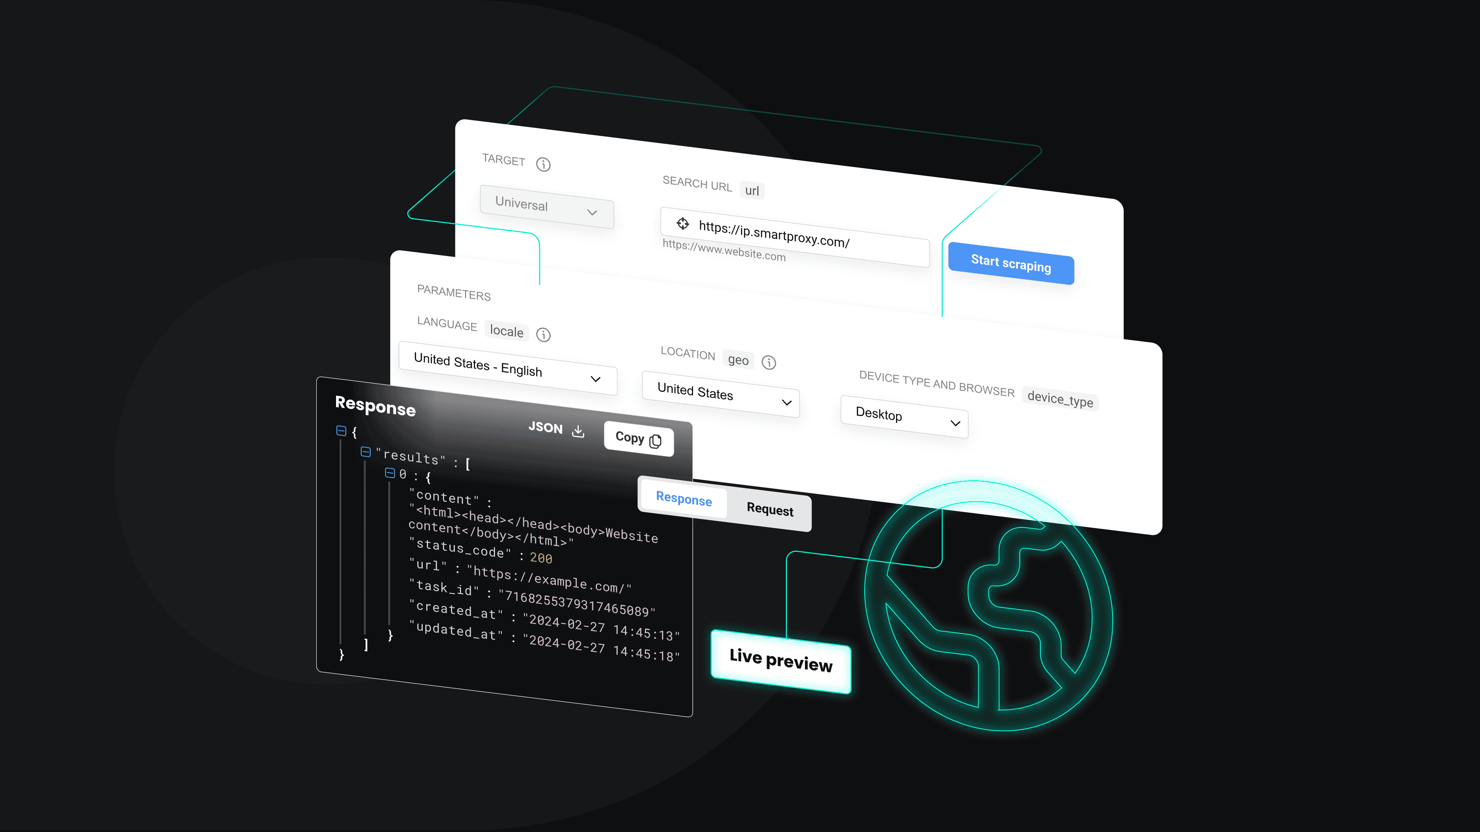
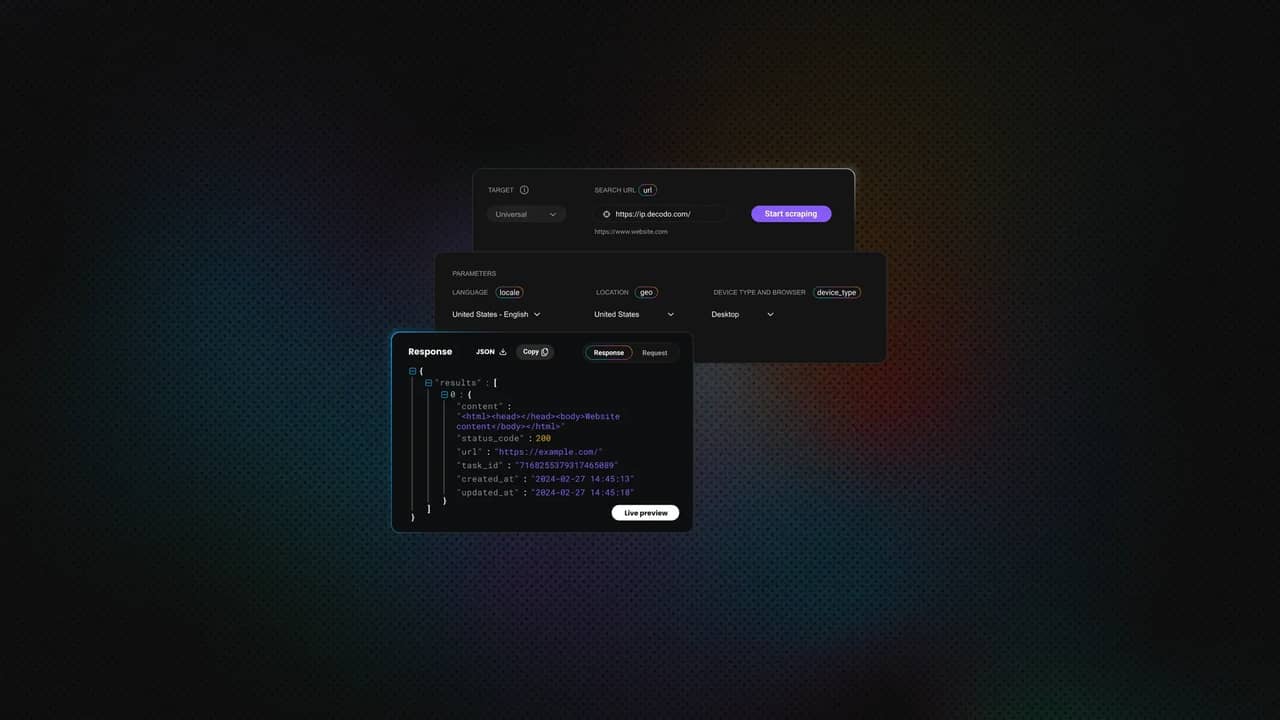
The Decodo dashboard generates code instantly in cURL, Node.js, or Python.
You can check the Markdown box and enable JS Rendering if the page is dynamic. You can also configure advanced parameters (like proxy location, device type, and more).
For Python, click the Python tab in the dashboard to generate the exact code. Here's the implementation:
The response returns clean Markdown text directly, ready to be saved or fed into an LLM:
Watch the 2-minute video setup guide here
Comparison: Custom script vs. Decodo API
Here's how your DIY Python script compares to a managed API solution:
Feature
Your Python script
Decodo Web Scraping API
Maintenance
High (breaks when HTML changes)
Minimal (infrastructure managed by Decodo)
Reliability
Depends on your local IP reputation
Enterprise-grade infrastructure
Scalability
Limited by your CPU/bandwidth
High concurrent request capacity
What to do with your scraped data
You now have a structured dataset of related Wikipedia topics. Here are some ways to use it:
- AI training data. The Markdown files and infoboxes provide clean text for fine-tuning language models.
- Knowledge graphs. Parse the infoboxes to build entity relationship databases.
- Research datasets. Analyze table data across multiple articles for comparative studies.
- Content analysis. Study how topics connect and what patterns emerge in Wikipedia's knowledge structure.
For projects that grow beyond individual files, consider structured storage solutions like databases or data warehouses.
Best practices
You now have a functional Wikipedia scraper. To keep it running reliably, follow these web scraping best practices:
- Check robots.txt. Verify if the website allows scraping.
- Rate limiting. Keep your delay enabled. We included time.sleep() for a reason.
- Identify yourself. Use a custom User-Agent that includes your contact info.
Conclusion
You have moved from a simple HTML parser to a crawler that explores Wikipedia's knowledge graph, and the next step is clear. To scale past experiments, shift from files to a database, tailor the crawl logic to your goals, add parallel processing for thousands of pages, and use tools like Decodo to handle the infrastructure pain points that come with real-world scale.
Scrape Wikipedia without blocks
Decodo's residential proxies distribute your requests across 115M+ IPs, letting you extract data at scale without hitting rate limits.
About the author

Justinas Tamasevicius
Director of Engineering
Justinas Tamaševičius is Director of Engineering with over two decades of expertise in software development. What started as a self-taught passion during his school years has evolved into a distinguished career spanning backend engineering, system architecture, and infrastructure development.
Connect with Justinas via LinkedIn.
All information on Decodo Blog is provided on an as is basis and for informational purposes only. We make no representation and disclaim all liability with respect to your use of any information contained on Decodo Blog or any third-party websites that may belinked therein.